First real drive
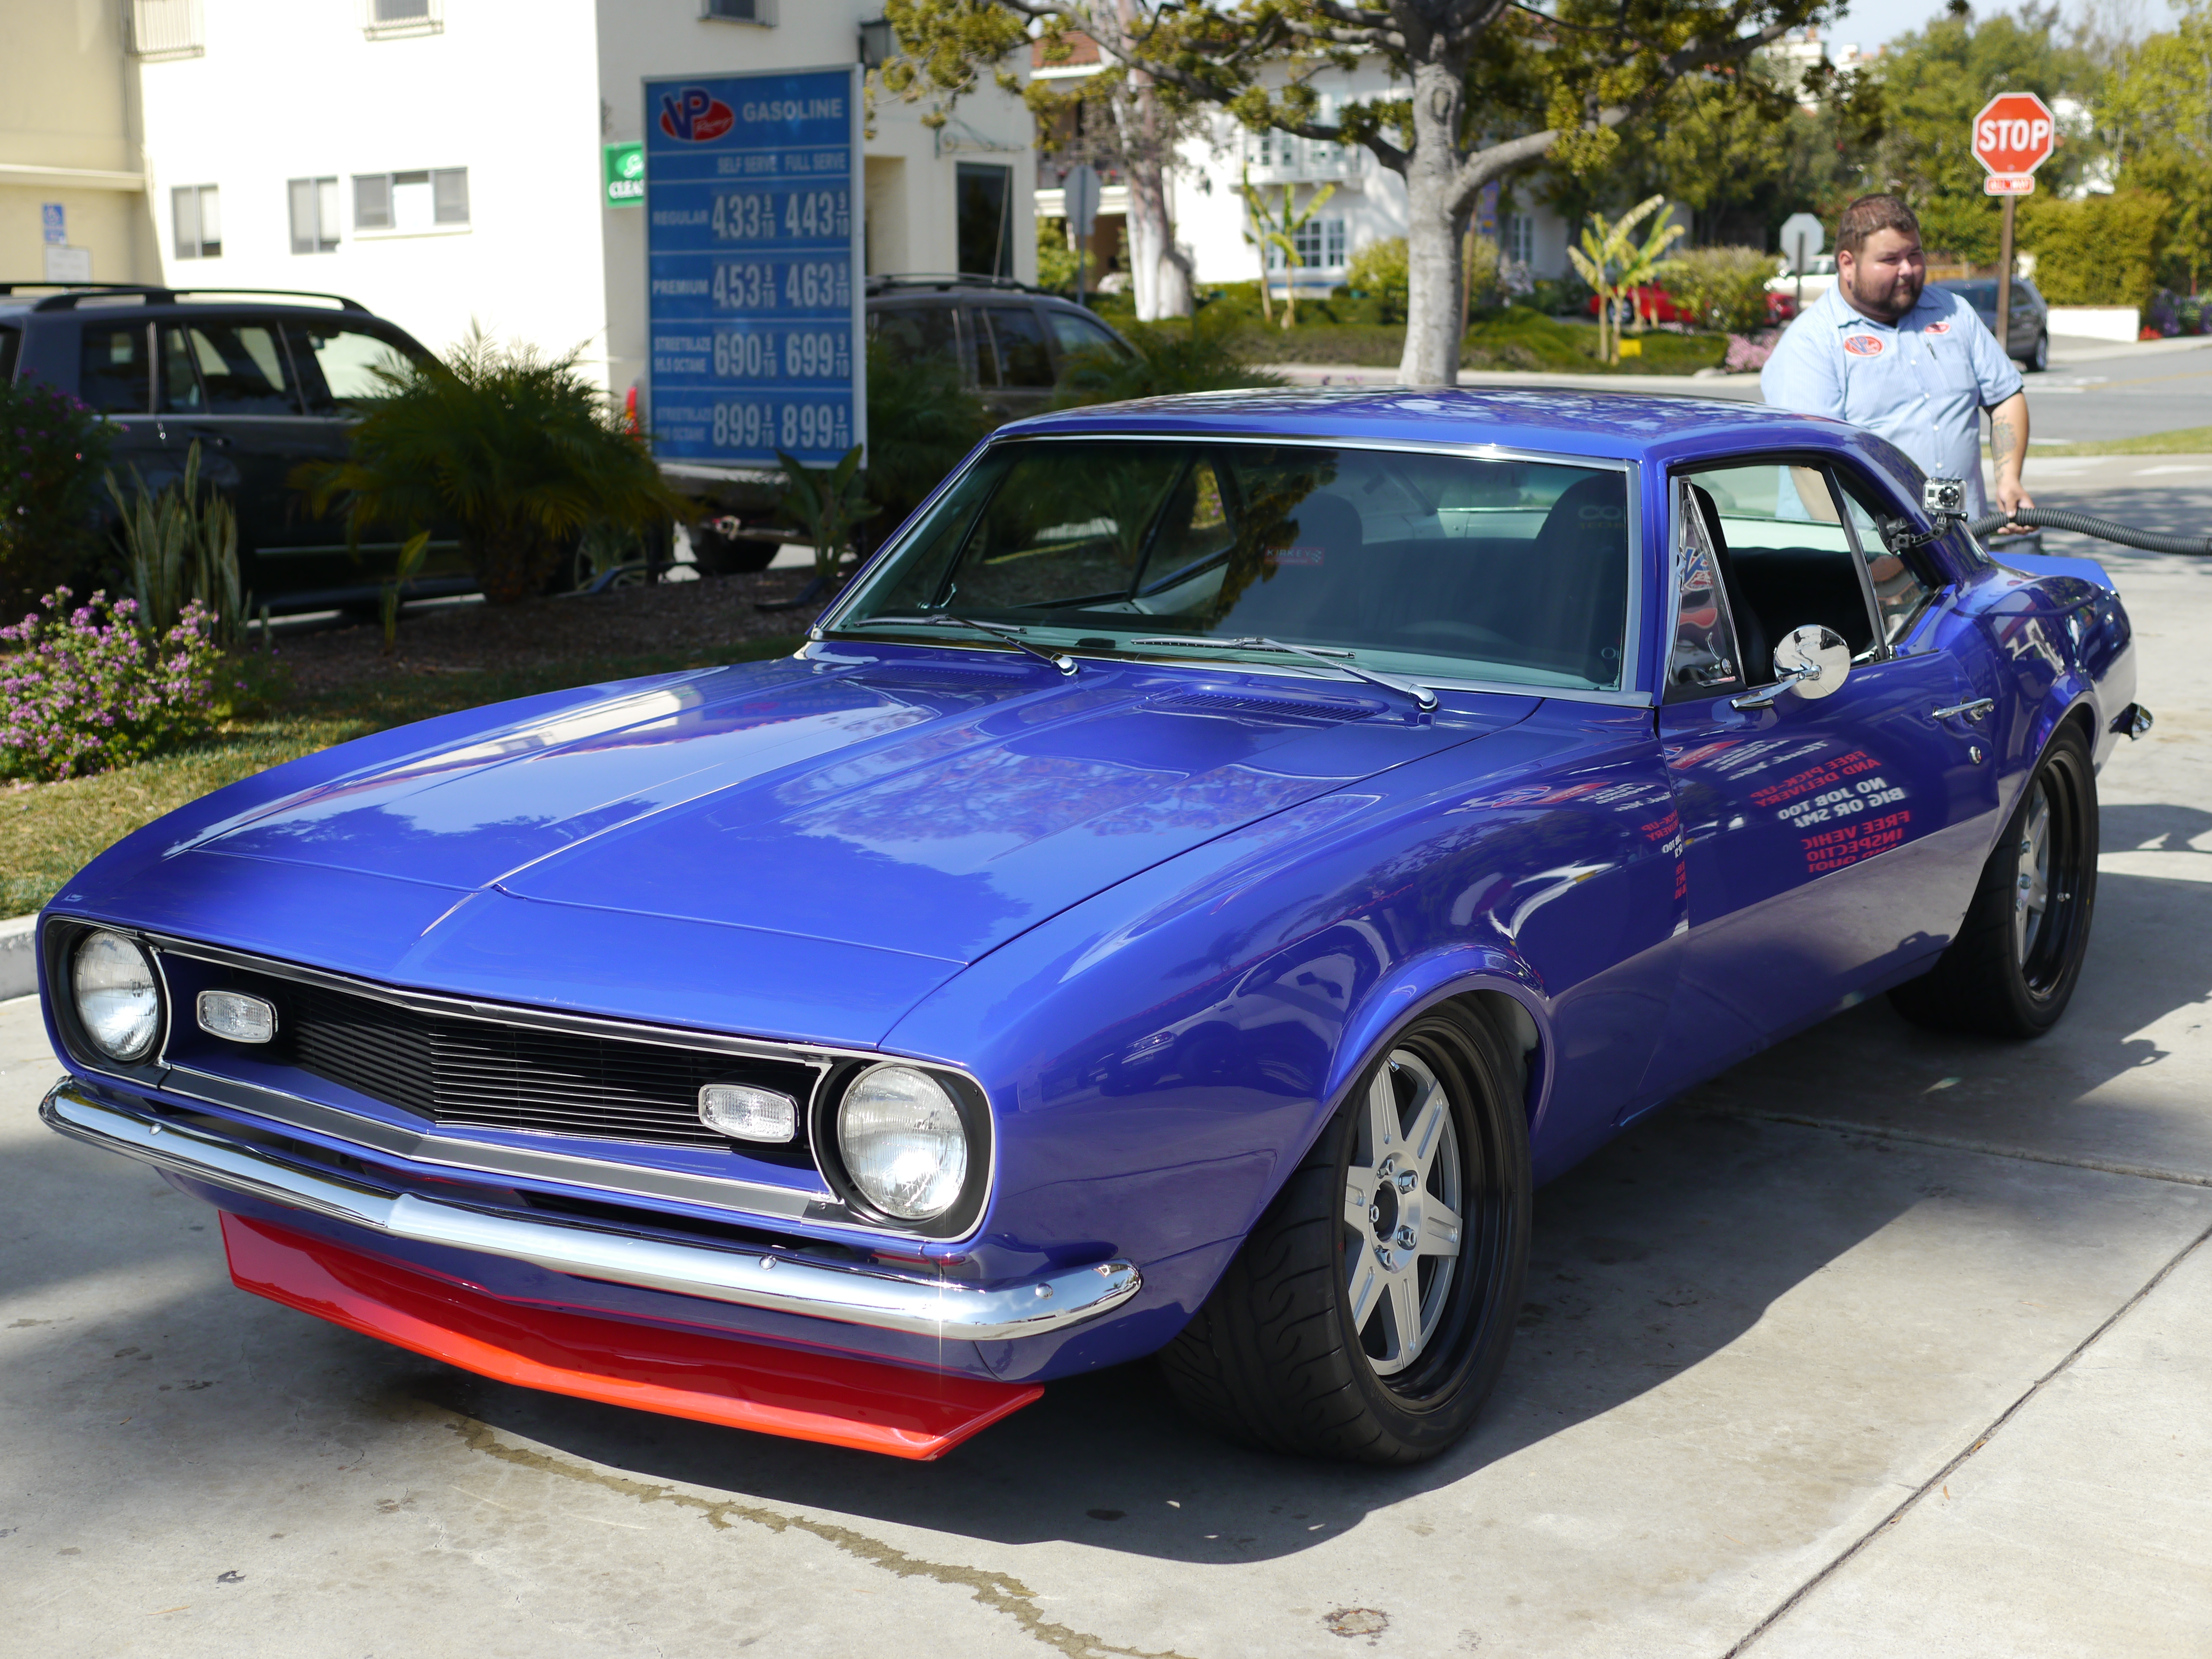
Took the Camaro for its first real drive today, to get gas of course!
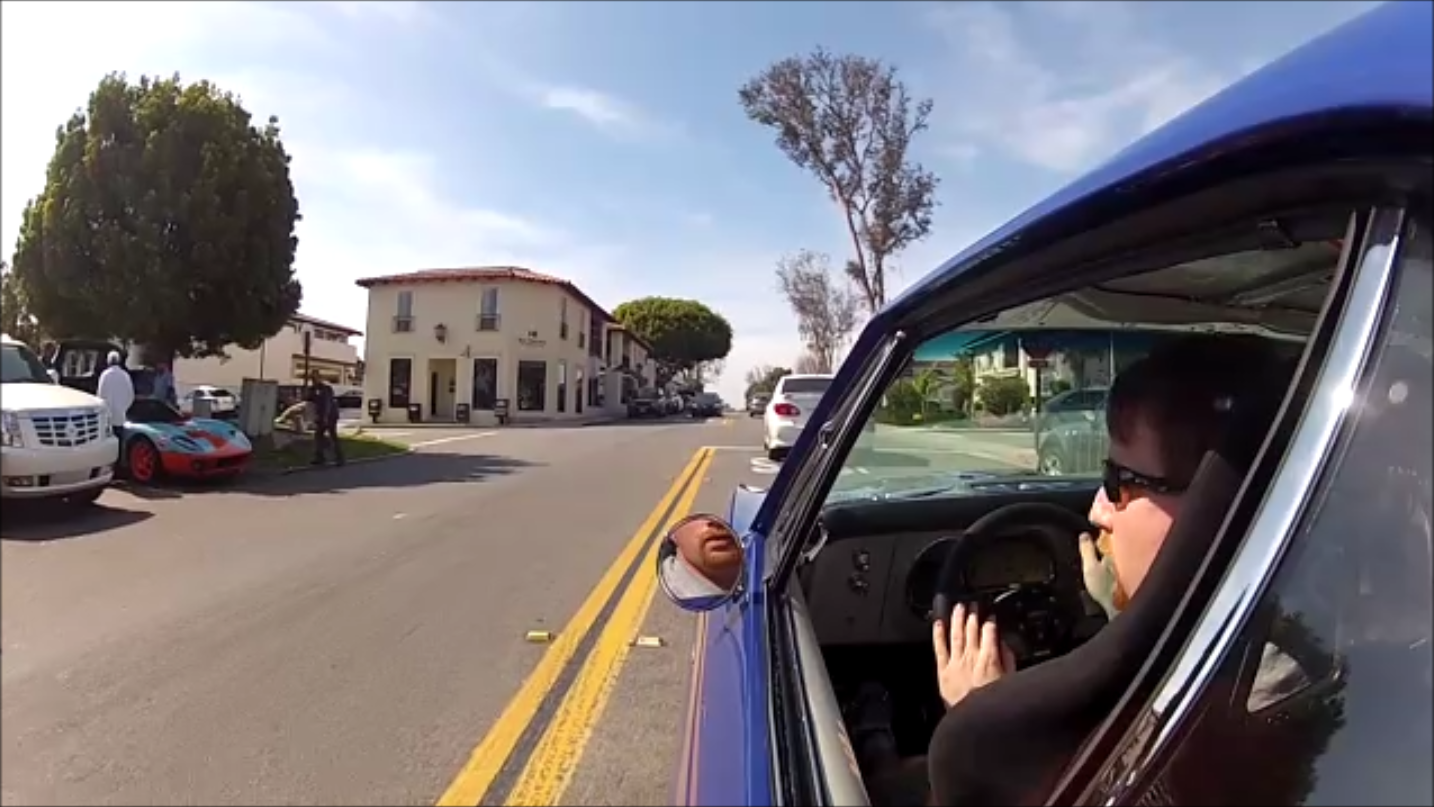
Suppose it is likely expected to see some kind of Ford GT thing blocking the driveway of your local 100-octane fuel station.
Speaking of which – ouch!
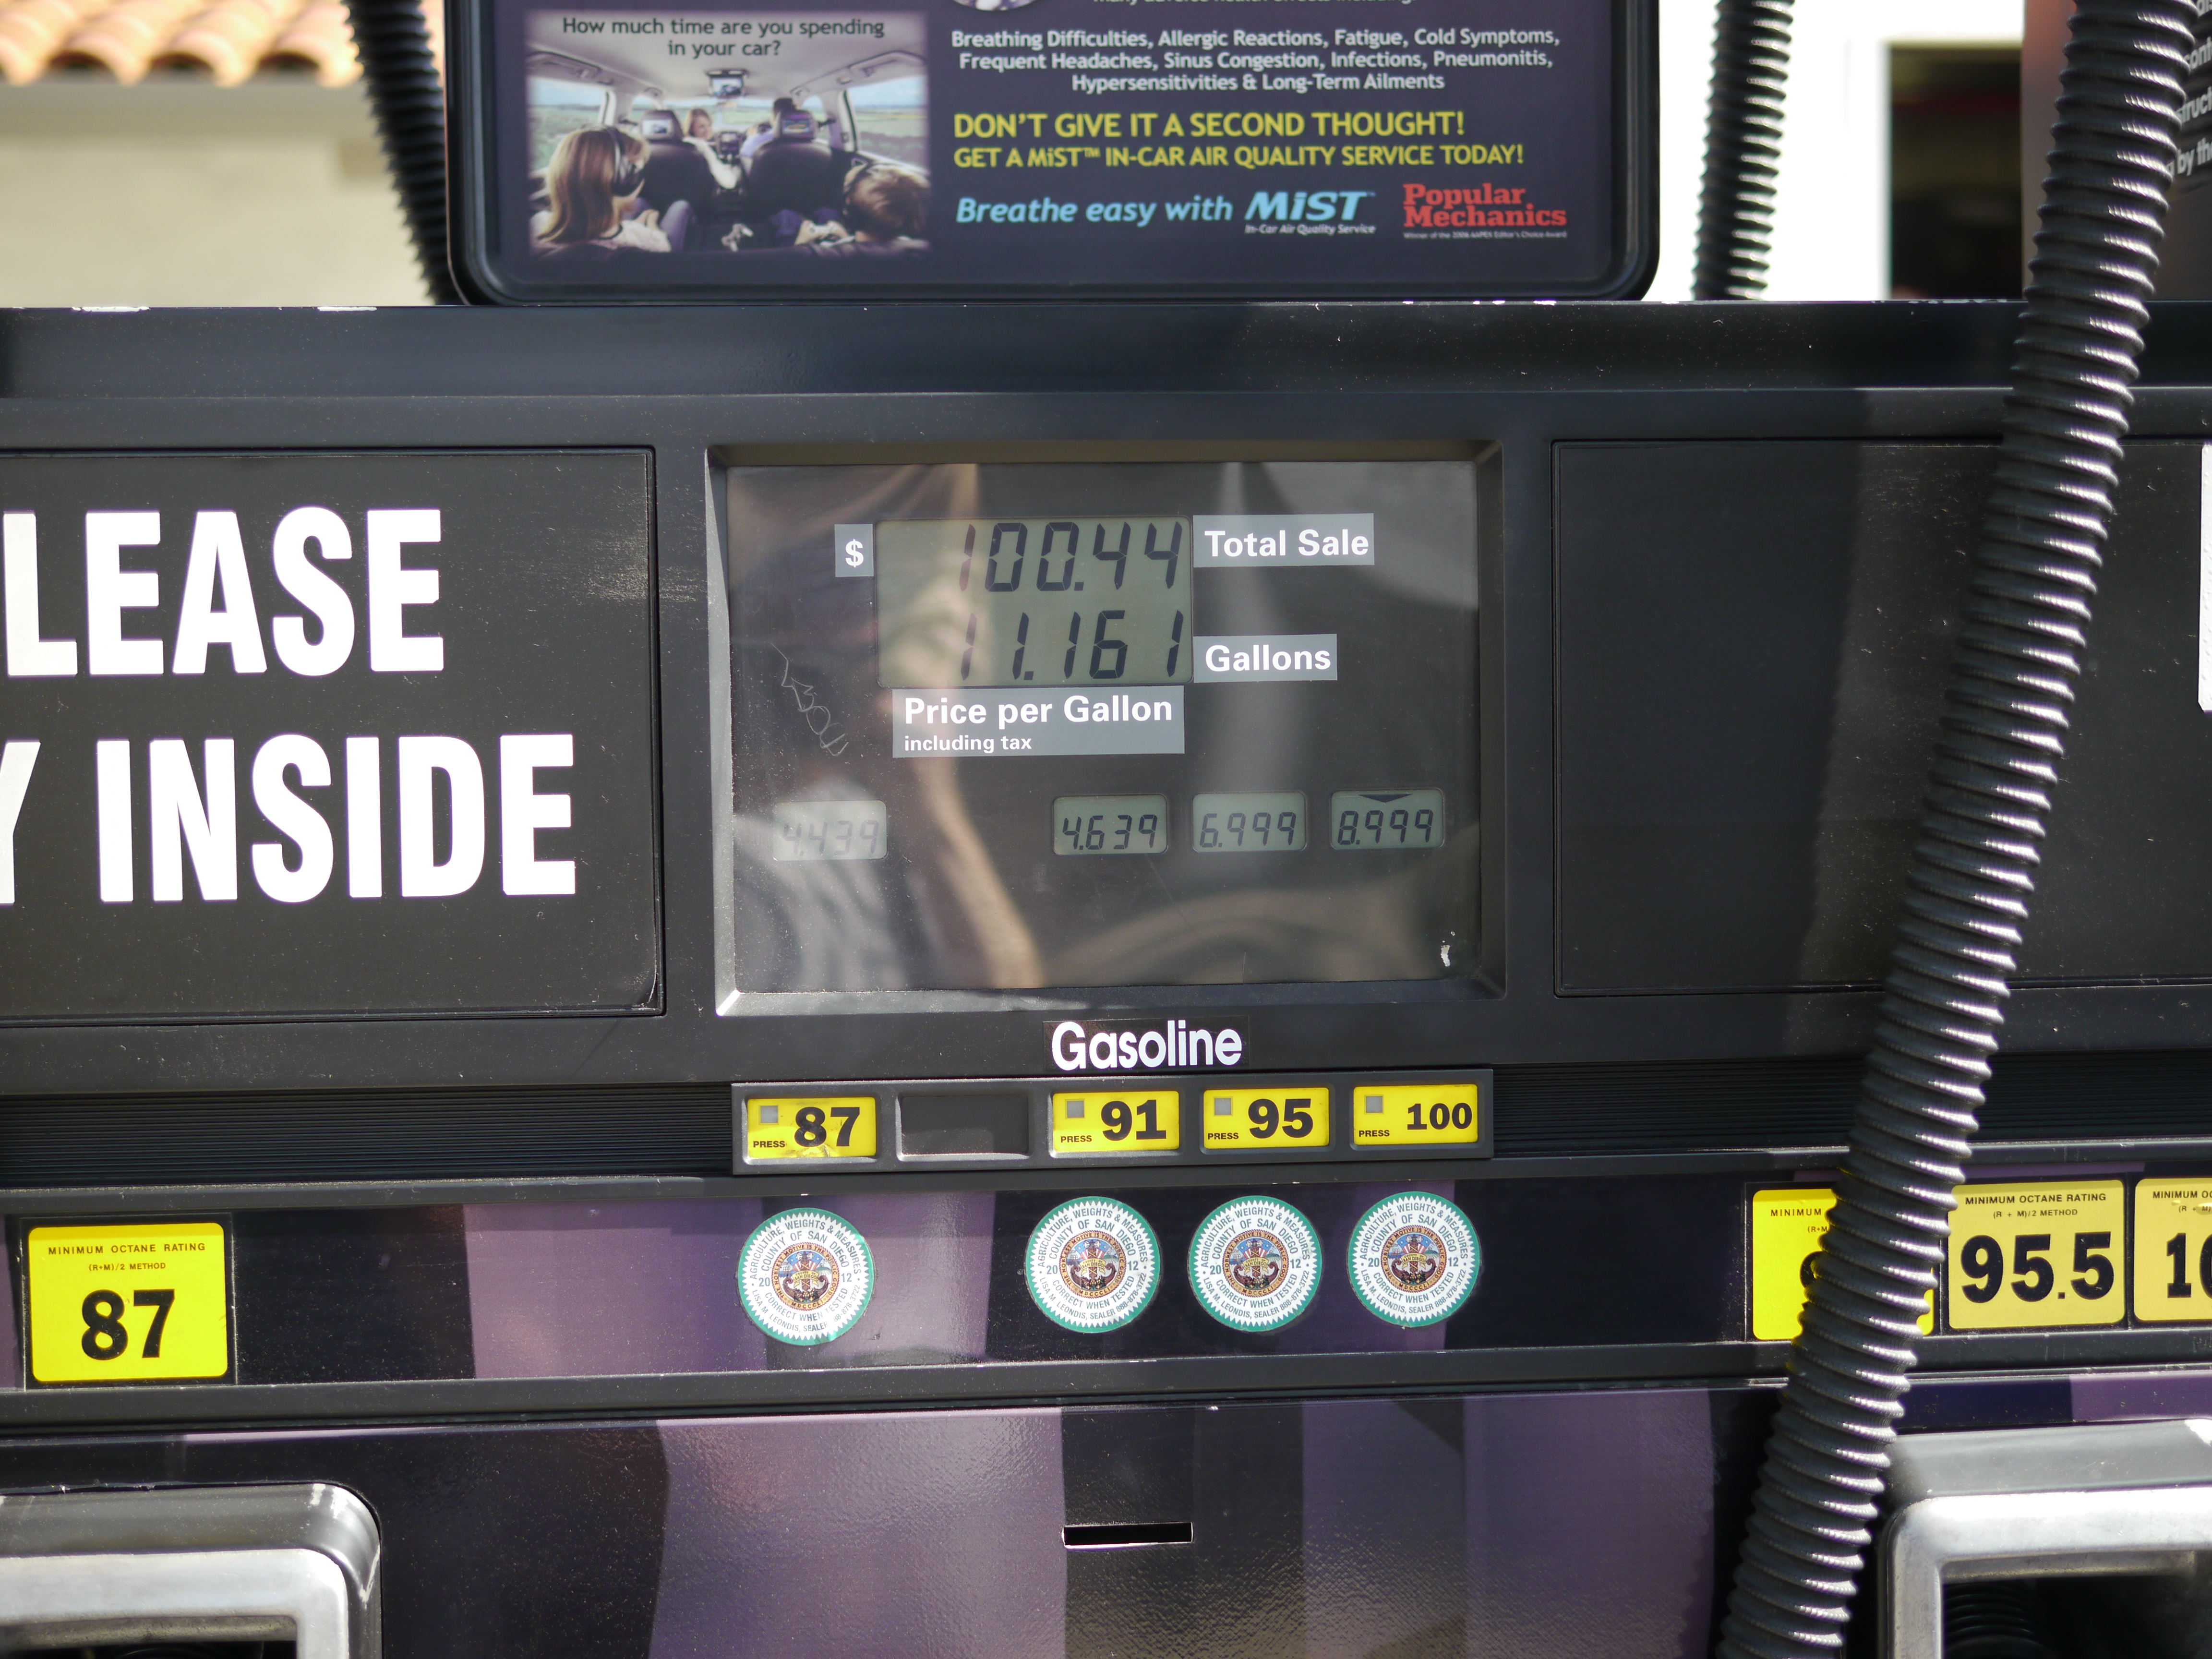
Put 10 gallons in earlier, so with this it’s been fed 21+. Surprised it took that much, and it wasn’t even filled to the point of splashing out the back. Must have burned more than I thought getting it tuned and taking it around the block, tank can only hold 18.
The river of fluid in the front of the car was it. Being a newbie to old cars, I didn’t realize you aren’t supposed to fill the radiator up all the way. As it gets hot, the fluid expands and dumps out the overflow tube. In this case onto the ground, there is no overflow bottle from the factory. In this case it’s pretty safe because it’s just distilled water + Redline Water Wetter, nothing slippery like coolant. Since the car had just been driven and was then sitting, the extra heat soak caused some extra spillage. Should be at the right level for this weekend.
GoPro was attached for the drive there – video here: http://youtu.be/MtqnUKTV_Zs – this is a pretty boring video, but…keep in mind this is the first drive of the car above about 20mph. I was stressed out of my mind. Every noise and vibration was a new one, and with everything new, never can tell if what you’re hearing/feeling is ok, or something you forgot to tighten. Suspect I’ll have that kind of stress for a while.
Driving impressions…hmmm…
The brakes were a little weird with a sort of shuddering at first. I think that was just the weird black stuff being taken off the front rotors. That went away pretty quickly. Brakes feel good now. Haven’t tested them to lockup yet, not sure which end will do so first.
The idle is too low, around 750rpm. Factory spec is 950, adjusted the idle screw after getting home. Stalled the car once at a stop sign, so embarrassing. The car started ok at the gas station, but took several seconds to get going at this stop sign. Thank goodness for that much bigger battery! Will be investigating some kind of heat shielding for the starter.
Back tires feel a little slippery – got the back end to move pretty easily, but controllably. Could be the grease and oils they’ve collected from sitting in the garage for almost 6 months.
There was only one pseudo-corner taken on the drive, and late in corner exit the rear made a banging noise over a mild bump. Will need to spend some time underneath to ascertain root cause – it wasn’t the shocks, they have almost 2″ of bump travel not used. Could have been the axle on the frame, or the front of the diff hitting the driveshaft tunnel.
Need to check pinion angle and possibly play with rear ride height.
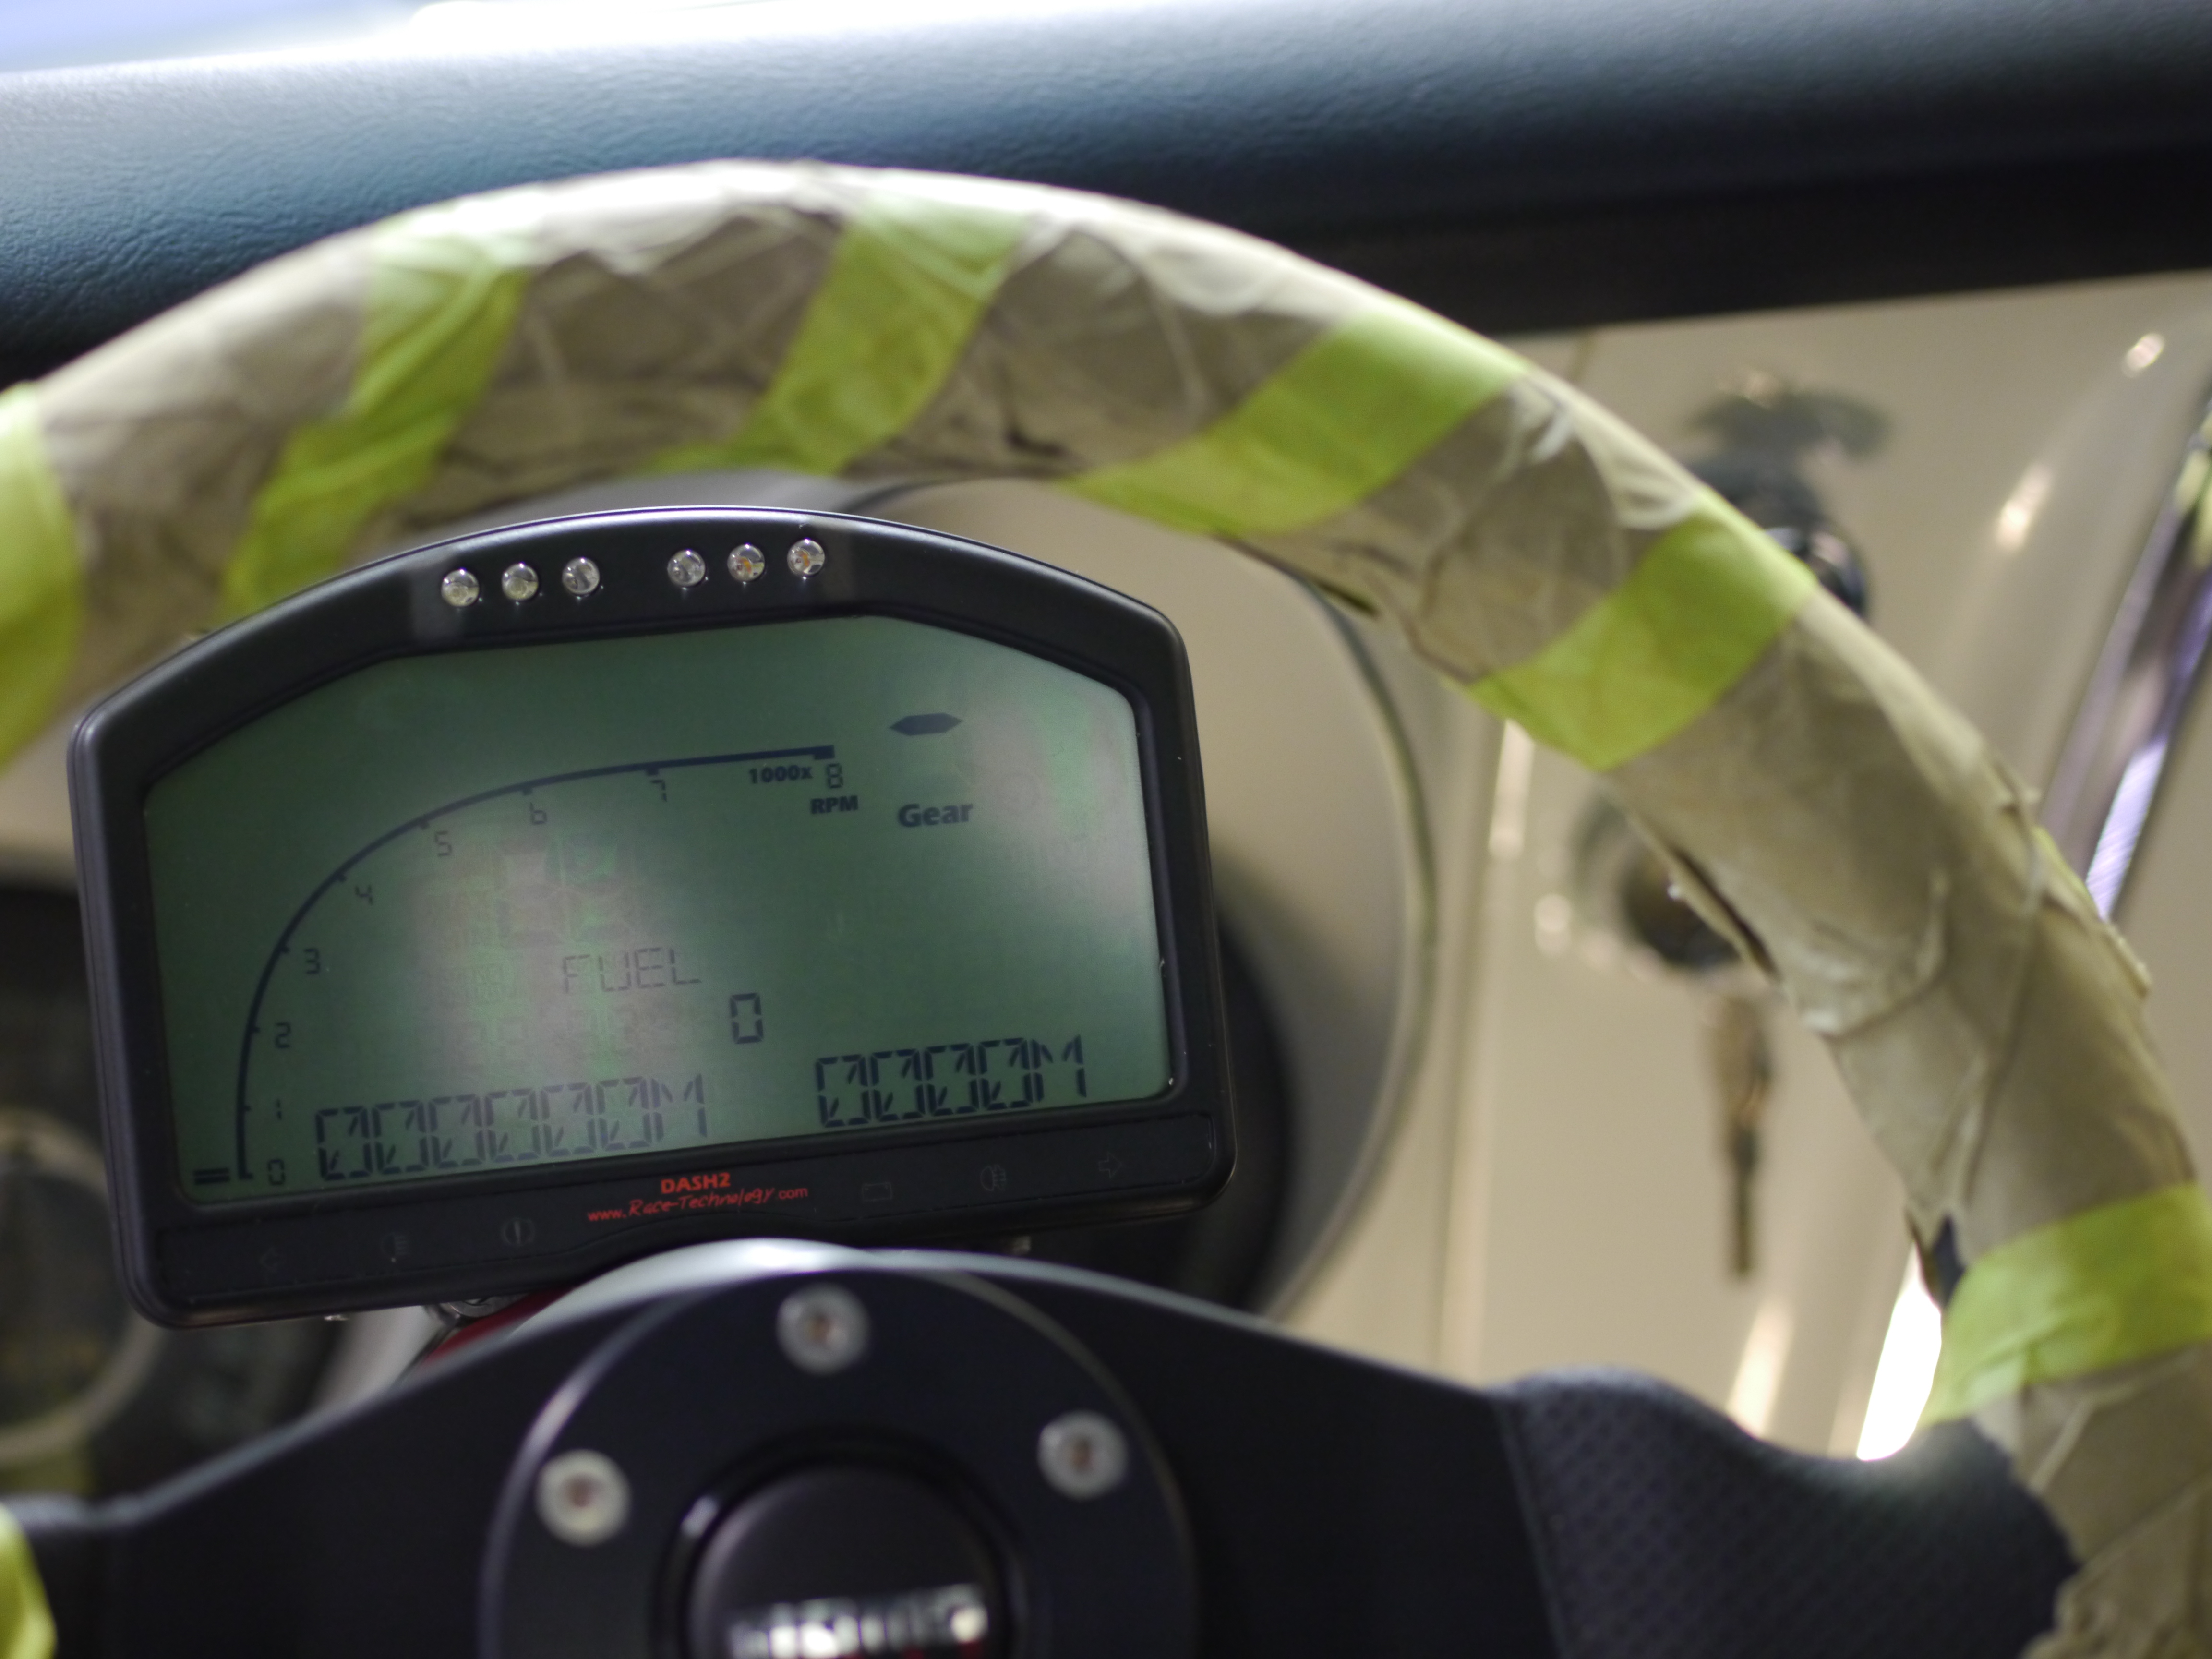
All major systems working well. Alternator charging, oil pressure is good, and the cooling system is keeping temps where needed. You can see all three (out-of-focus, shooting-while-driving photo, sorry) in the dash display below-
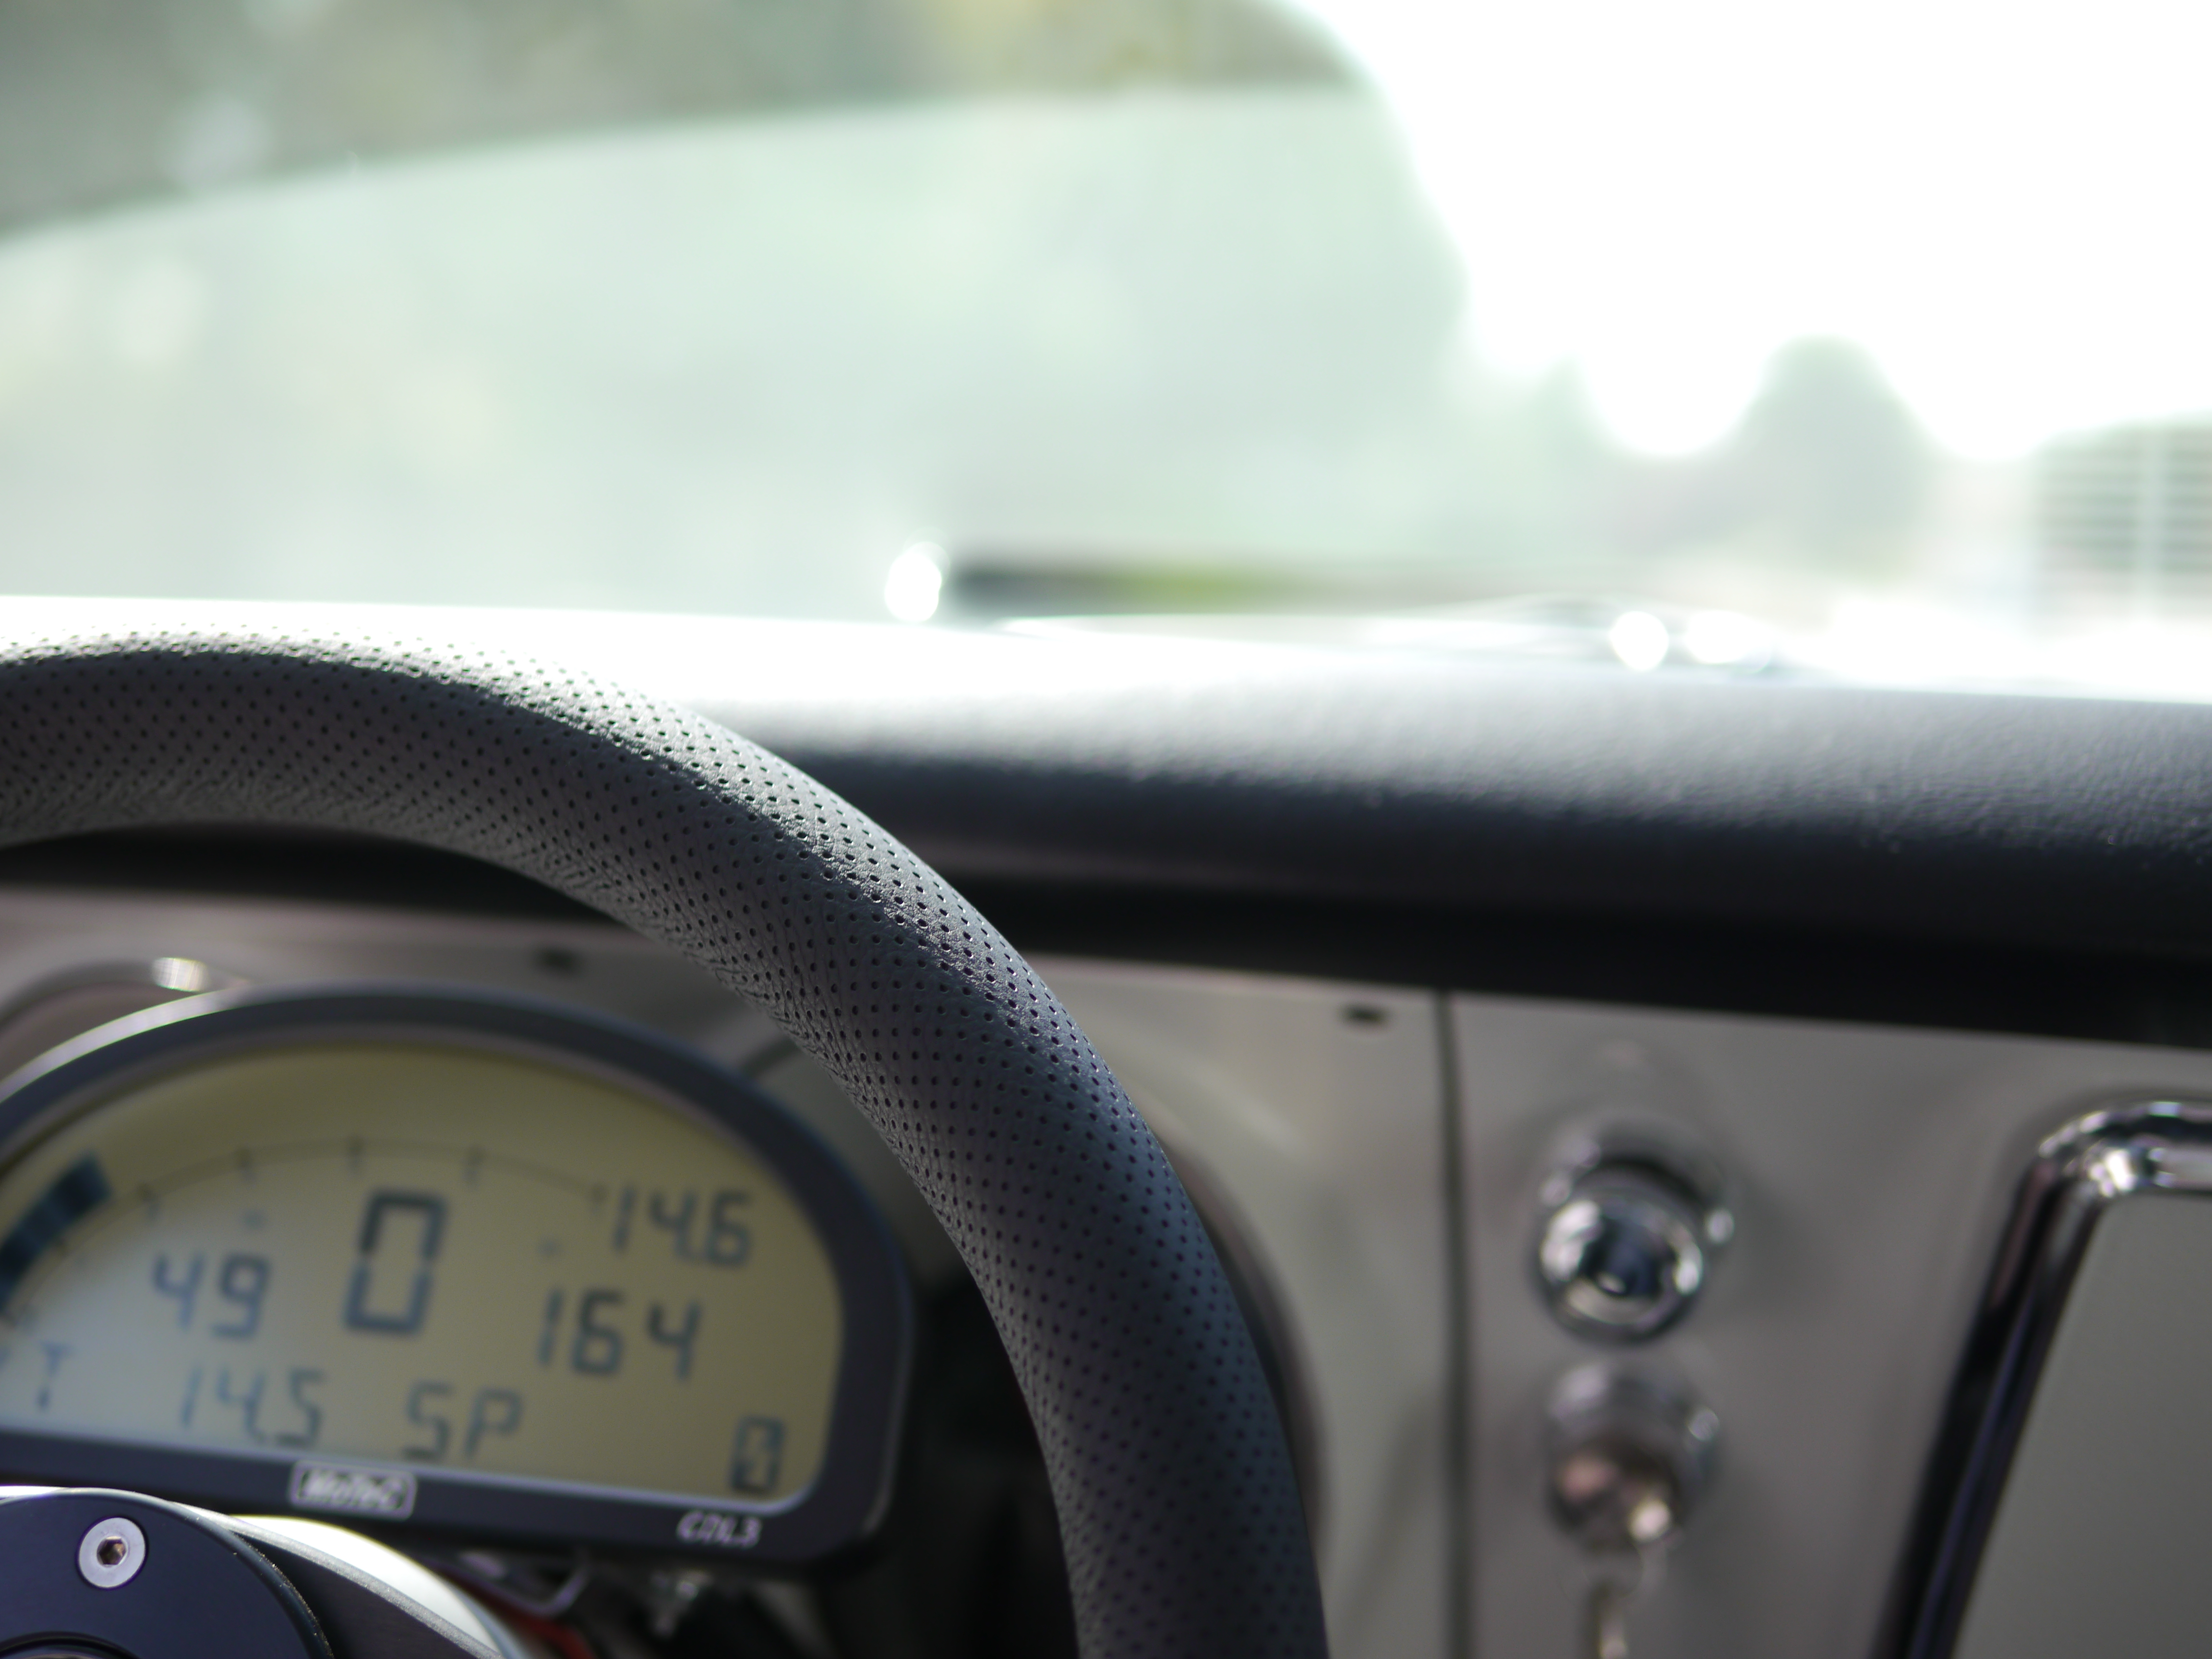
Speaking of which, I *love* the Motec CDL3. Perhaps it is due somewhat to my day job as the IT Director for a software company – but I have a real appreciation for hardware and software pairs made to this level of excellence. Yes, it was expensive, but this is a case where “you get what you pay for” works out favorably. Need to get it pulling speed from the GPS, at which point it can also do a gear calculation to replace the big 0 in the middle.
Car is pretty loud – plan to get it in to the exhaust shop this week for some help. While decelerating in gear, the steep rear end sounds vaguely like a siren, a little unnerving 🙂
Spring rates are pretty extreme for this chassis (~1500 front, 250 rear) but the car doesn’t feel that stiff. While it looks low, it really isn’t – components like the headers and oil pan have good clearance underneath, tucking above the frame rails, making it so I can get in and out of driveways and such just as easily, if not more so, than a stock Viper.
The only shock setting I know is the fronts are at full stiff for rebound. Everything else will be all over the map. Feels like it needs more rear rebound – in some quick steering inputs I could tell the front tires were turning, but the car mostly just wanted to keep going straight. Could be it has some front toe-in.
Where to go from here?
I like an autocross car to feel responsive, almost dangerously so, on the street. Today this felt a lot more like a pickup – safe and sure-footed. Perhaps that’s because it shares more in common with a pickup than a sports car…
From here it’s going to be a long way to go in getting it to work how I want in STX. Nationals is only 5 months away, many iterations of spring rates, shock settings, alignments, potentially shock valvings, wheel/tire tests and decisions. The car is not likely to be very good early on, so for those following along, don’t get discouraged by a particularly poor finish. I am likely to get slaughtered at my first few events (which just happen to be big SCCA National races) but really I’ll be happy if the car just makes it through the events ok mechanically. Haven’t driven at all since Nationals of last year (7 months back now) so some of it will be driver too.
Still a few things on the to-do list for the week to be ready for the weekend:
- Headliner and interior panels
- Exhaust – weld up mating flanges, exit out side or rear
- Thorough nut-and-bolt check
- Alignment
- Shock baseline
- Numbers
Apt to be tired by the time it gets here!
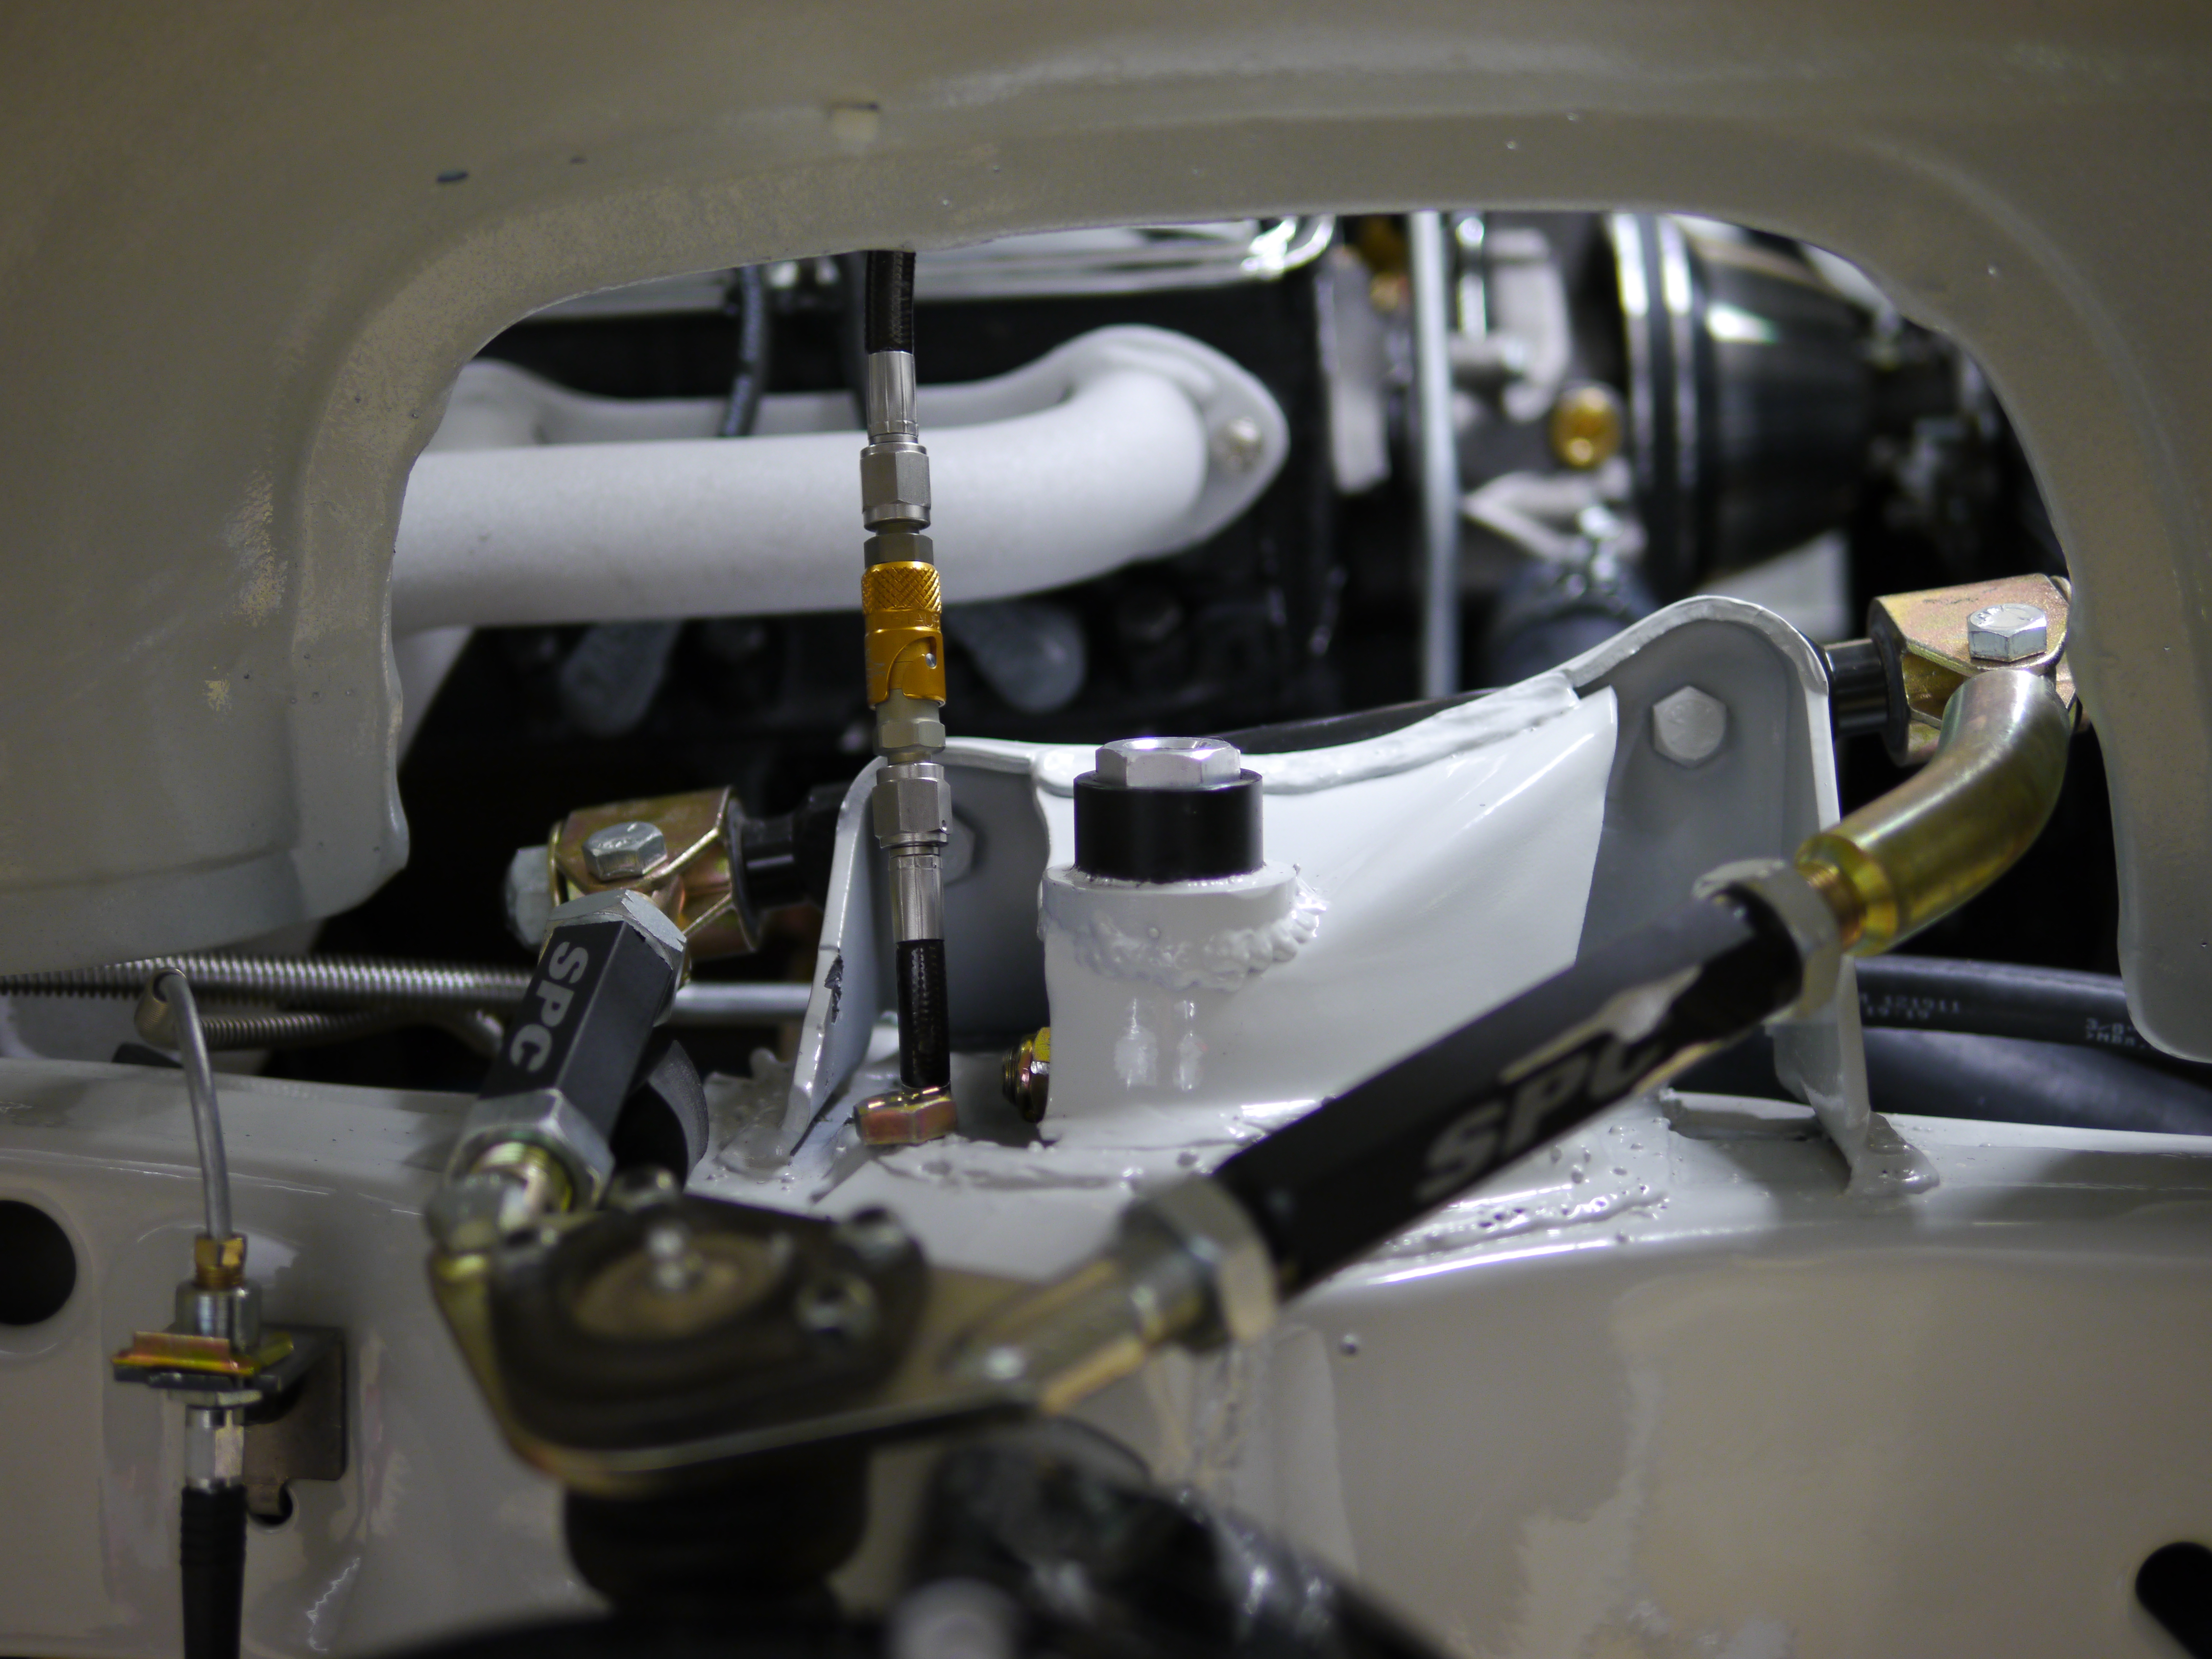
Shock installation
Finally got the rear shocks all buttoned up-
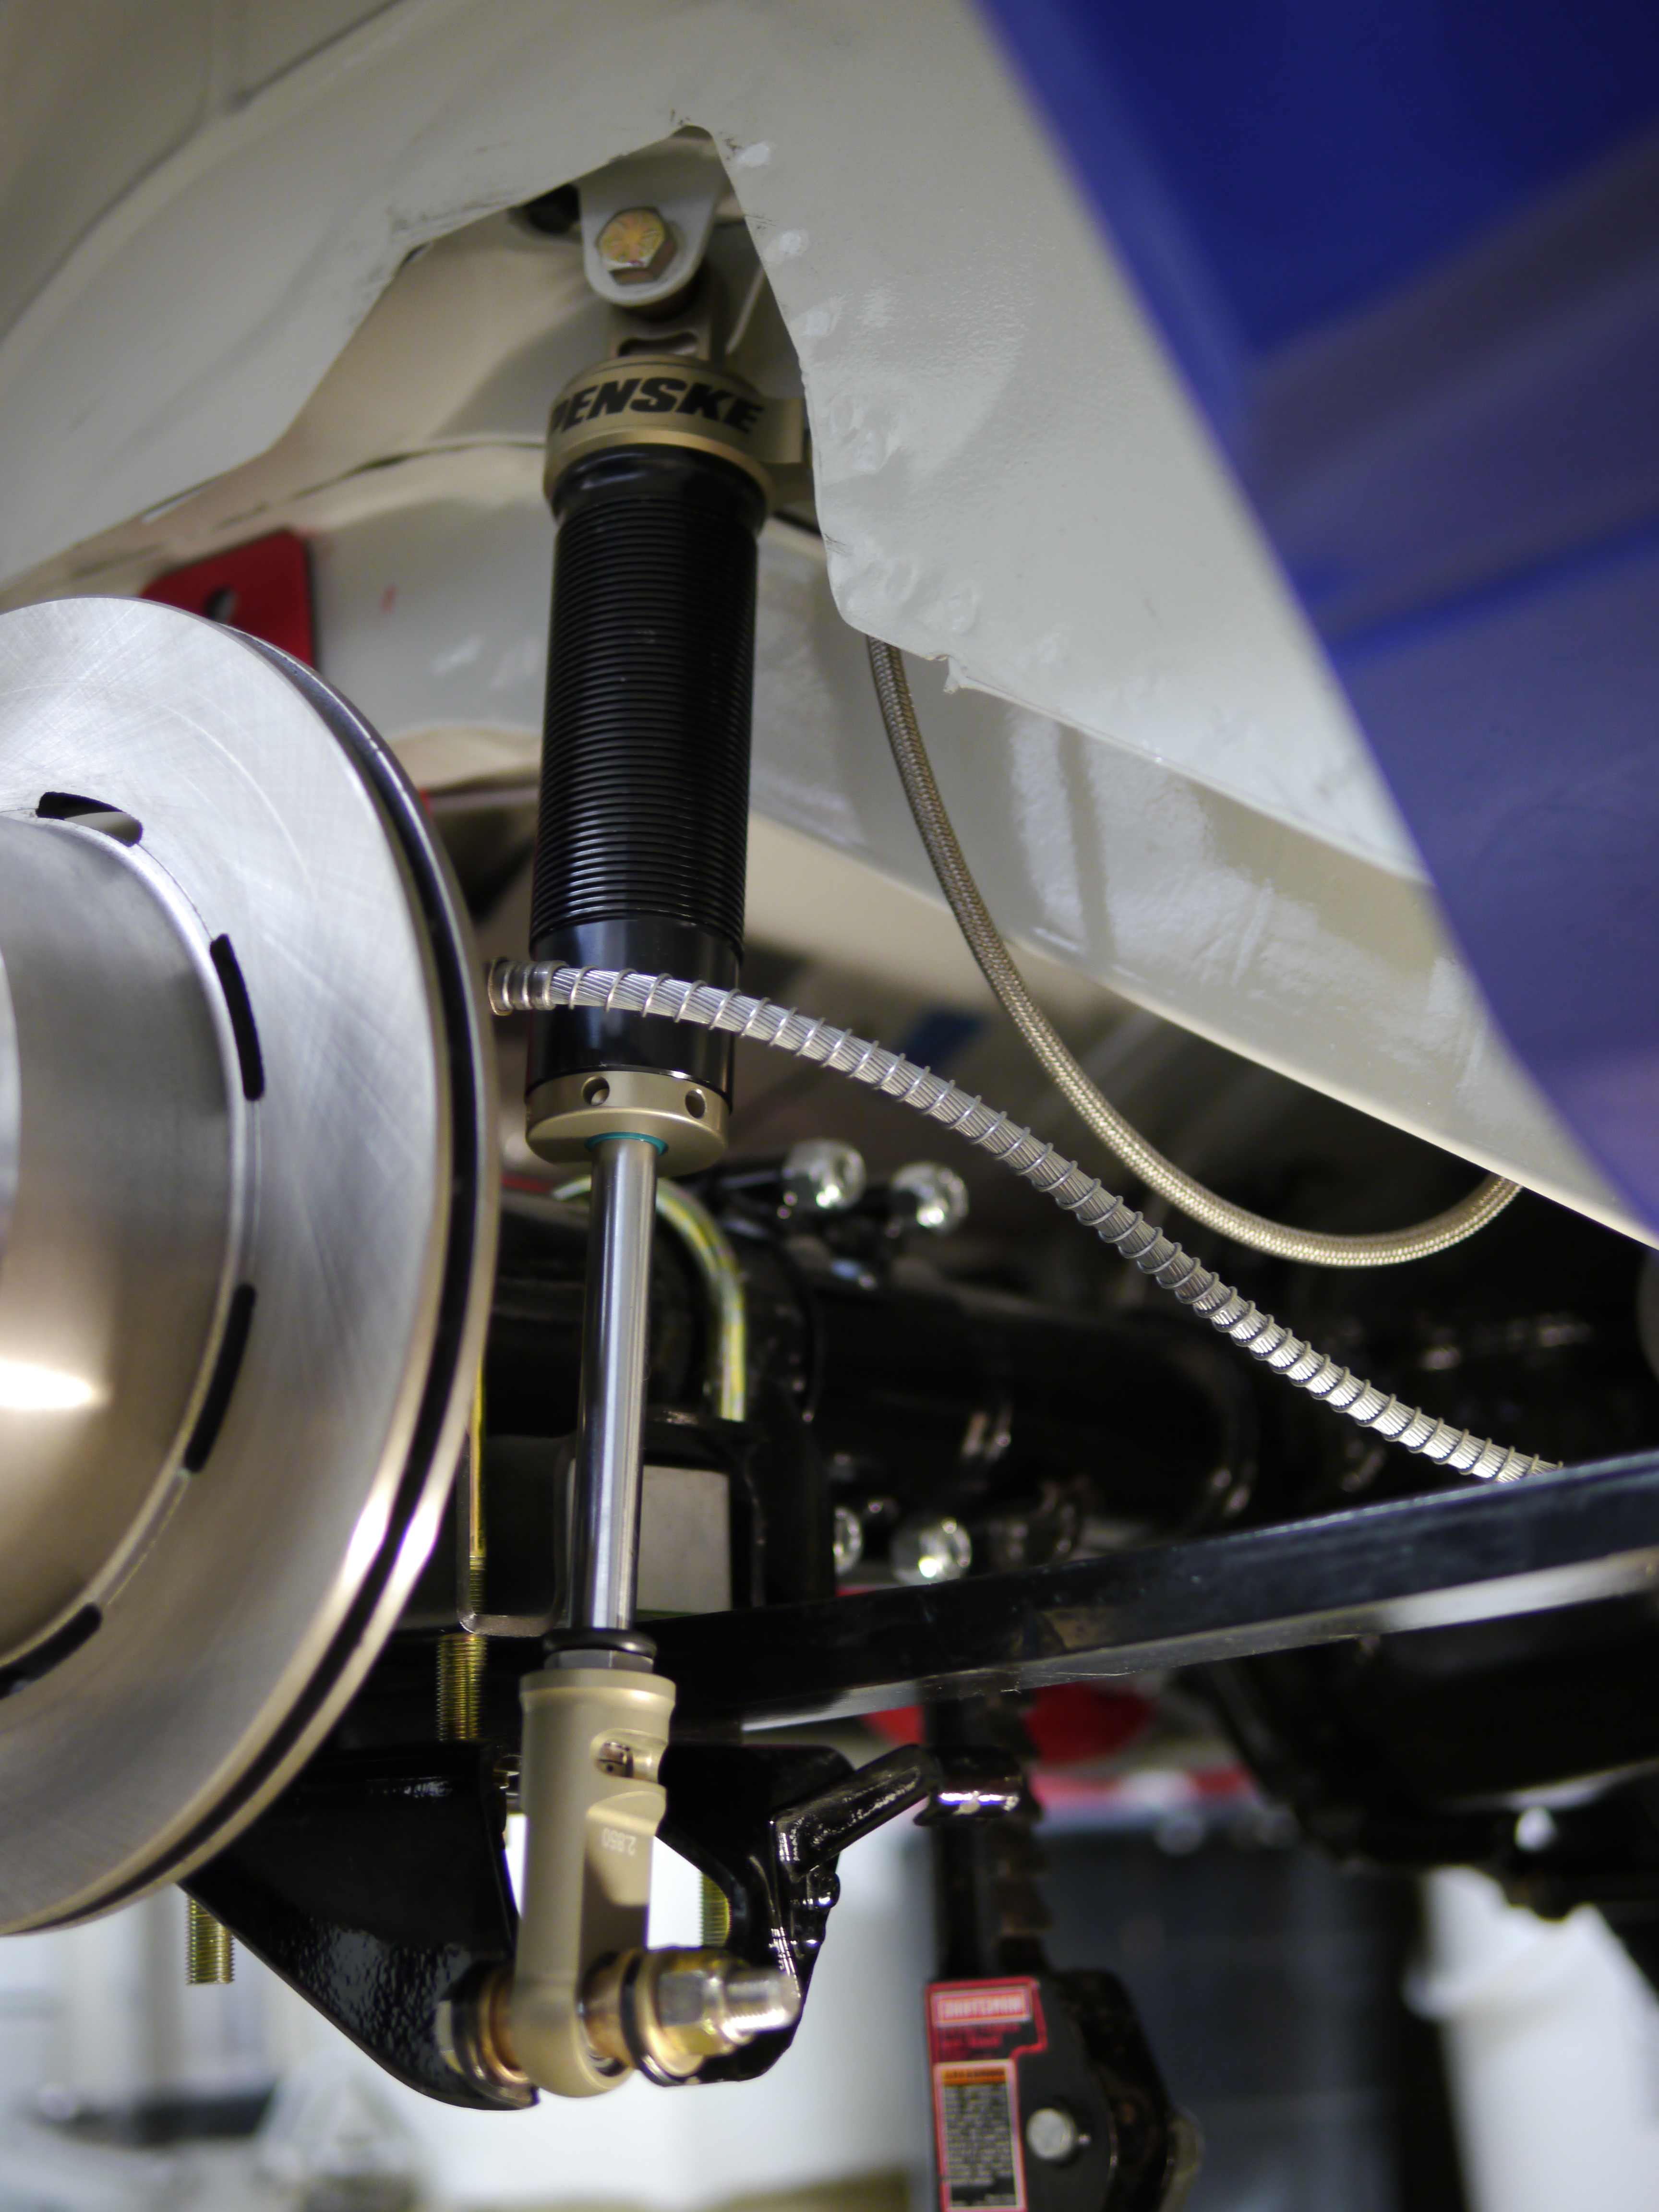

Not a ton to mention that isn’t obvious from the pictures. Shocks are mounted inverted, which helps reduce unsprung weight a tiny bit. In this case it also means the remote reservoir hose doesn’t move as the suspension moves through its travel, which should be a good thing for the life of those components.
Since the rear swaybar is a no-go at this ride height, was able to re-use the swaybar mount holes for little canister mount brackets. Really happy the length of hose to the remote cansiters, and the way it bends around the frame rails without touching anything – worked out perfectly.
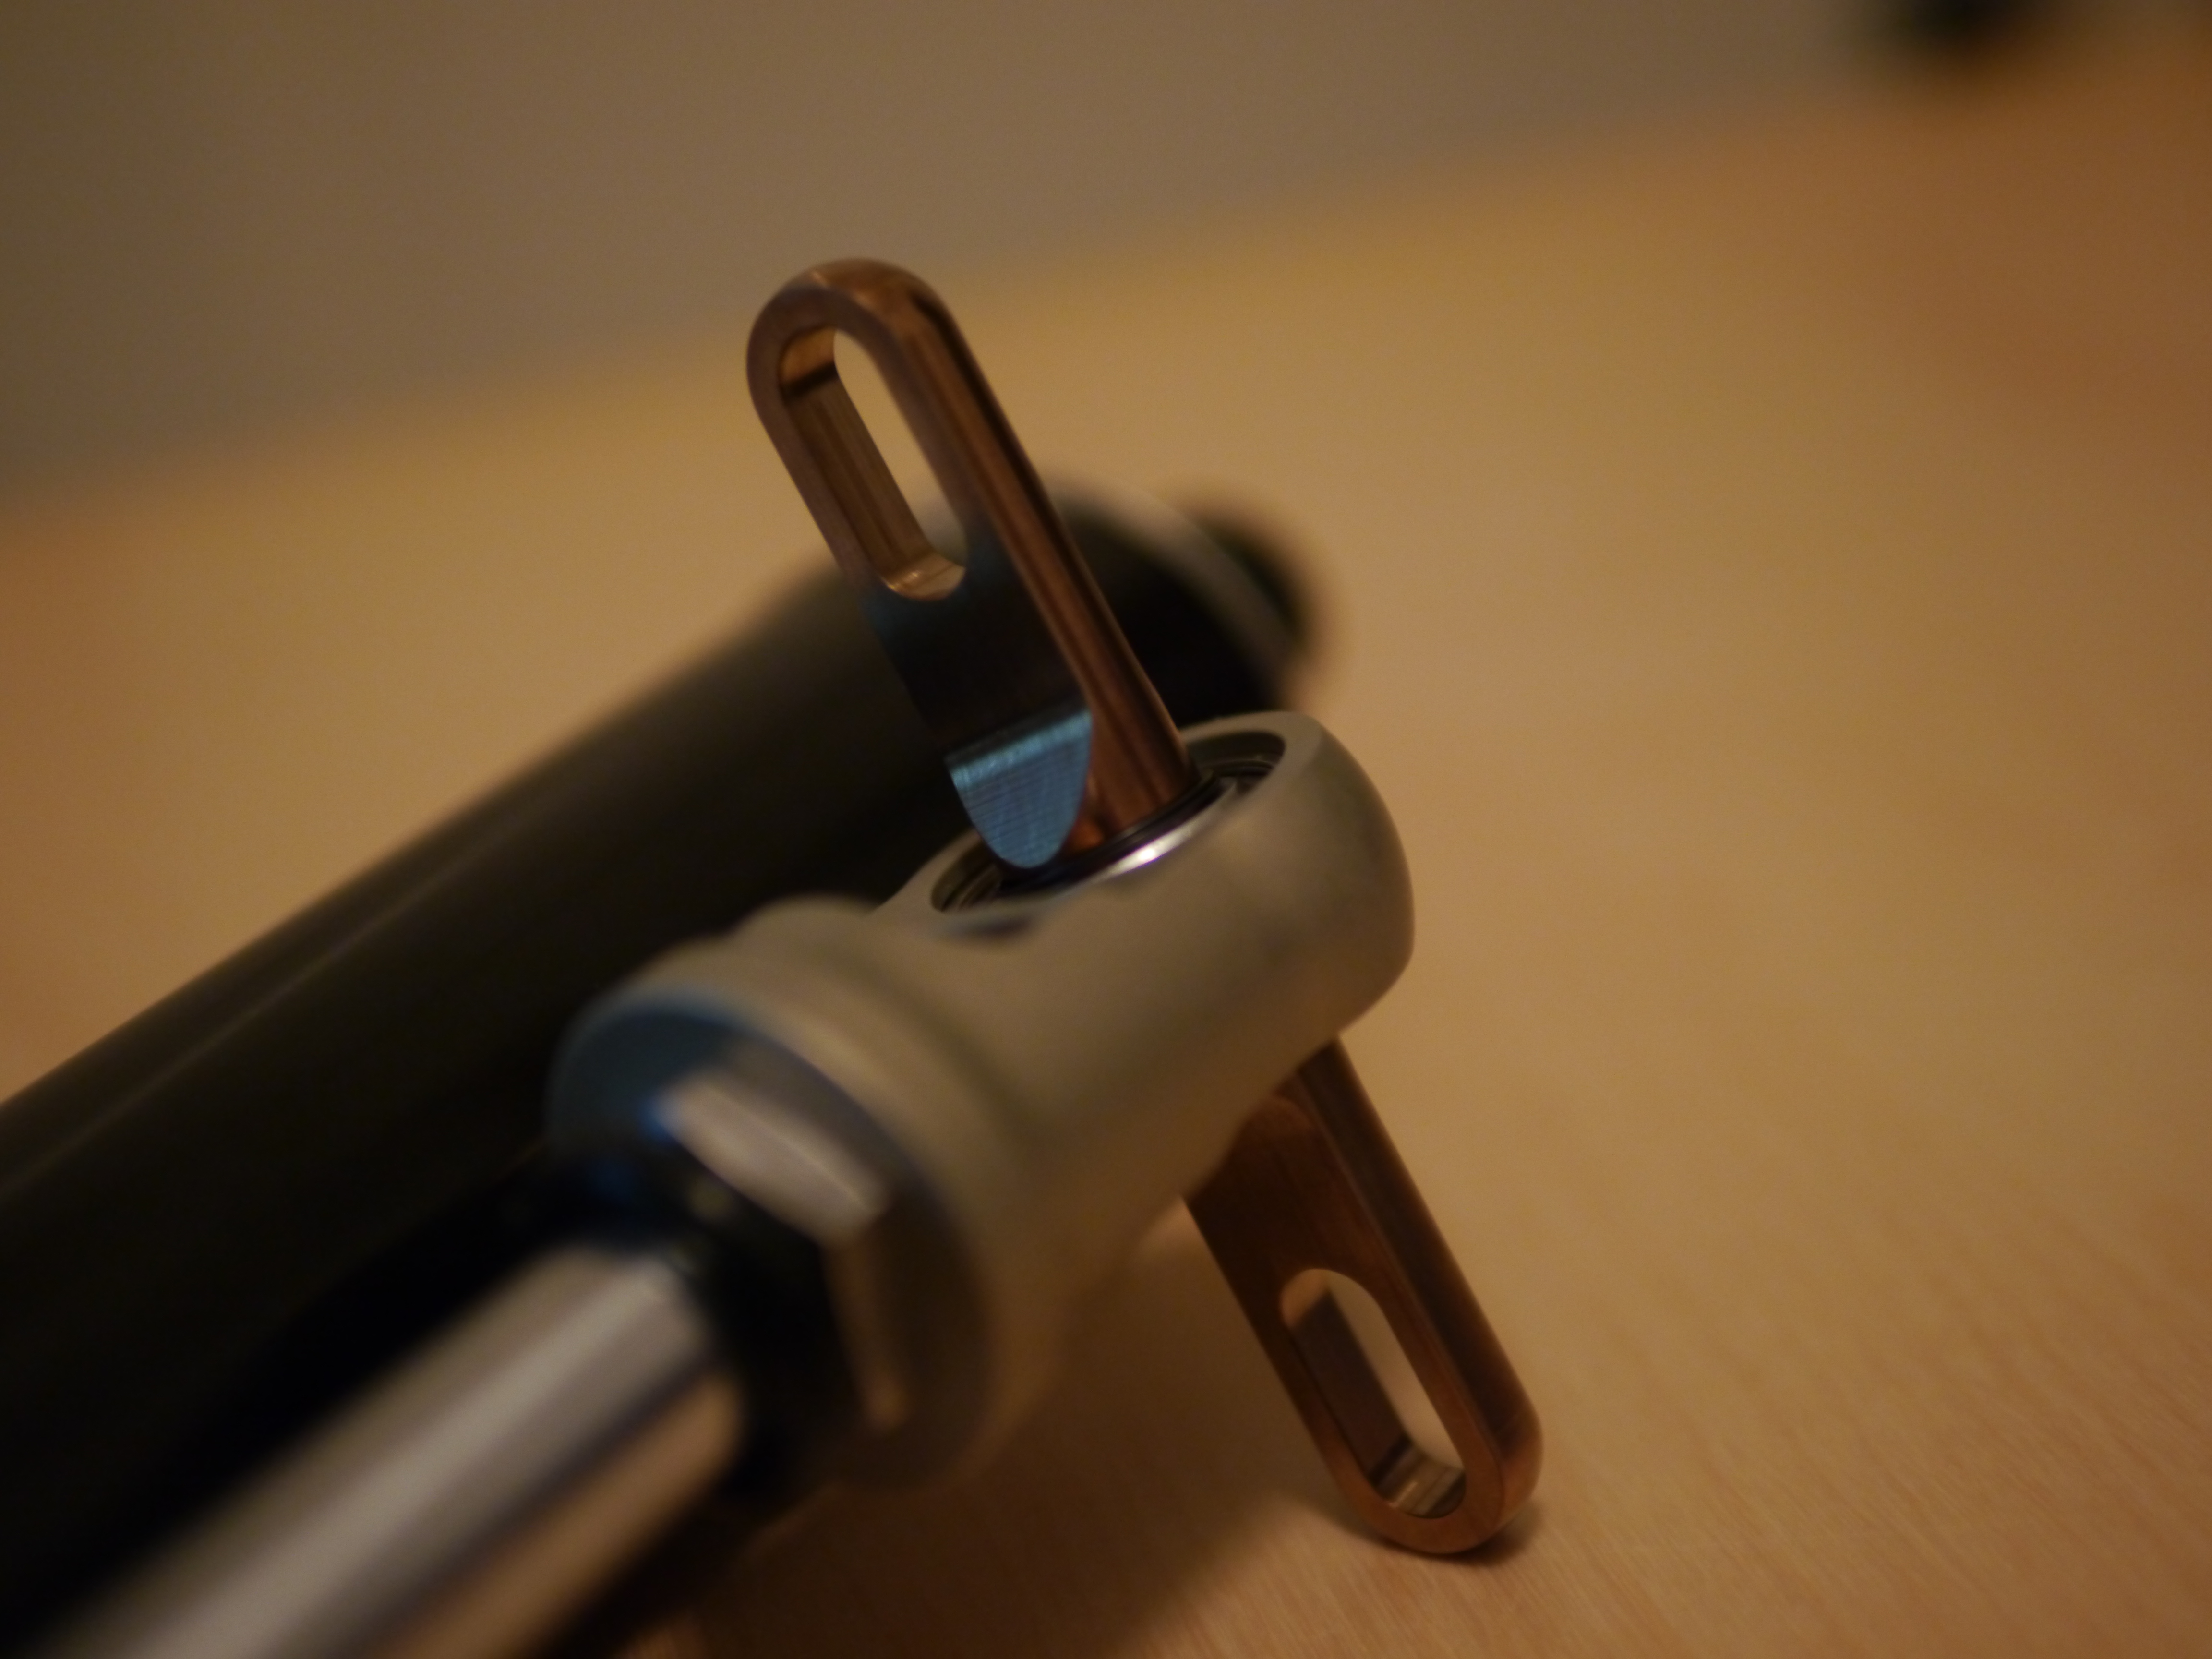
The rear shocks have four adjustments, in two locations. Rebound and “shaft” (better come up with a better name for that, too likely to be the target of jokes) adjustments are in the window where the lower shock eyelet mounts to the leaf spring plate (as an aside – note this shock mount plate puts the shock in double-shear – most run the crummy single-shear plates) and adjustments for low and high speed compression are those two knobs at the top of the canister – not the easiest to get to but reachable if you lie beside the car.
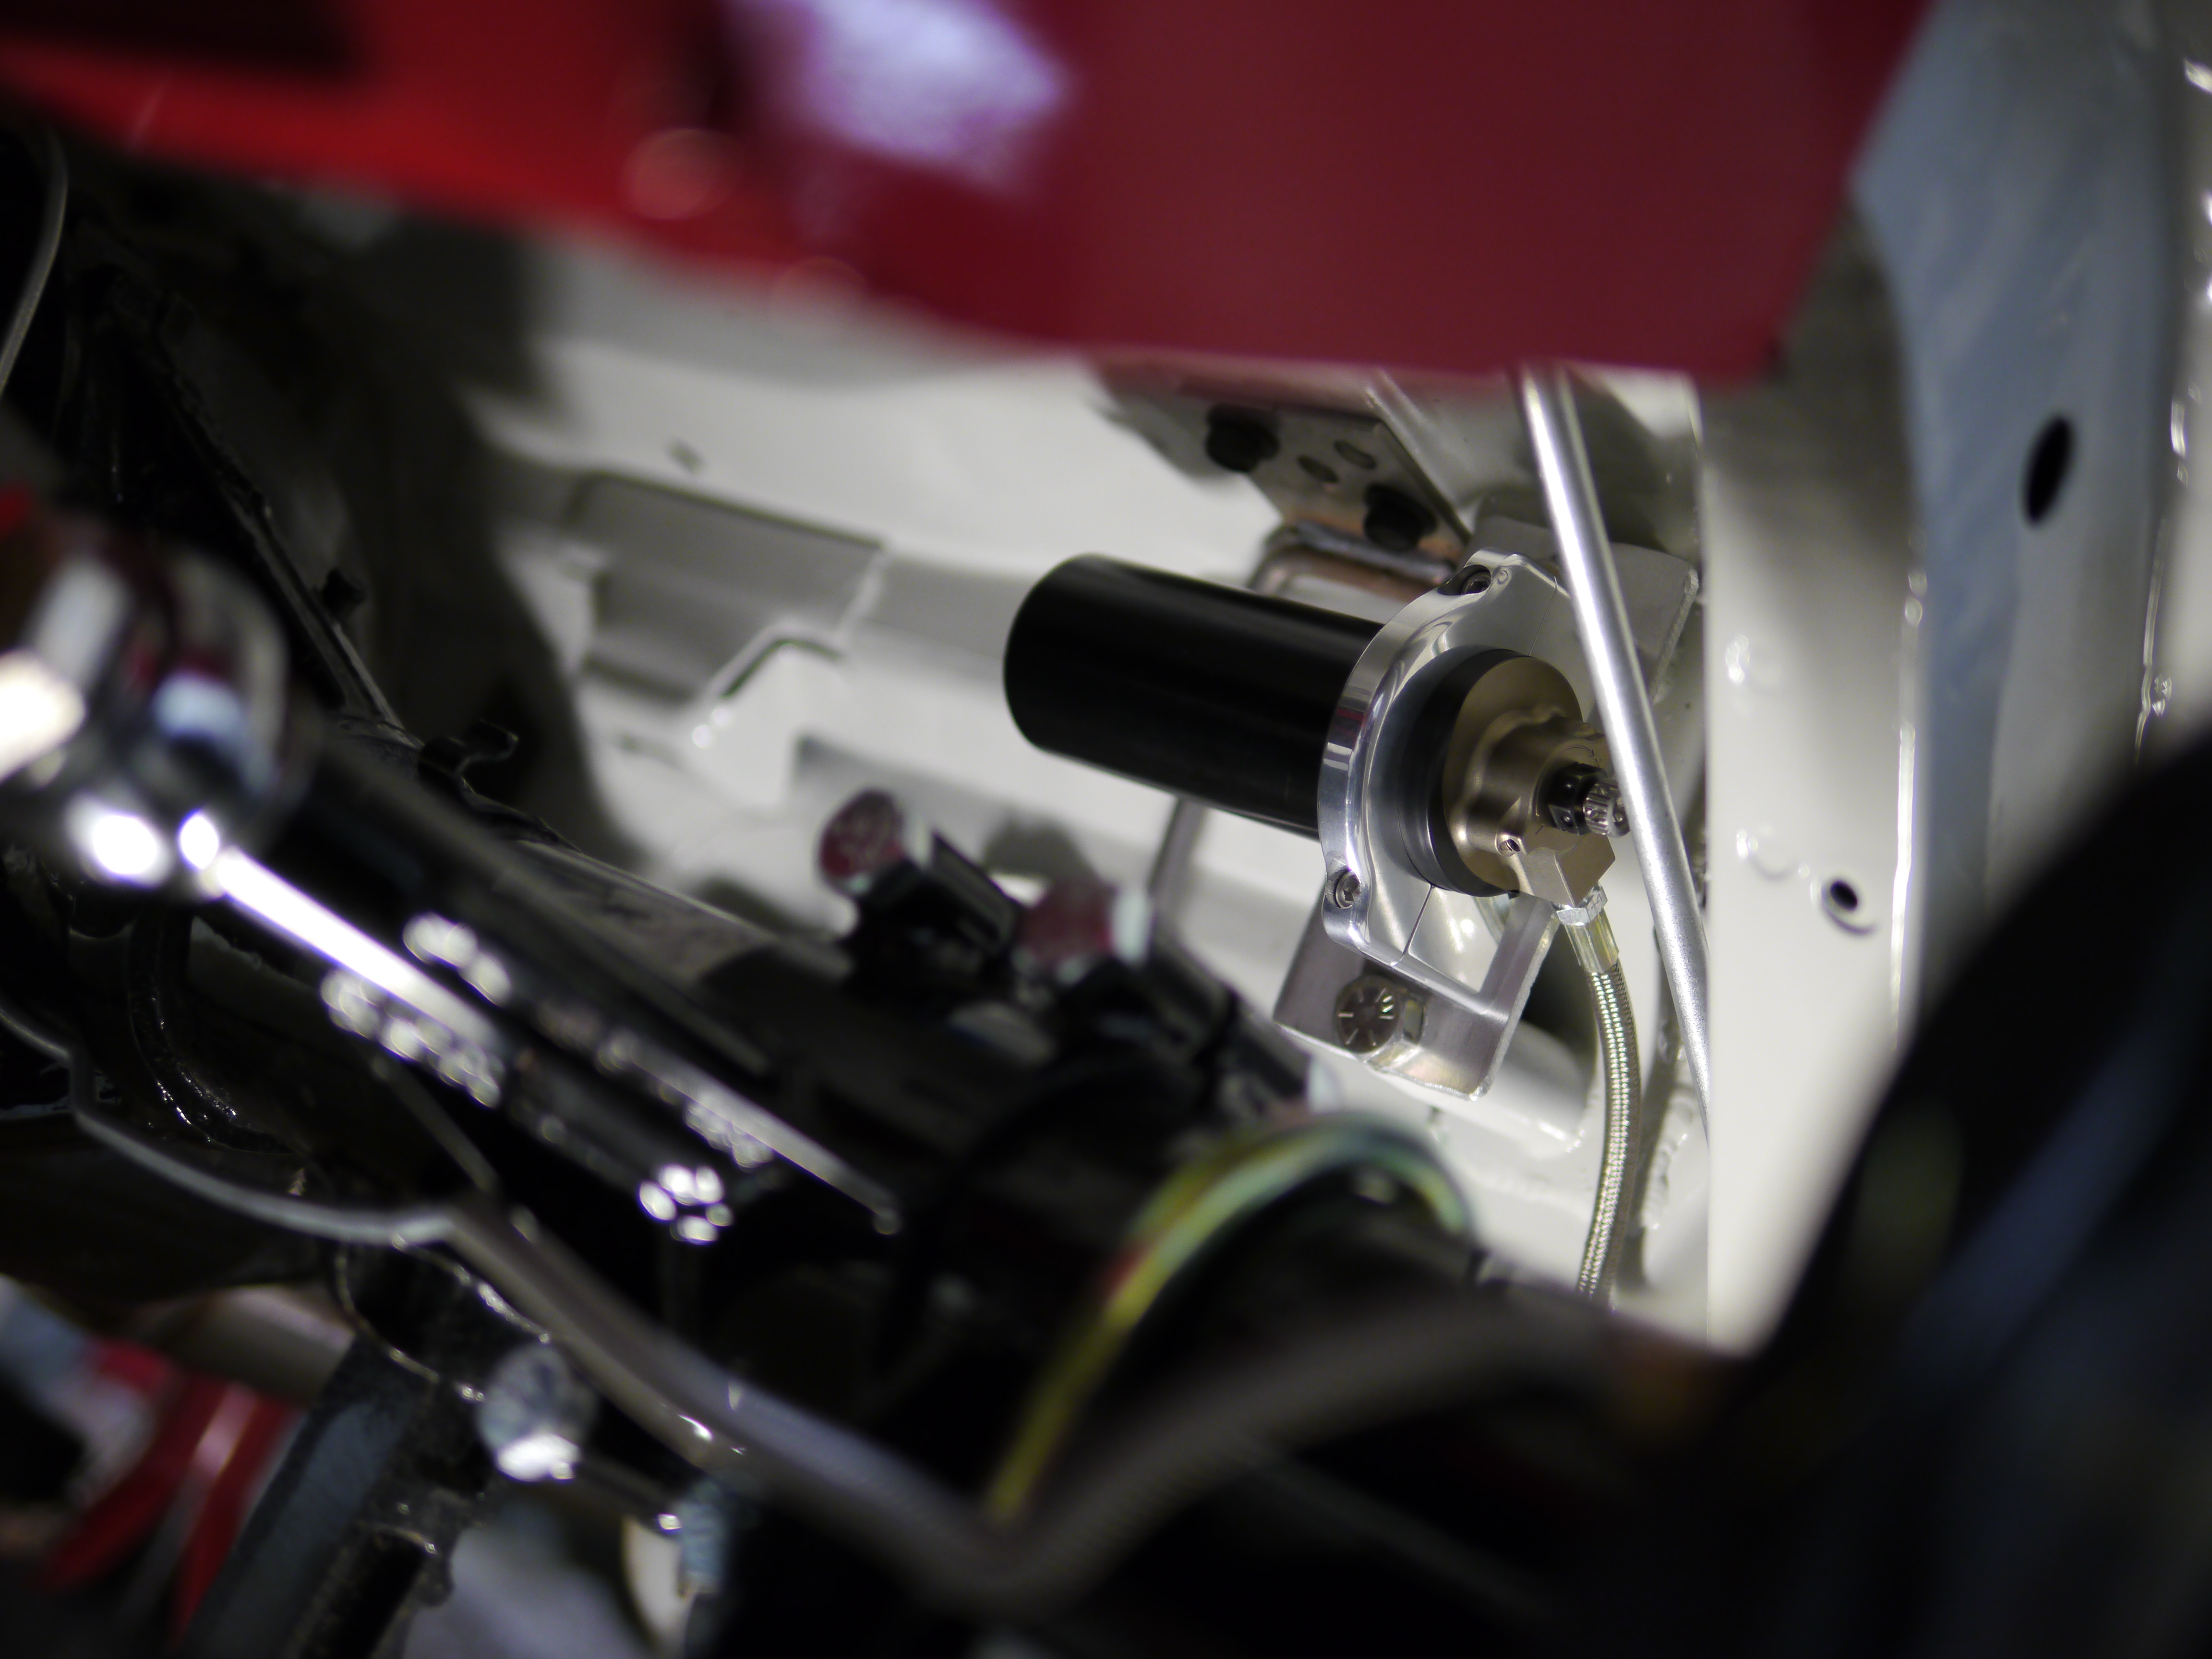
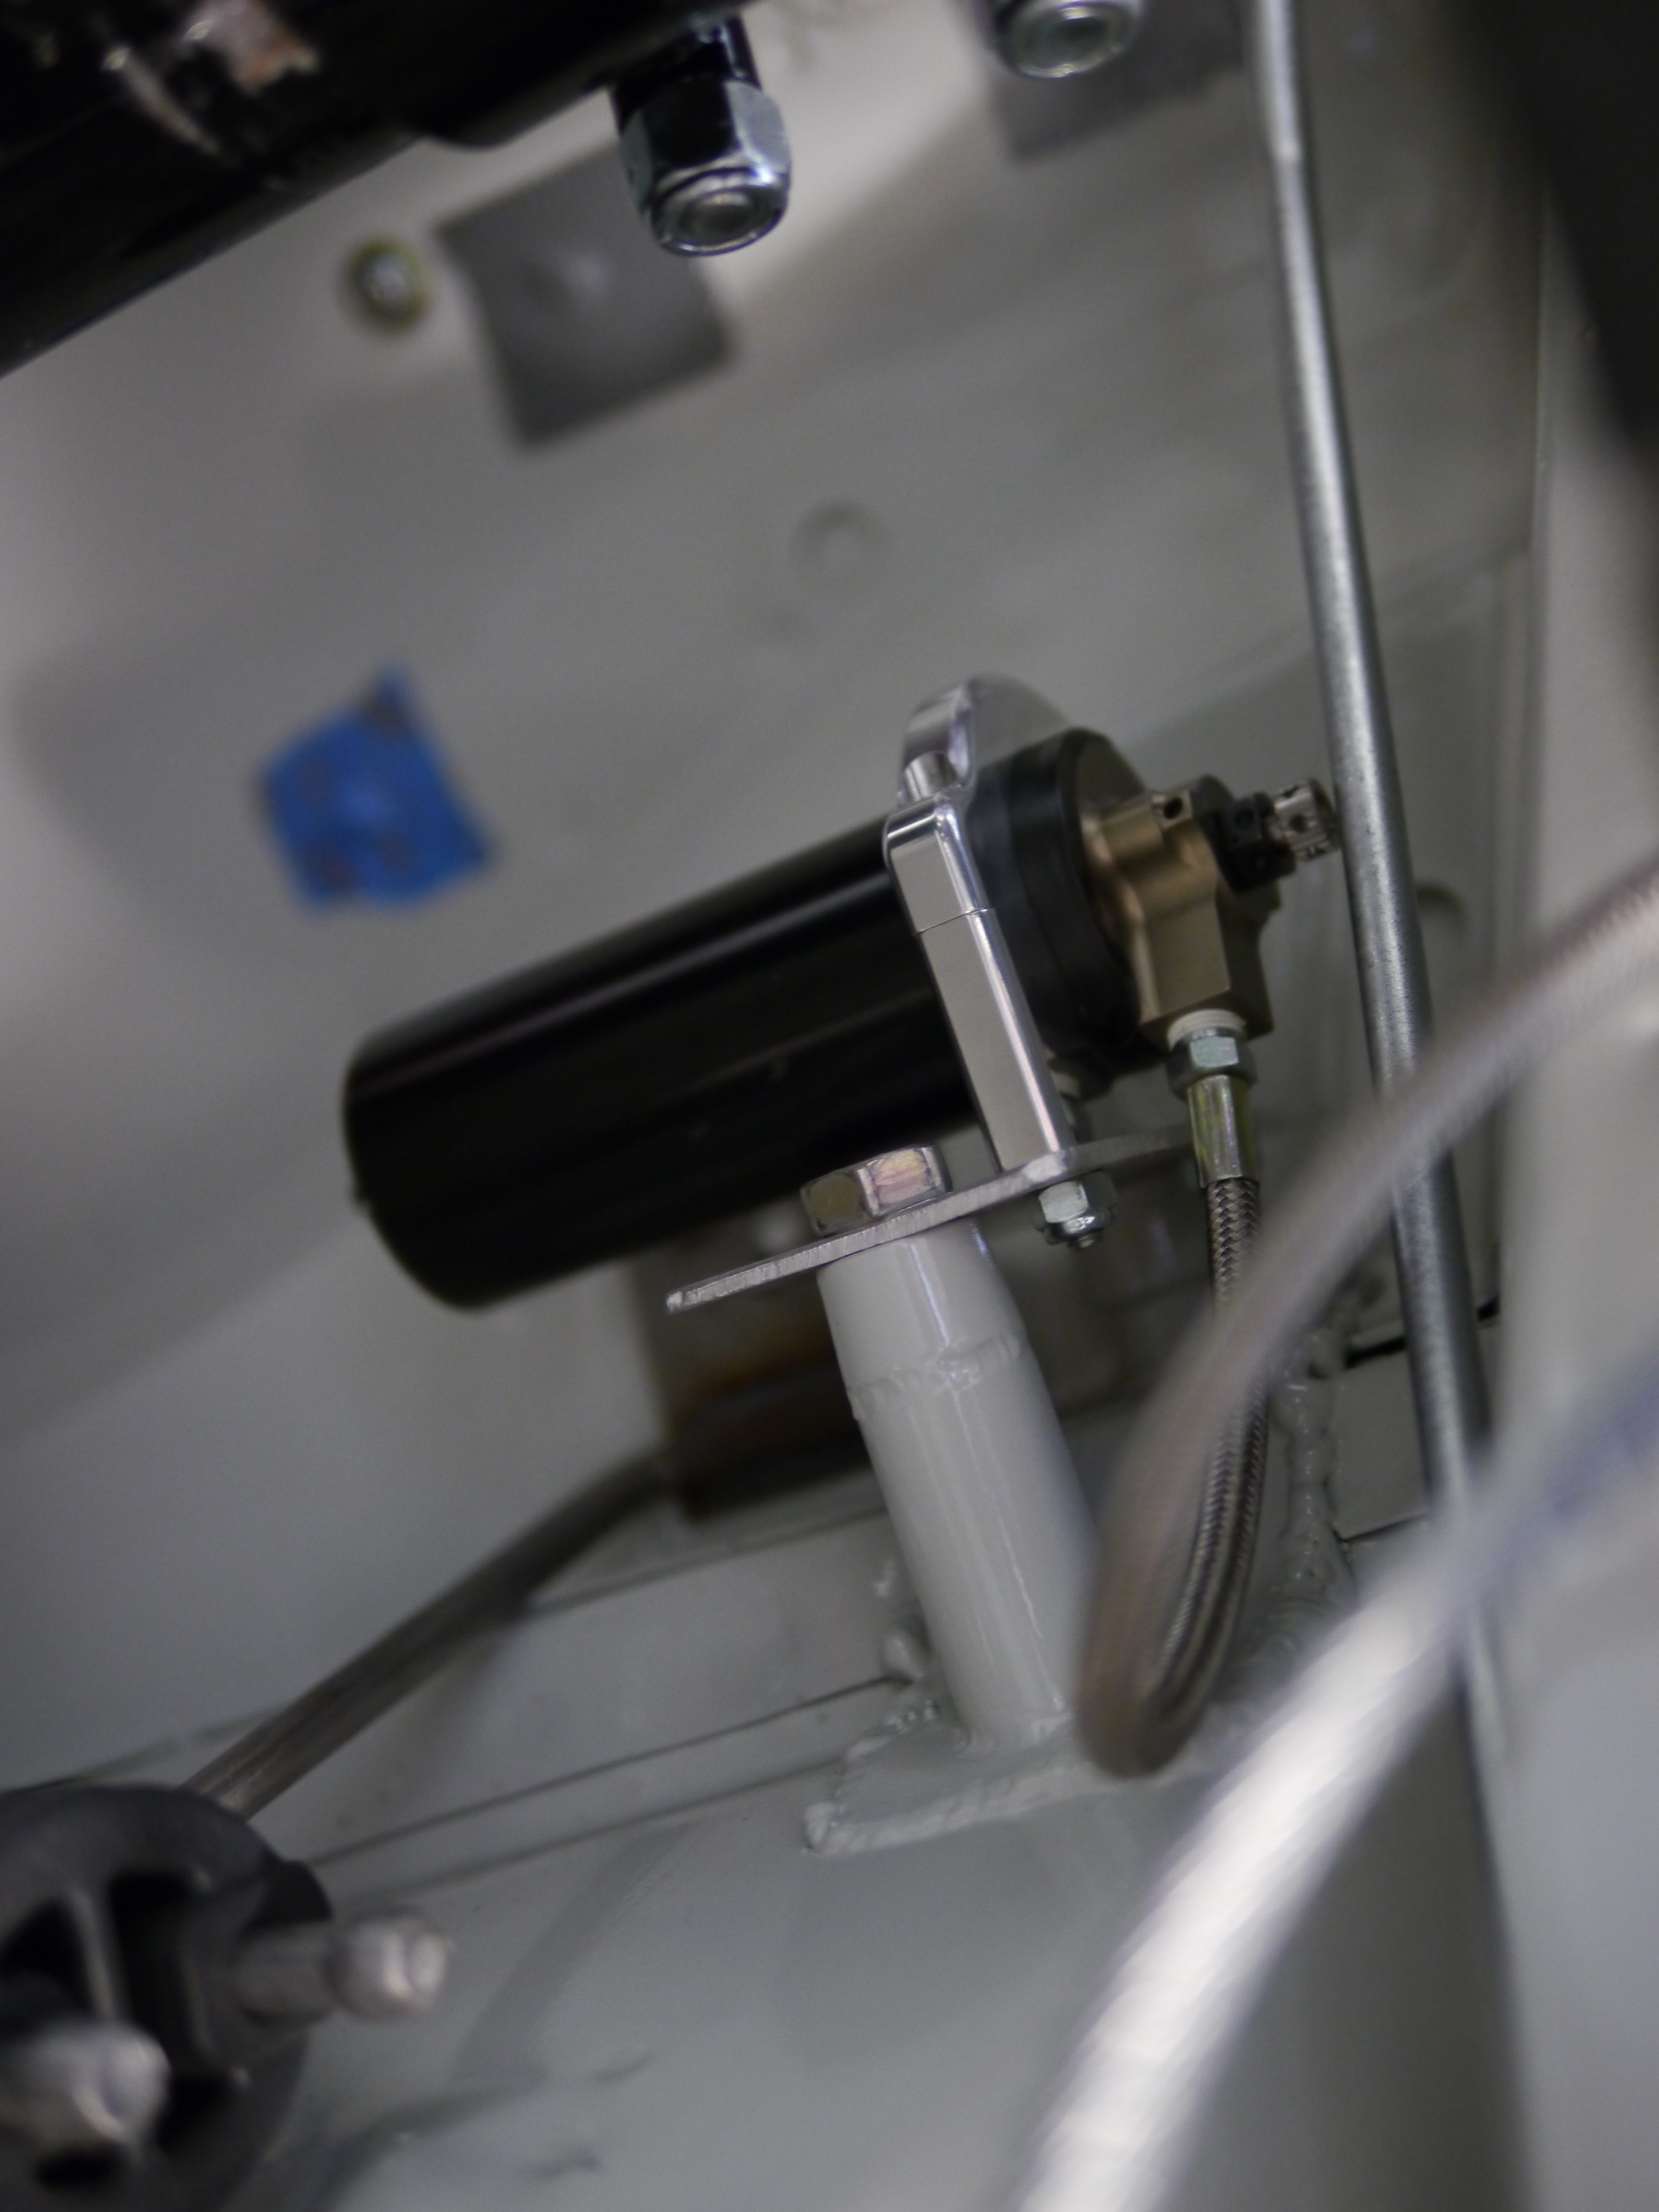
Up front, the shocks are so buried, there isn’t much to see. These things were a packaging nightmare!
Here too they are inverted, which provides the same benefits as the rear. Though in this case it’s more a matter of packaging necessity, than preference.
Since one of the advantages of these sorts of shocks is the bling factor, and the fronts are basically totally hidden, here’s a couple pics before they went on the car:
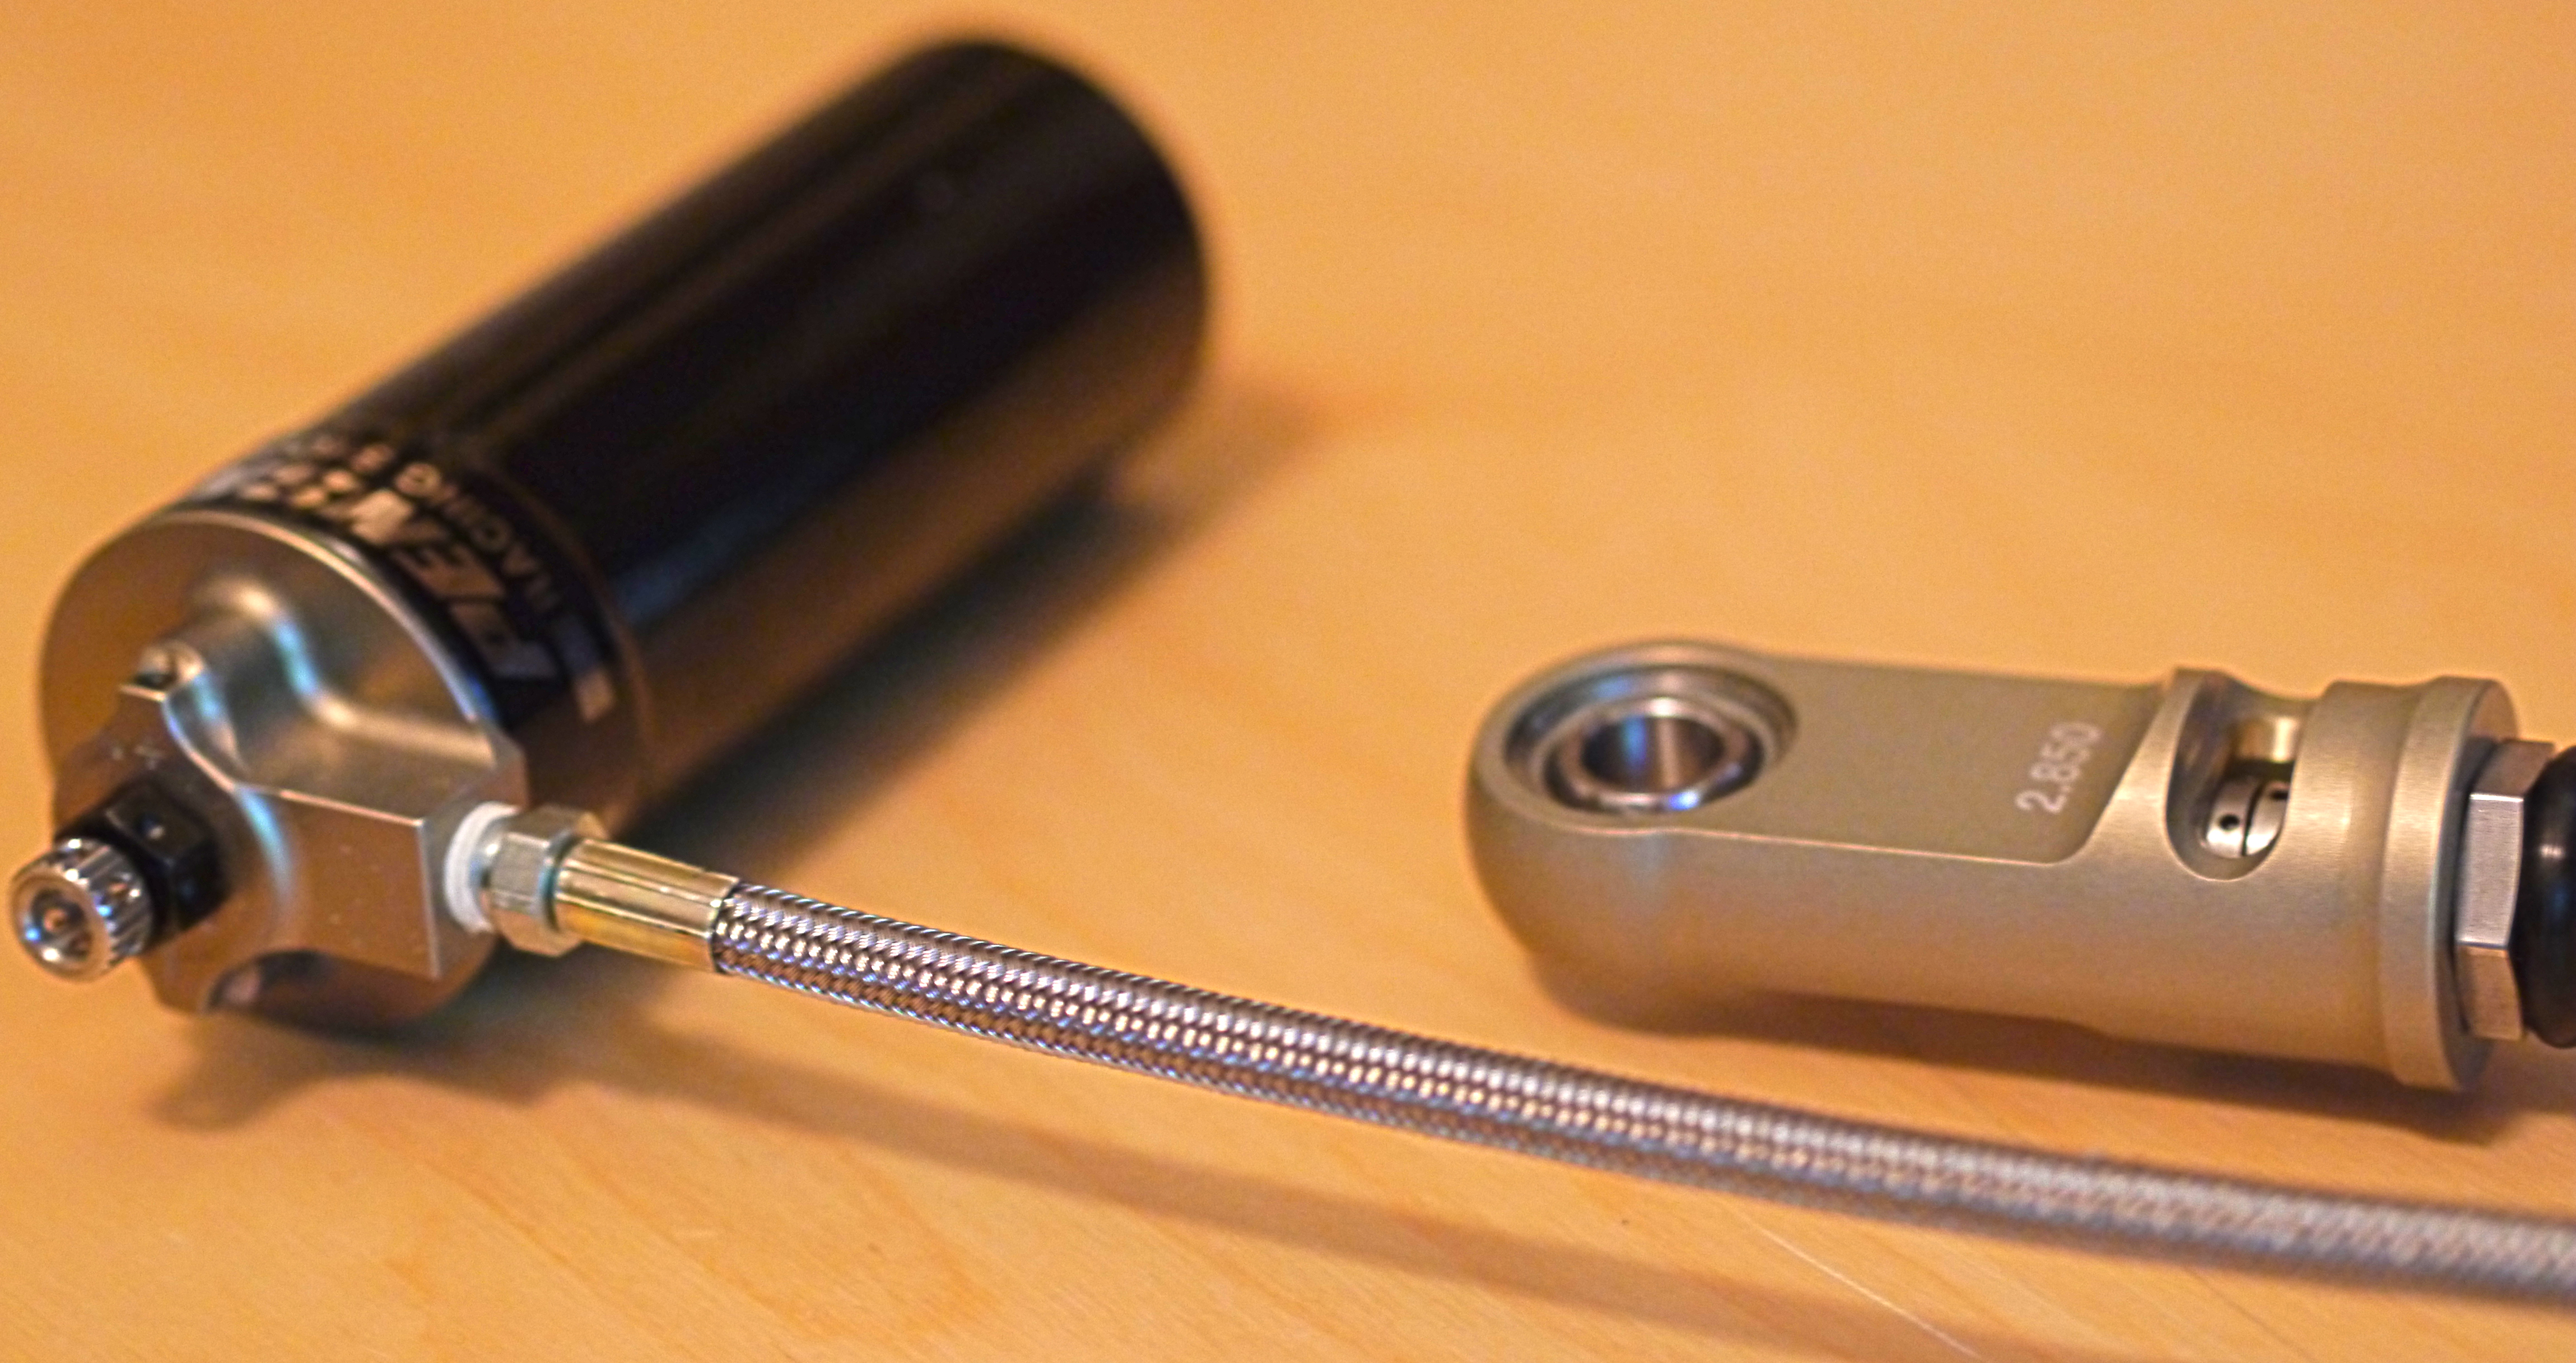
Complete shock – 8760 body with 8300 canister
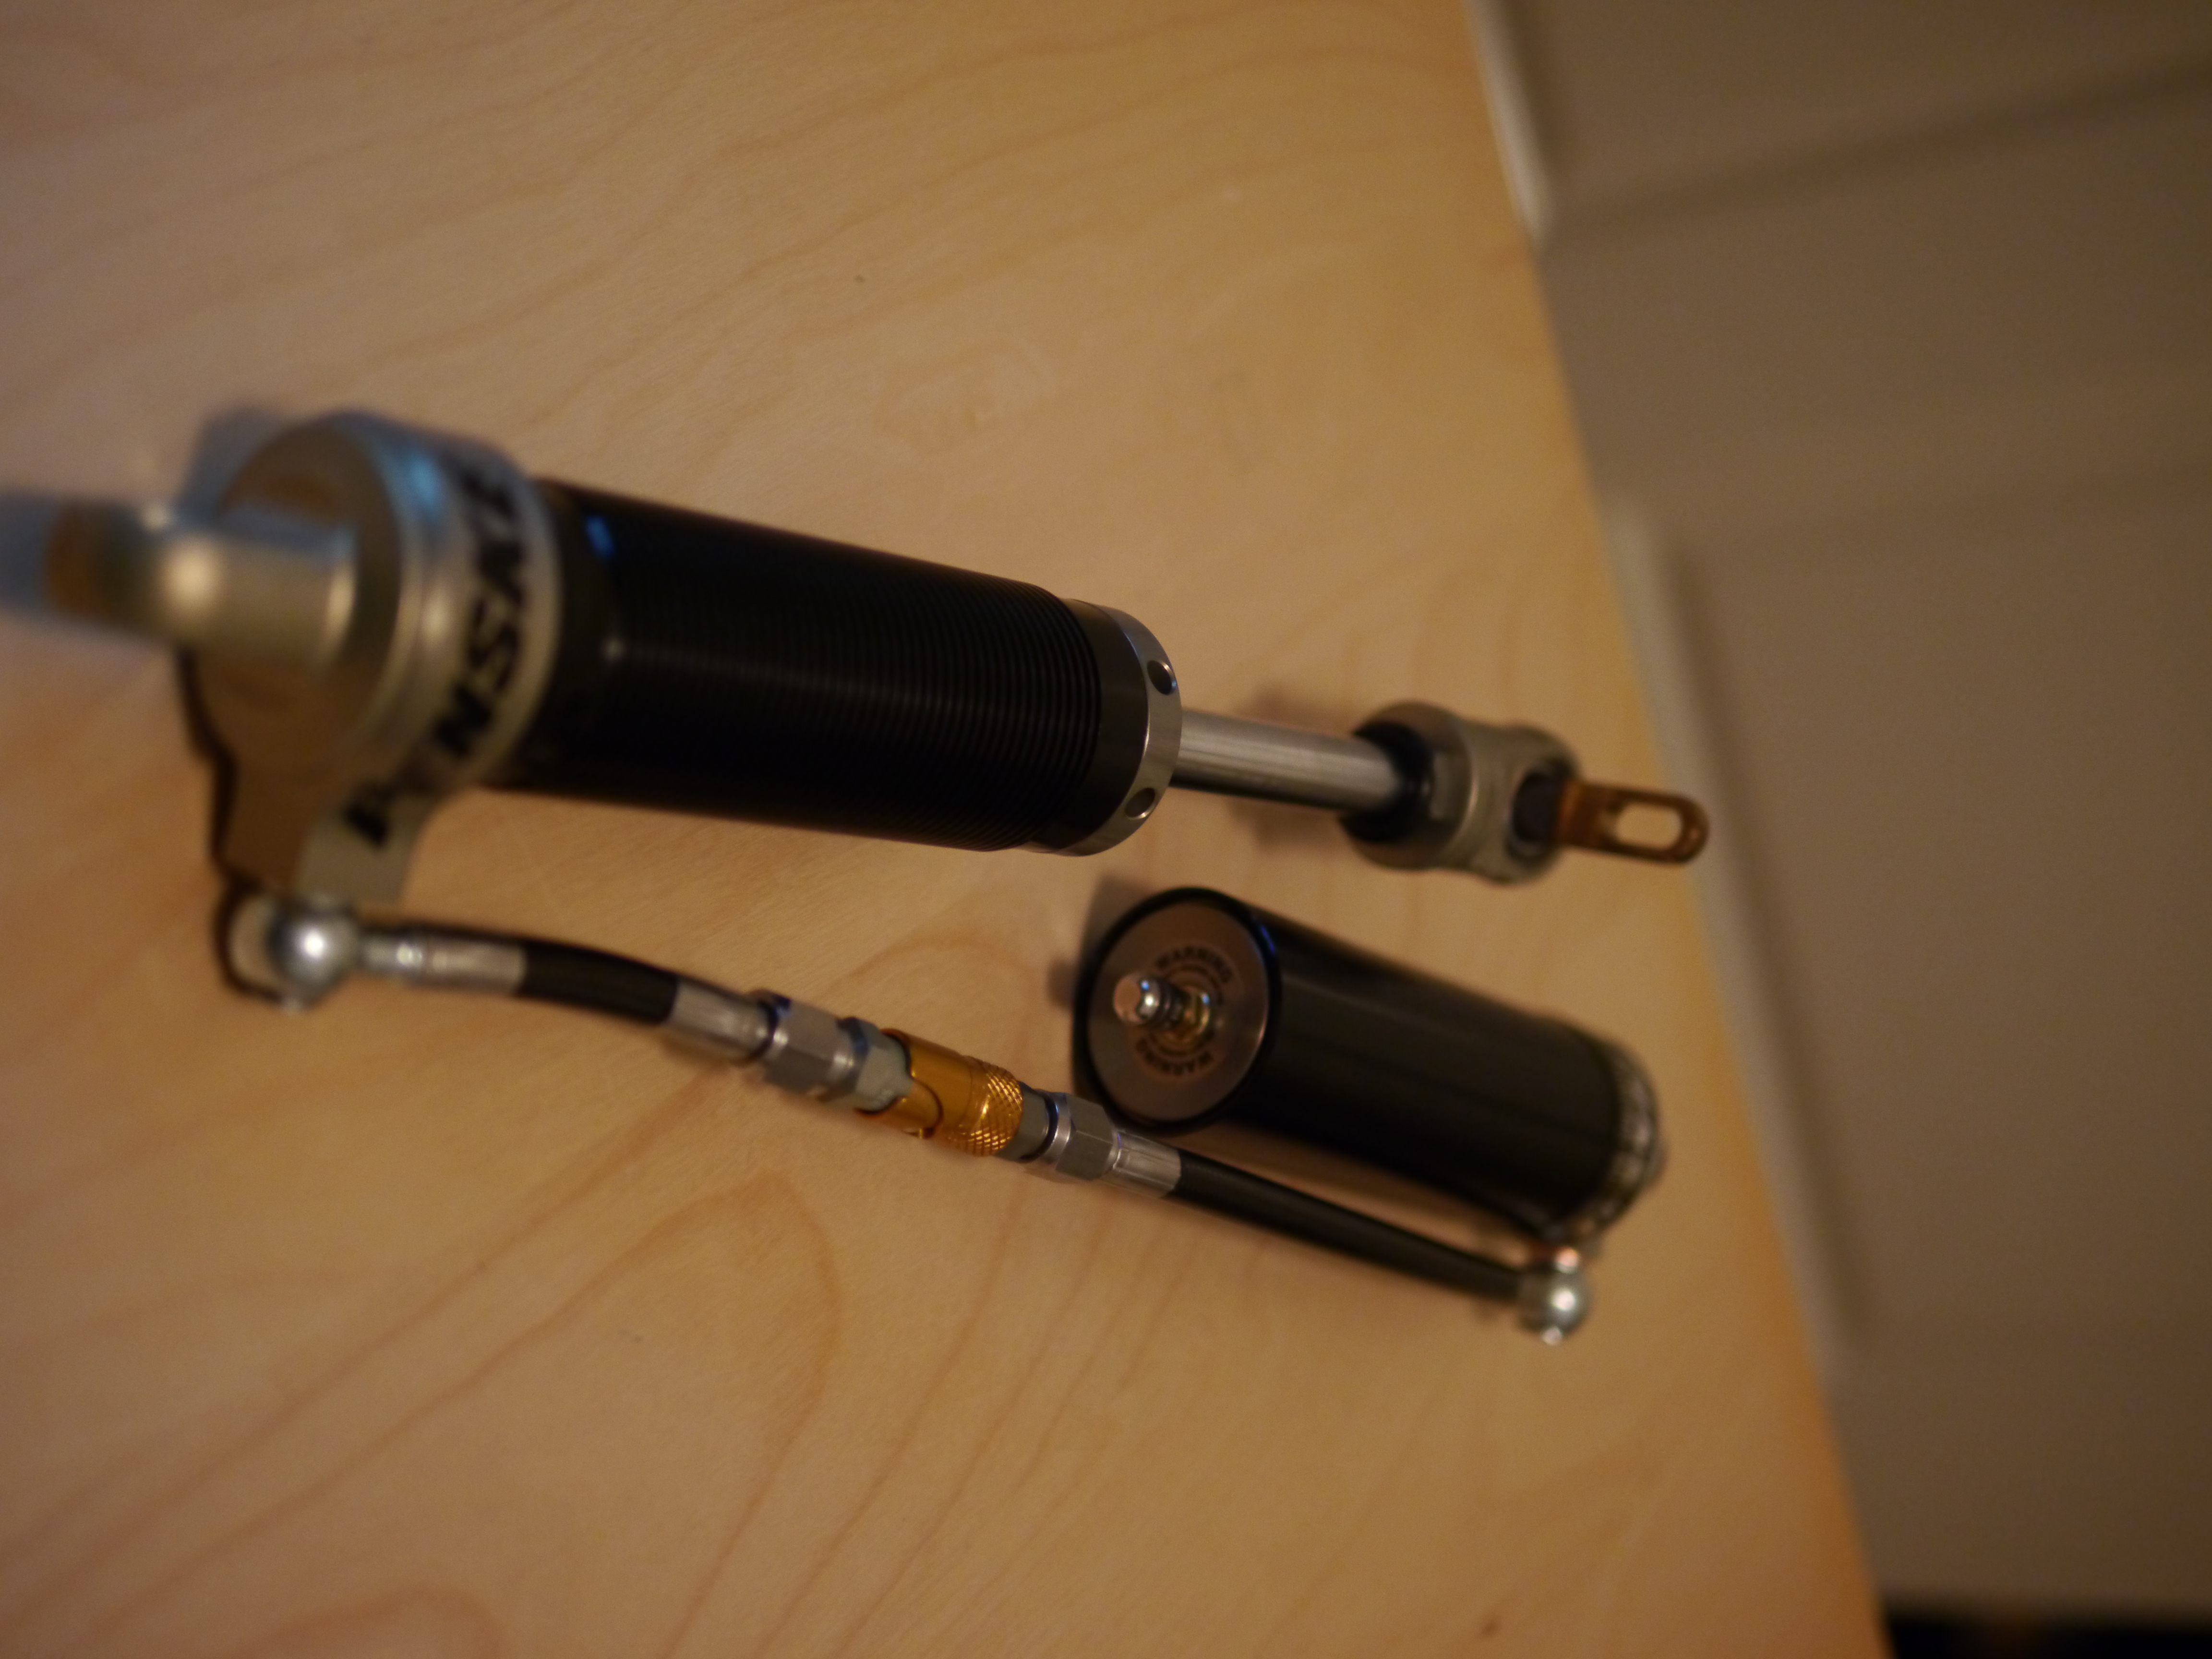
T-bar
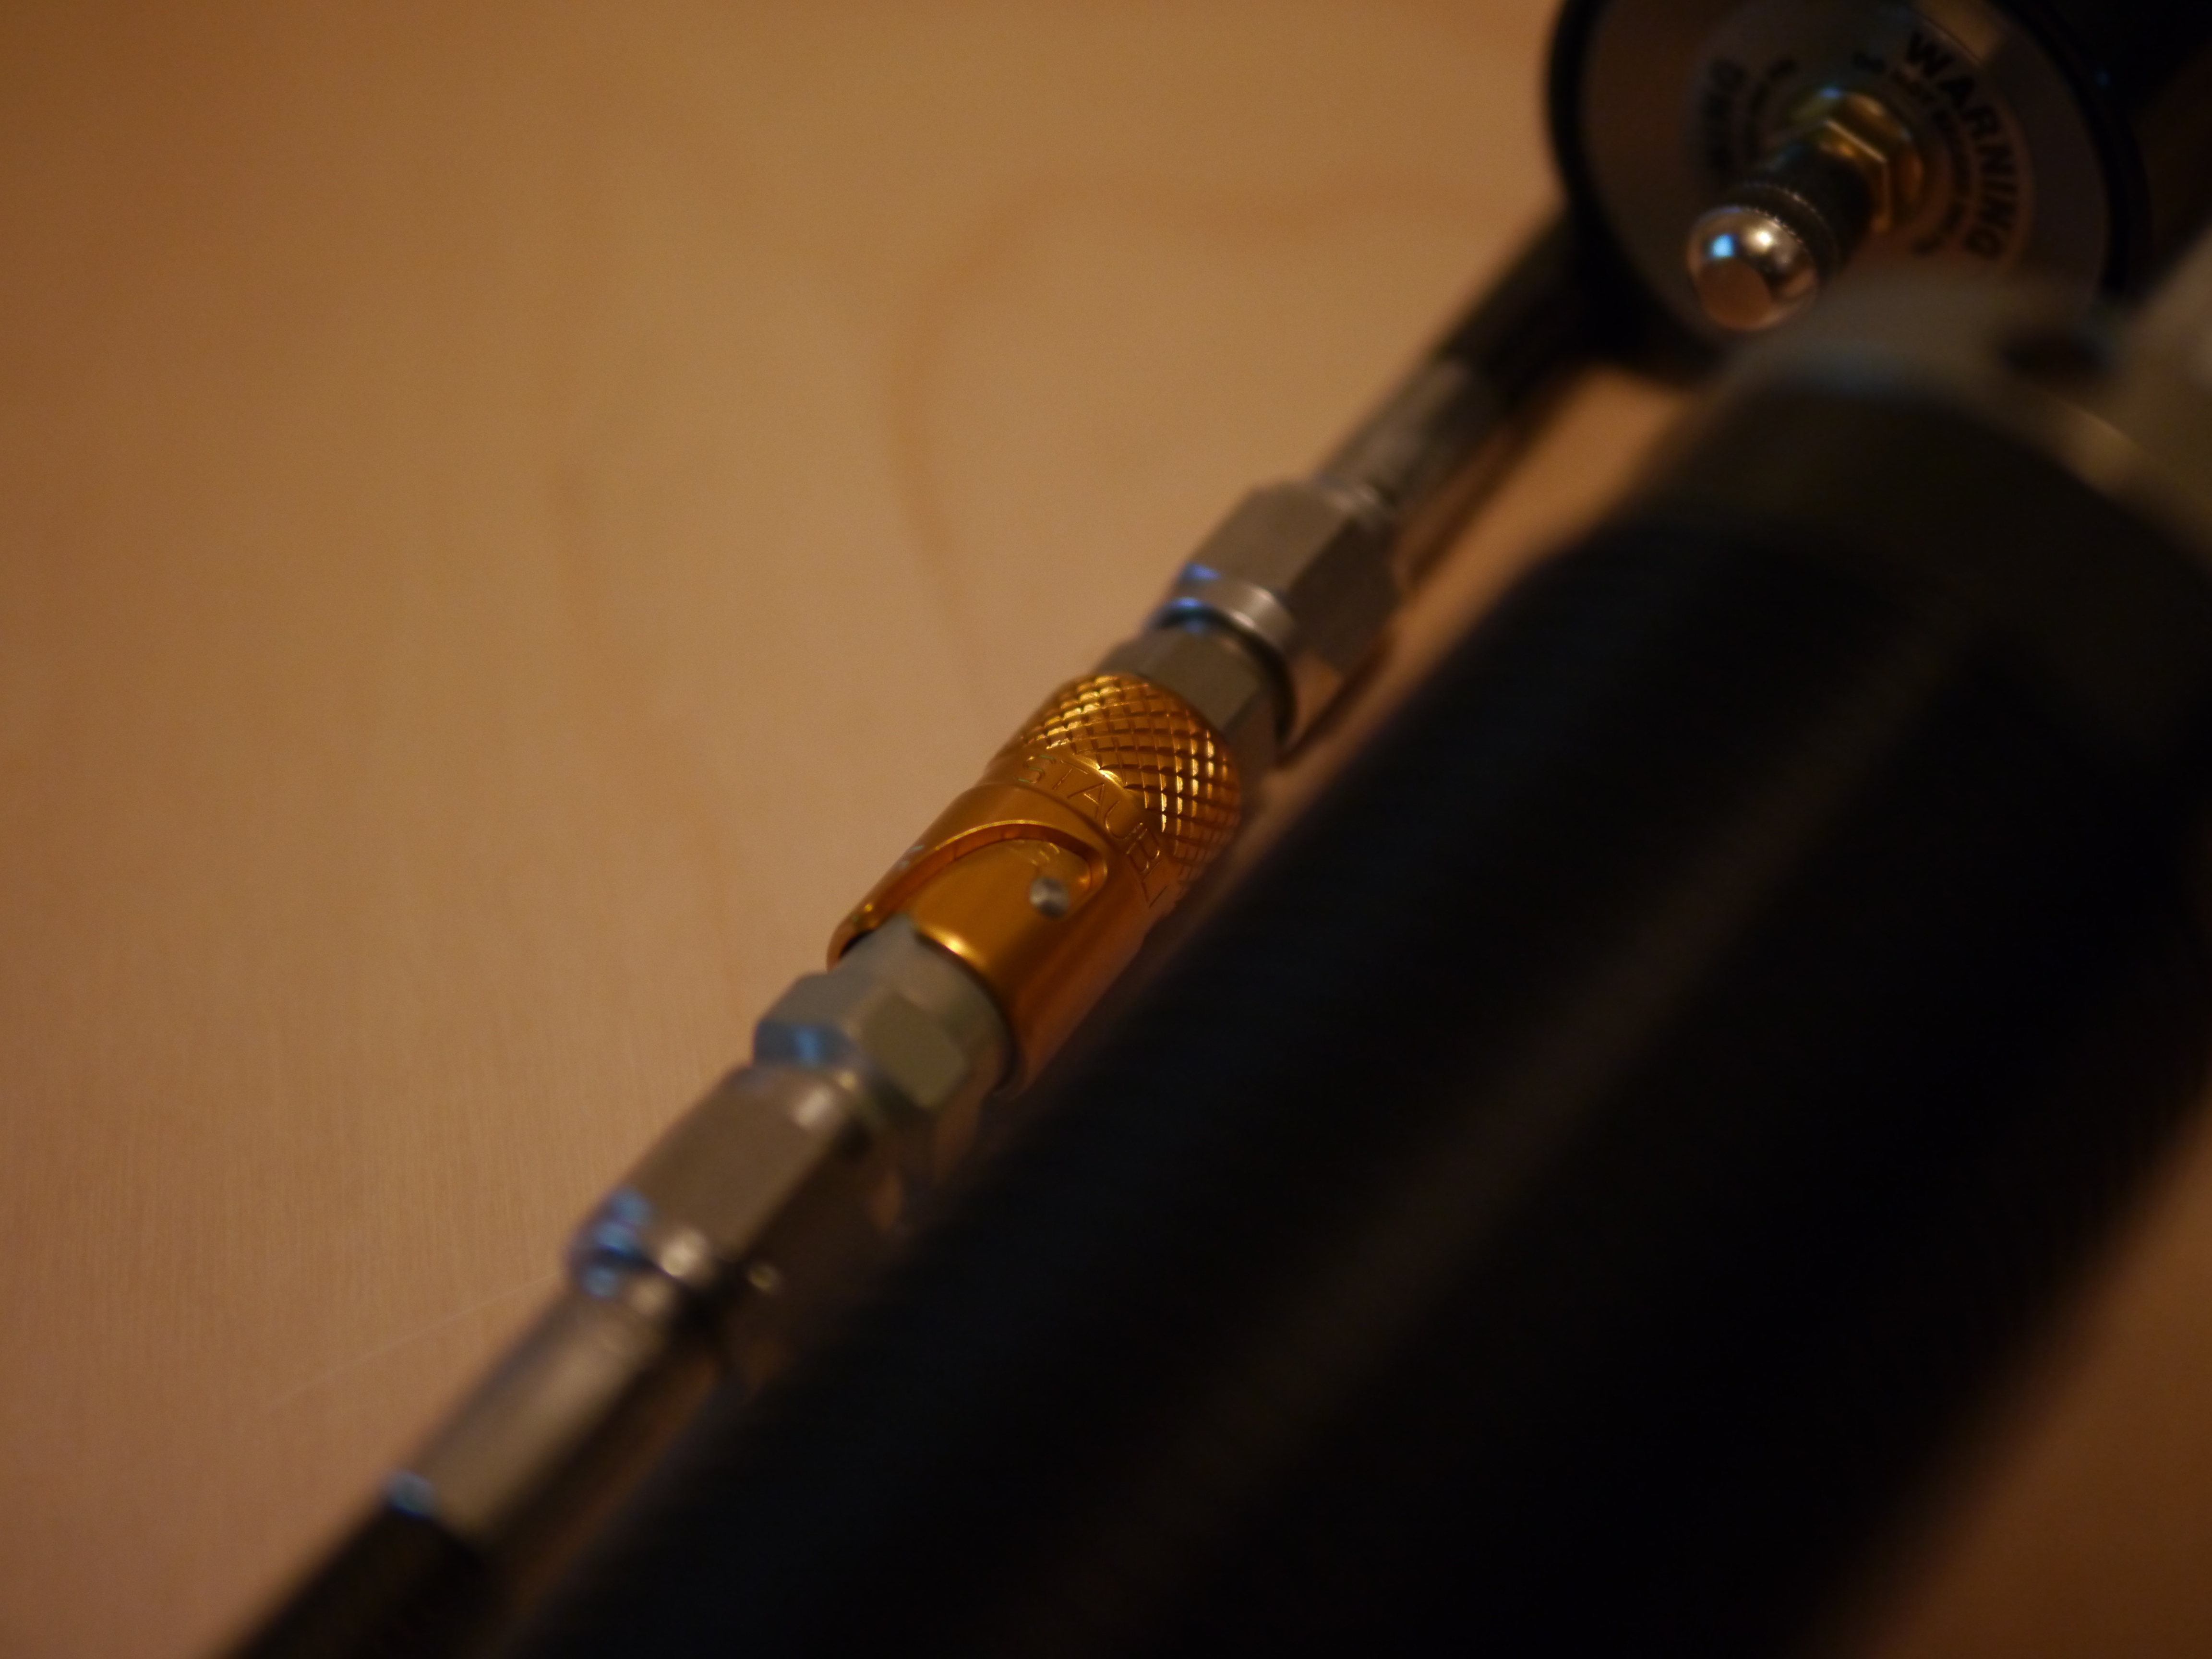
Staubli quick disconnect
And on the car, buried as can be-
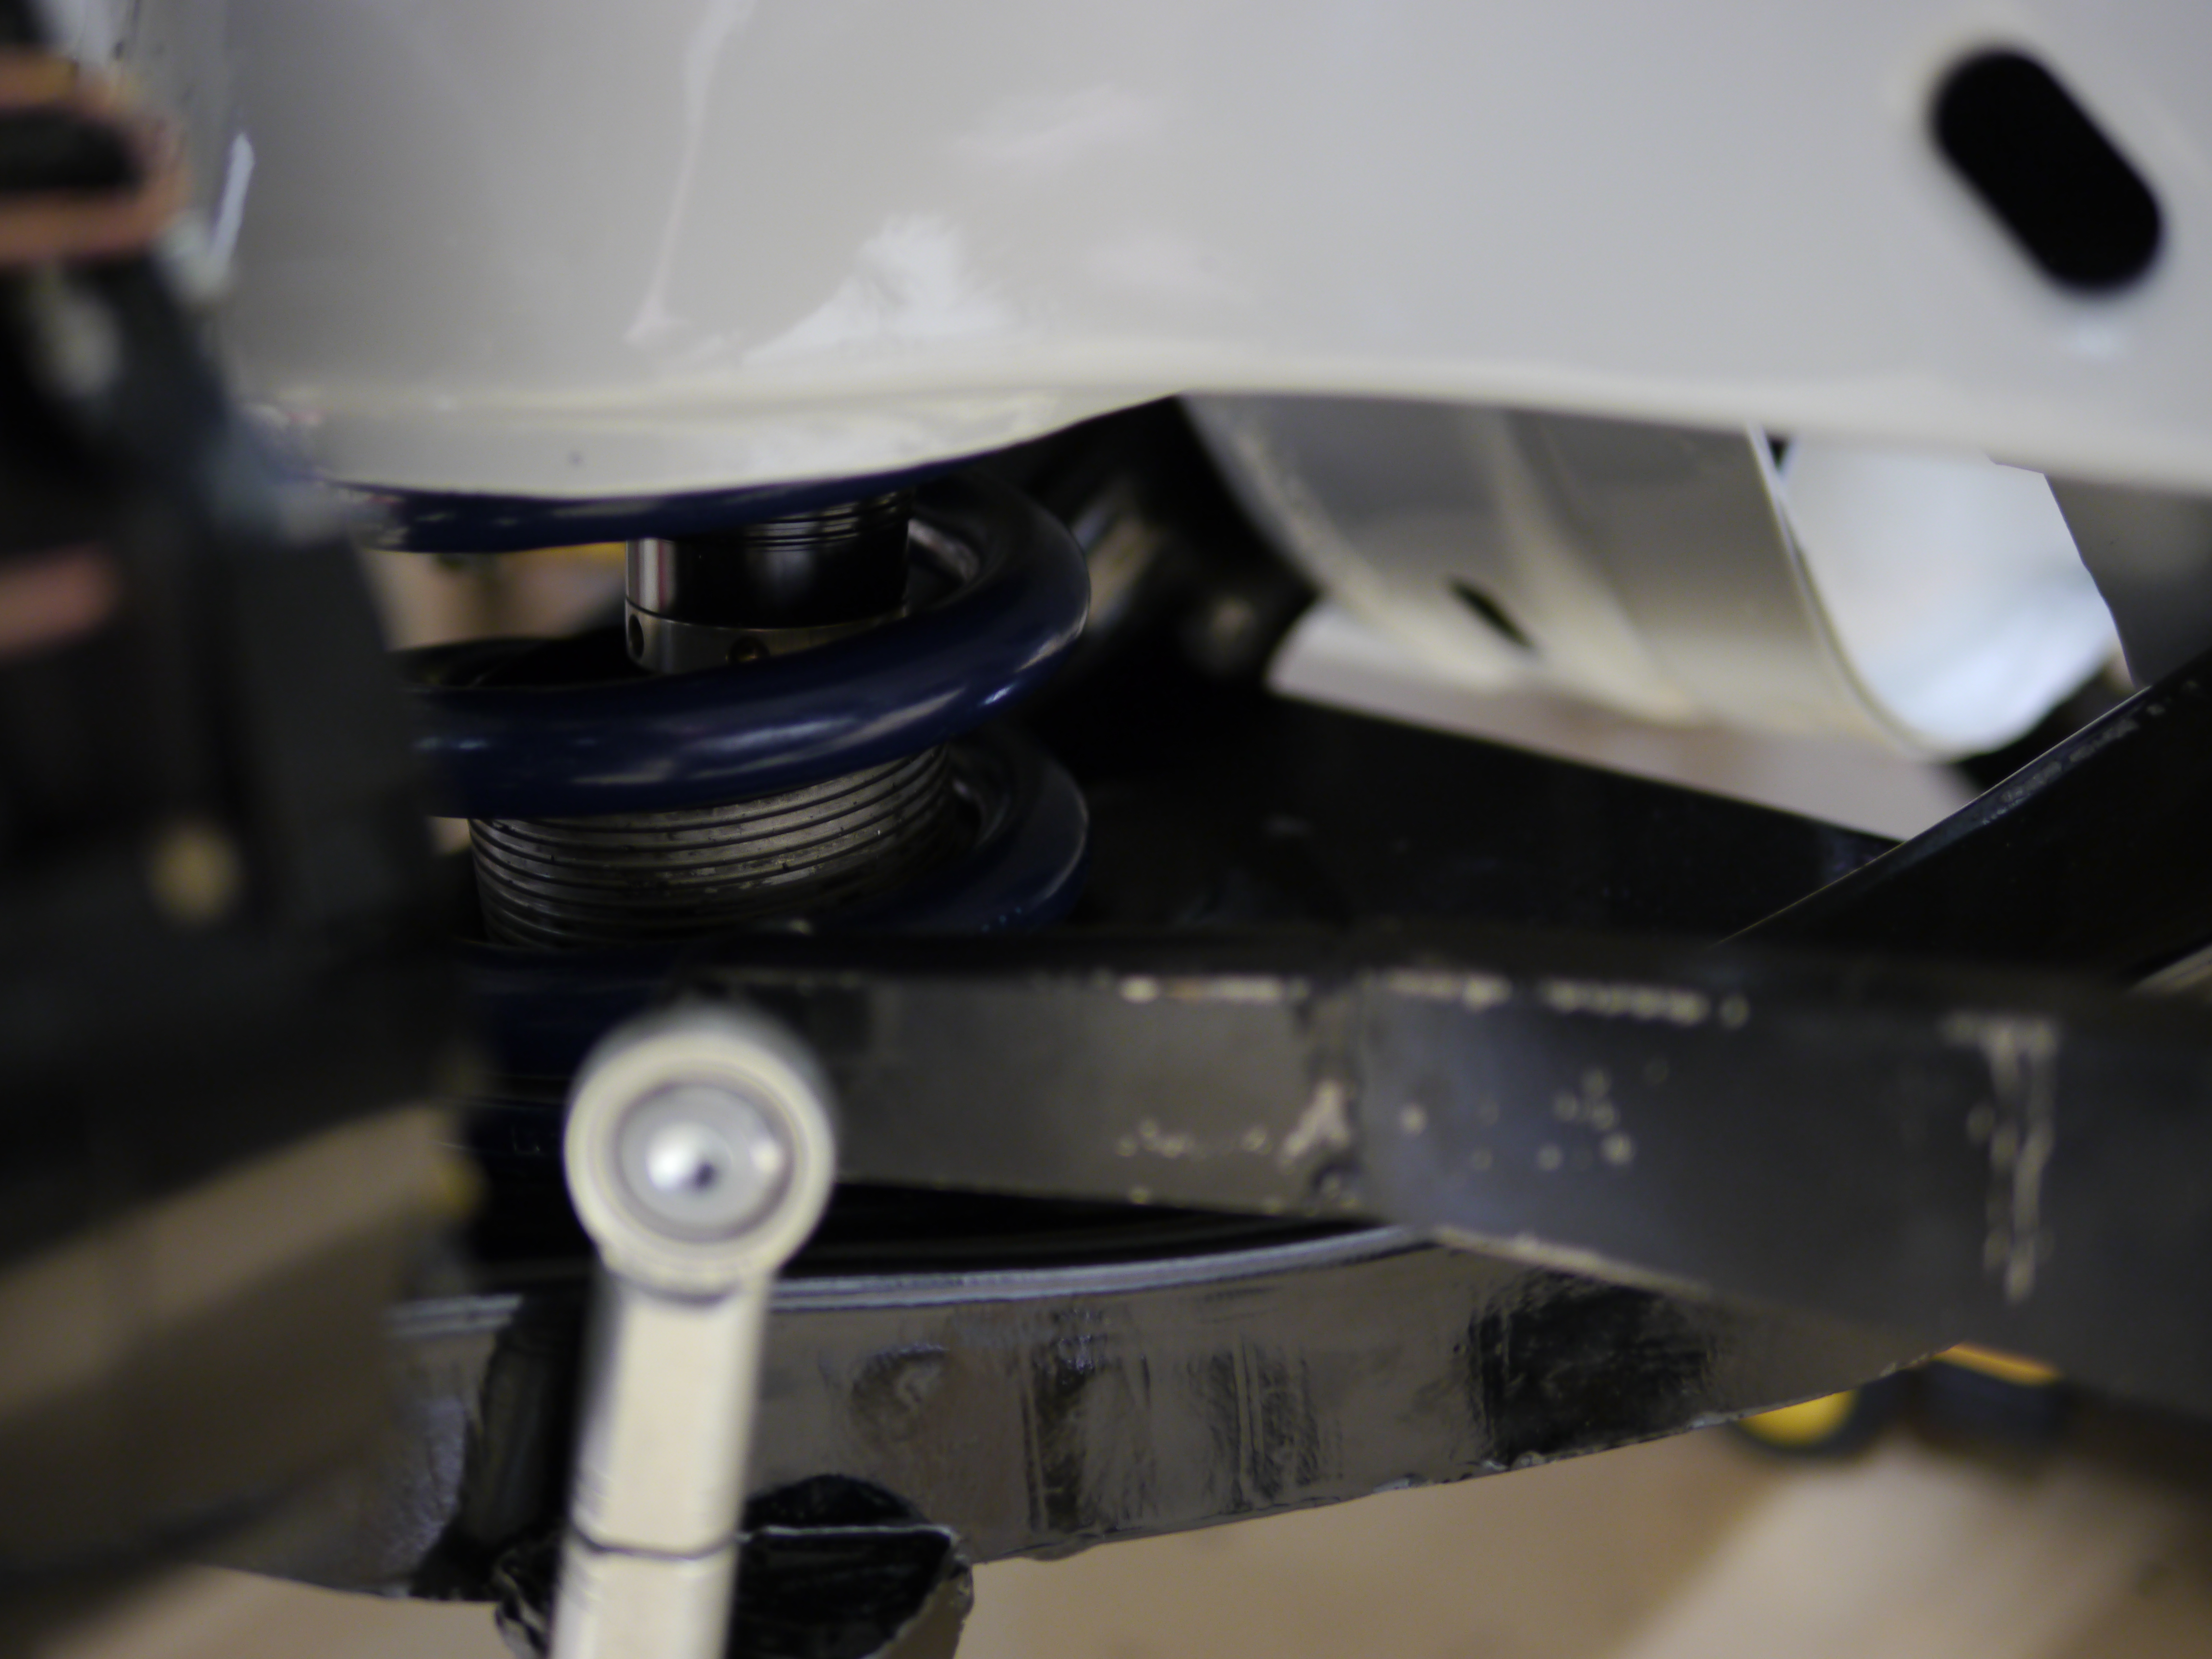
Thank goodness I chose the smaller 45mm bodied 8760s – they just barely clear the rear spring adjustment cup at full droop. To provide room for the remote reservoir nonsense, had to run a 1″ horseshoe-shaped spring spacer up top, which for now meant completely removing the ride height adjuster at bottom. To regain that ability, will need to get shorter springs, or cut these ones down a little.
The canister is in a super-temporary spot until I figure out how to mount it in the engine compartment.
Front adjustment of compression will require opening the hood to turn the knob on the canister. Rebound will require tools, as the “window” with the knob inside is buried in the lower control arm. I’m going to change the way it attaches from this draft (which is approximately version 4.7) to allow the adjustment to be made with only one tool, and not require raising the car or any other disassembly. I probably won’t change front rebound that often anyway, leaving it at max and hoping it’s enough. The front shocks are capable of really big forces, but those forces drop off very quickly as the adjuster is moved away from full.
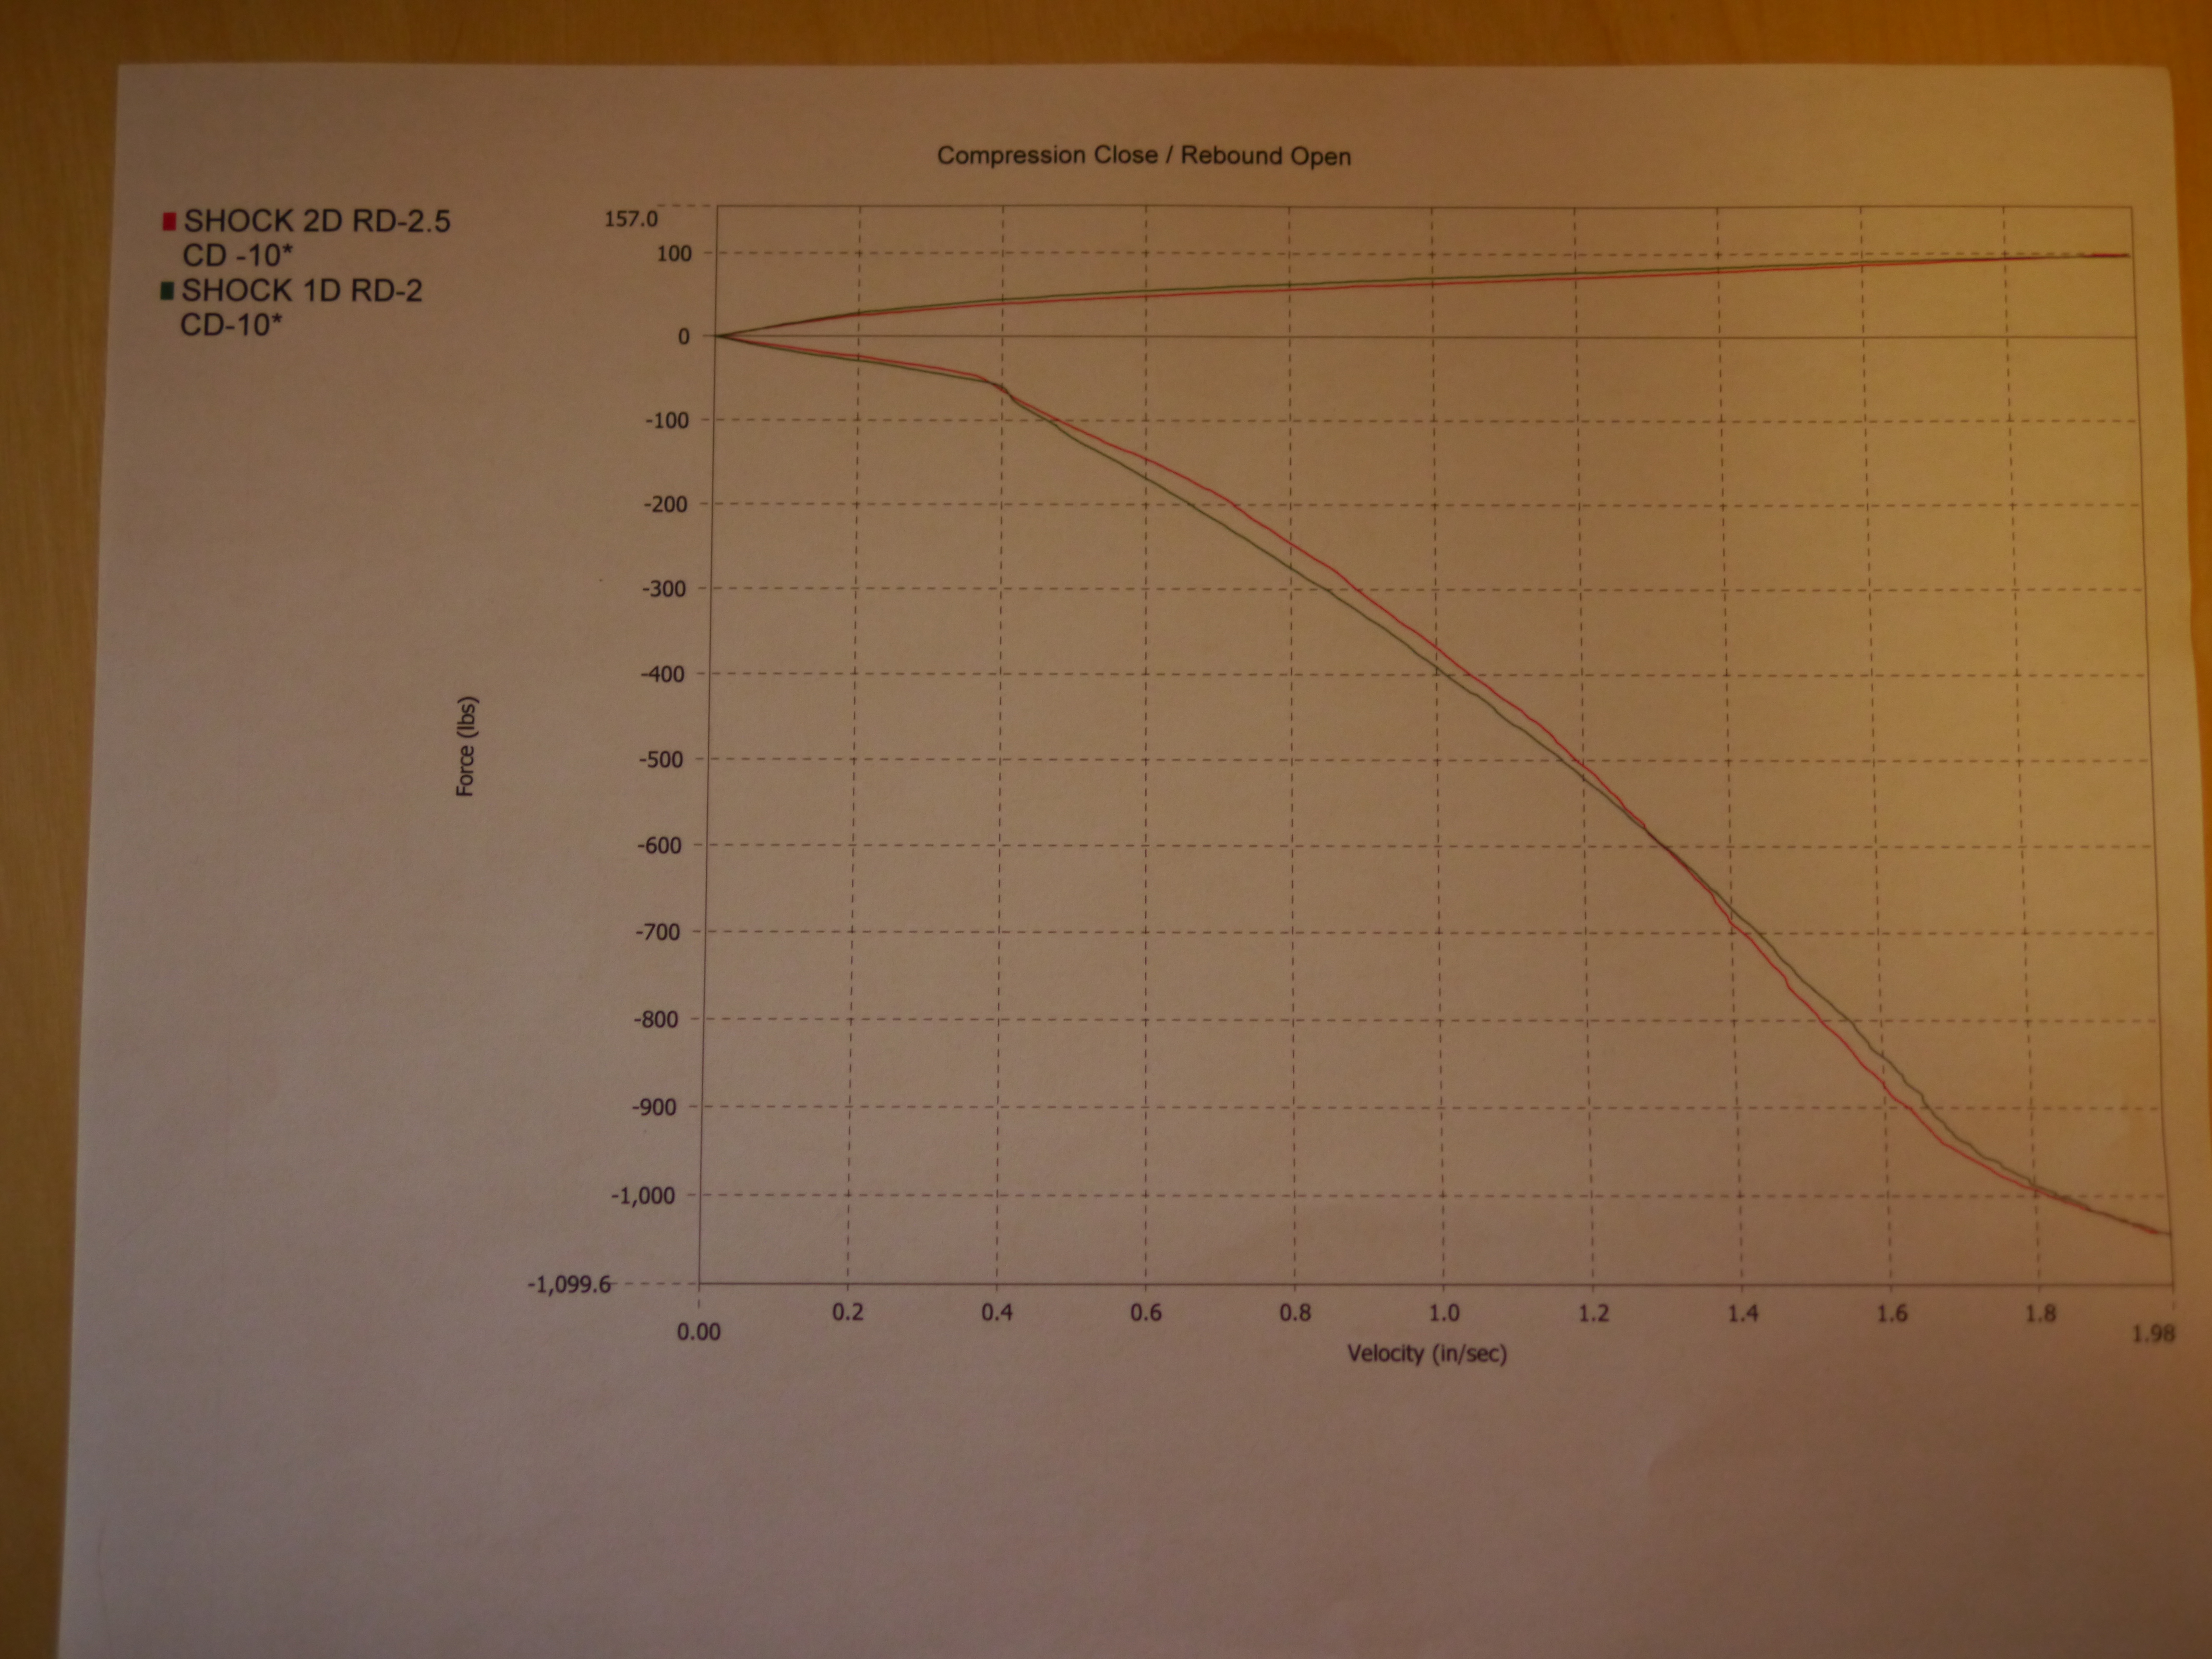
Speaking of those forces, here is a dyno of the front shocks, or at least, a portion of what they can do – note the x axis ends at 2in/sec. 🙂
Bigger battery and cutoff switch installed + weight placement musings
In the process of getting the car wired I must have left things in a slightly draining state overnight, which killed the Odyssey PC680 battery originally installed:
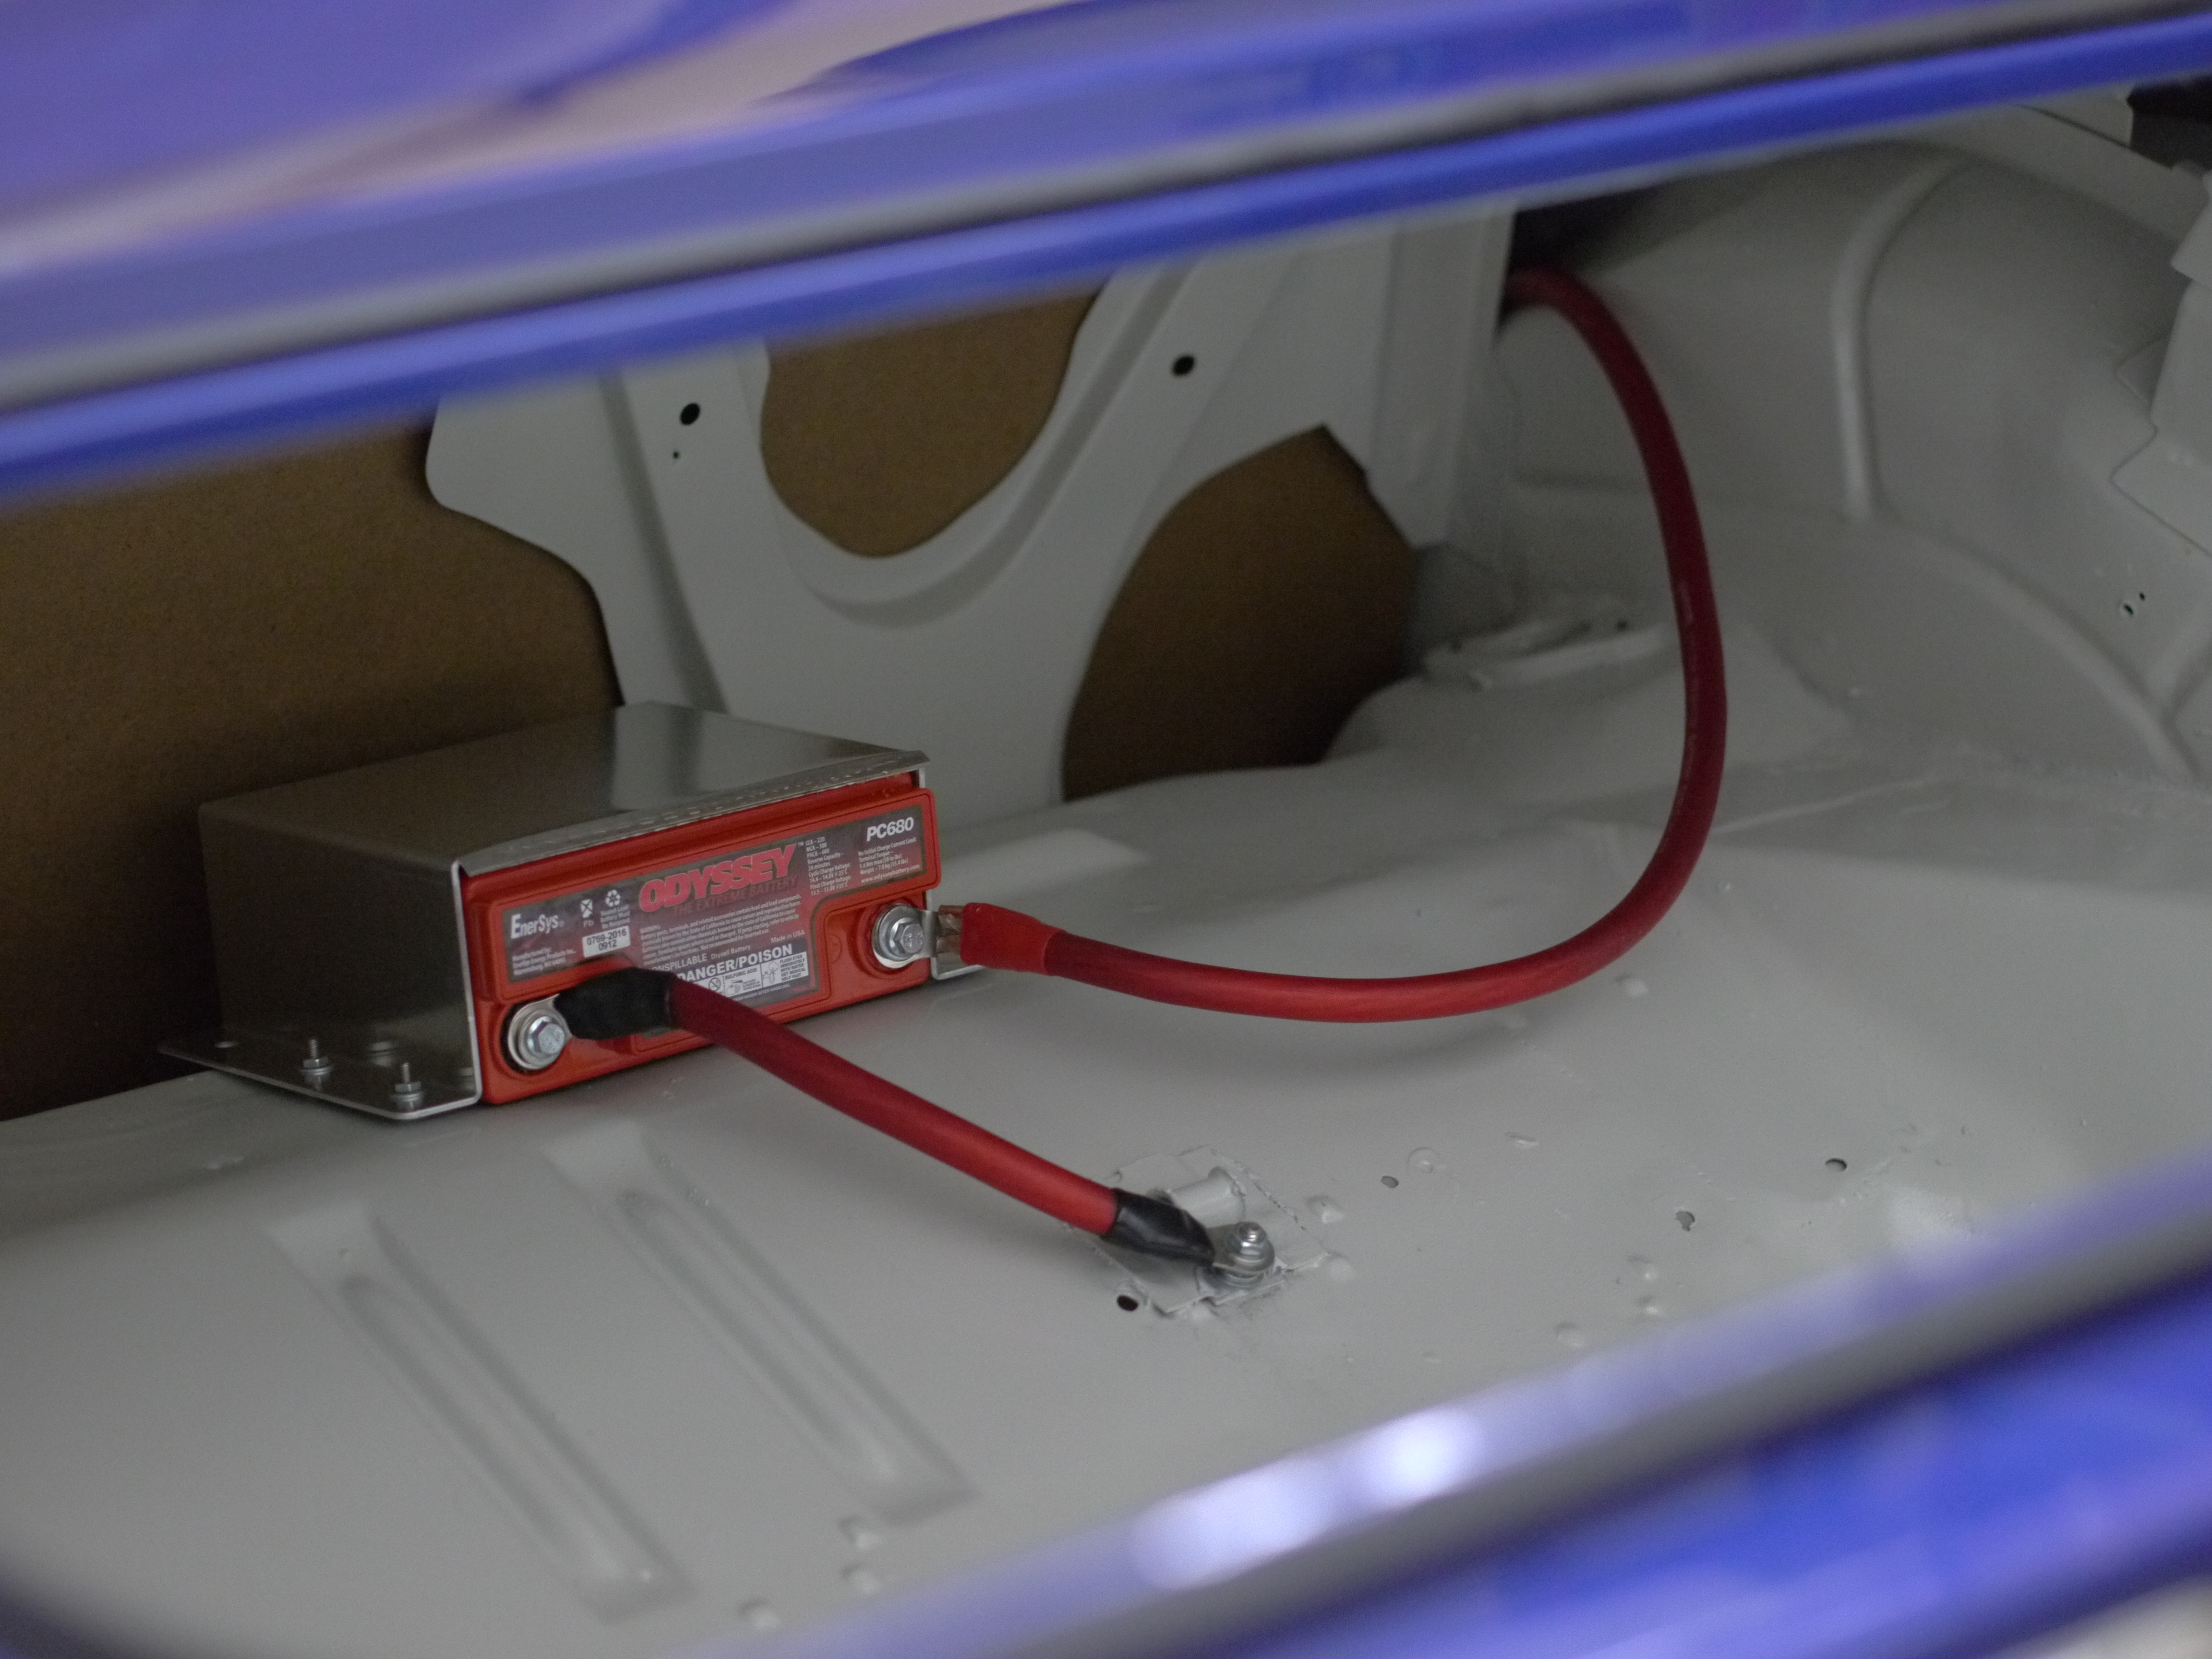
Which is a bummer, I’d hoped that thing would last a while. I let it charge for a long time using a good charger, but it failed to come back to life, and had difficulty getting the motor to turn over back on the day I first drove it.
Not wanting to have those kind of hassles when it “matters”, at an actual event, or somewhere out on the street, elected to get a much larger battery, until something like Nationals, when the 34lb. weight savings will be most meaningful.
So in went an Odyssey PC1200, a substantially higher-capacity unit. Still the same AGM technology allowing it to be mounted in any orientation.
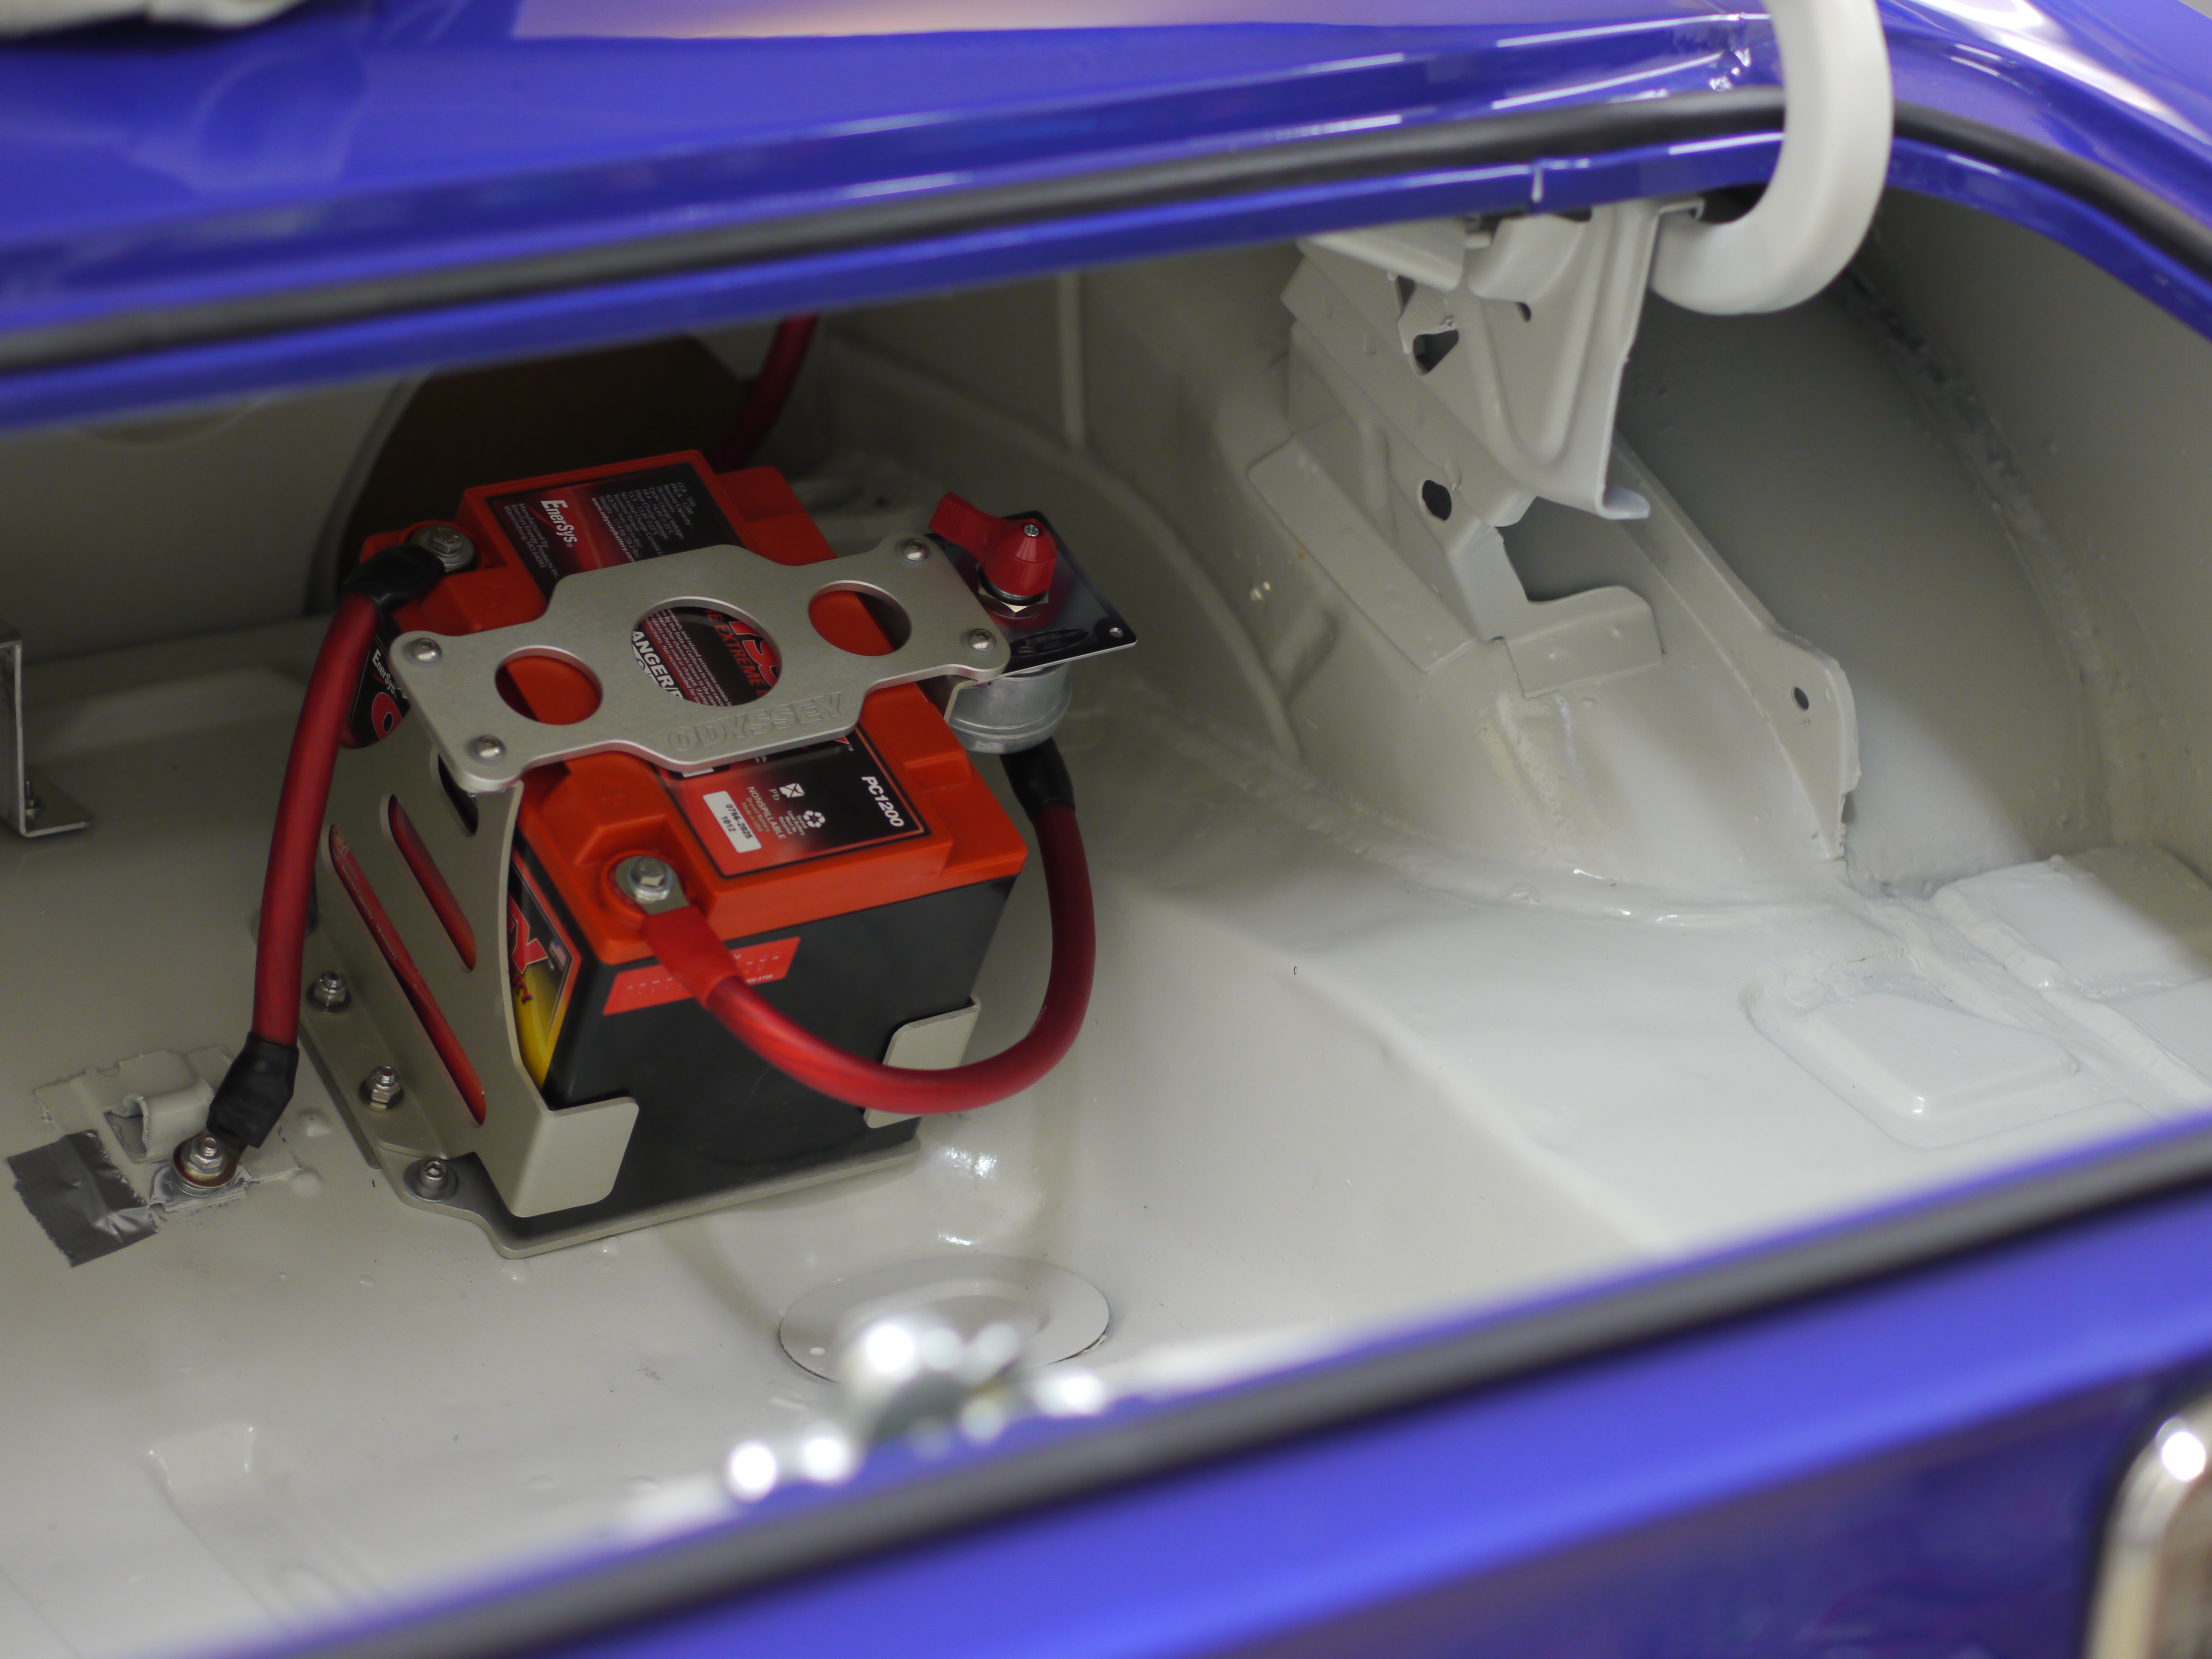
Not quite enough room to mount it up on the “shelf” where the PC680 went, it ended up a little further back, to the right, and lower.
Also installed a battery cut-off switch. This will ensure the battery isn’t being drained when the car is not in use.
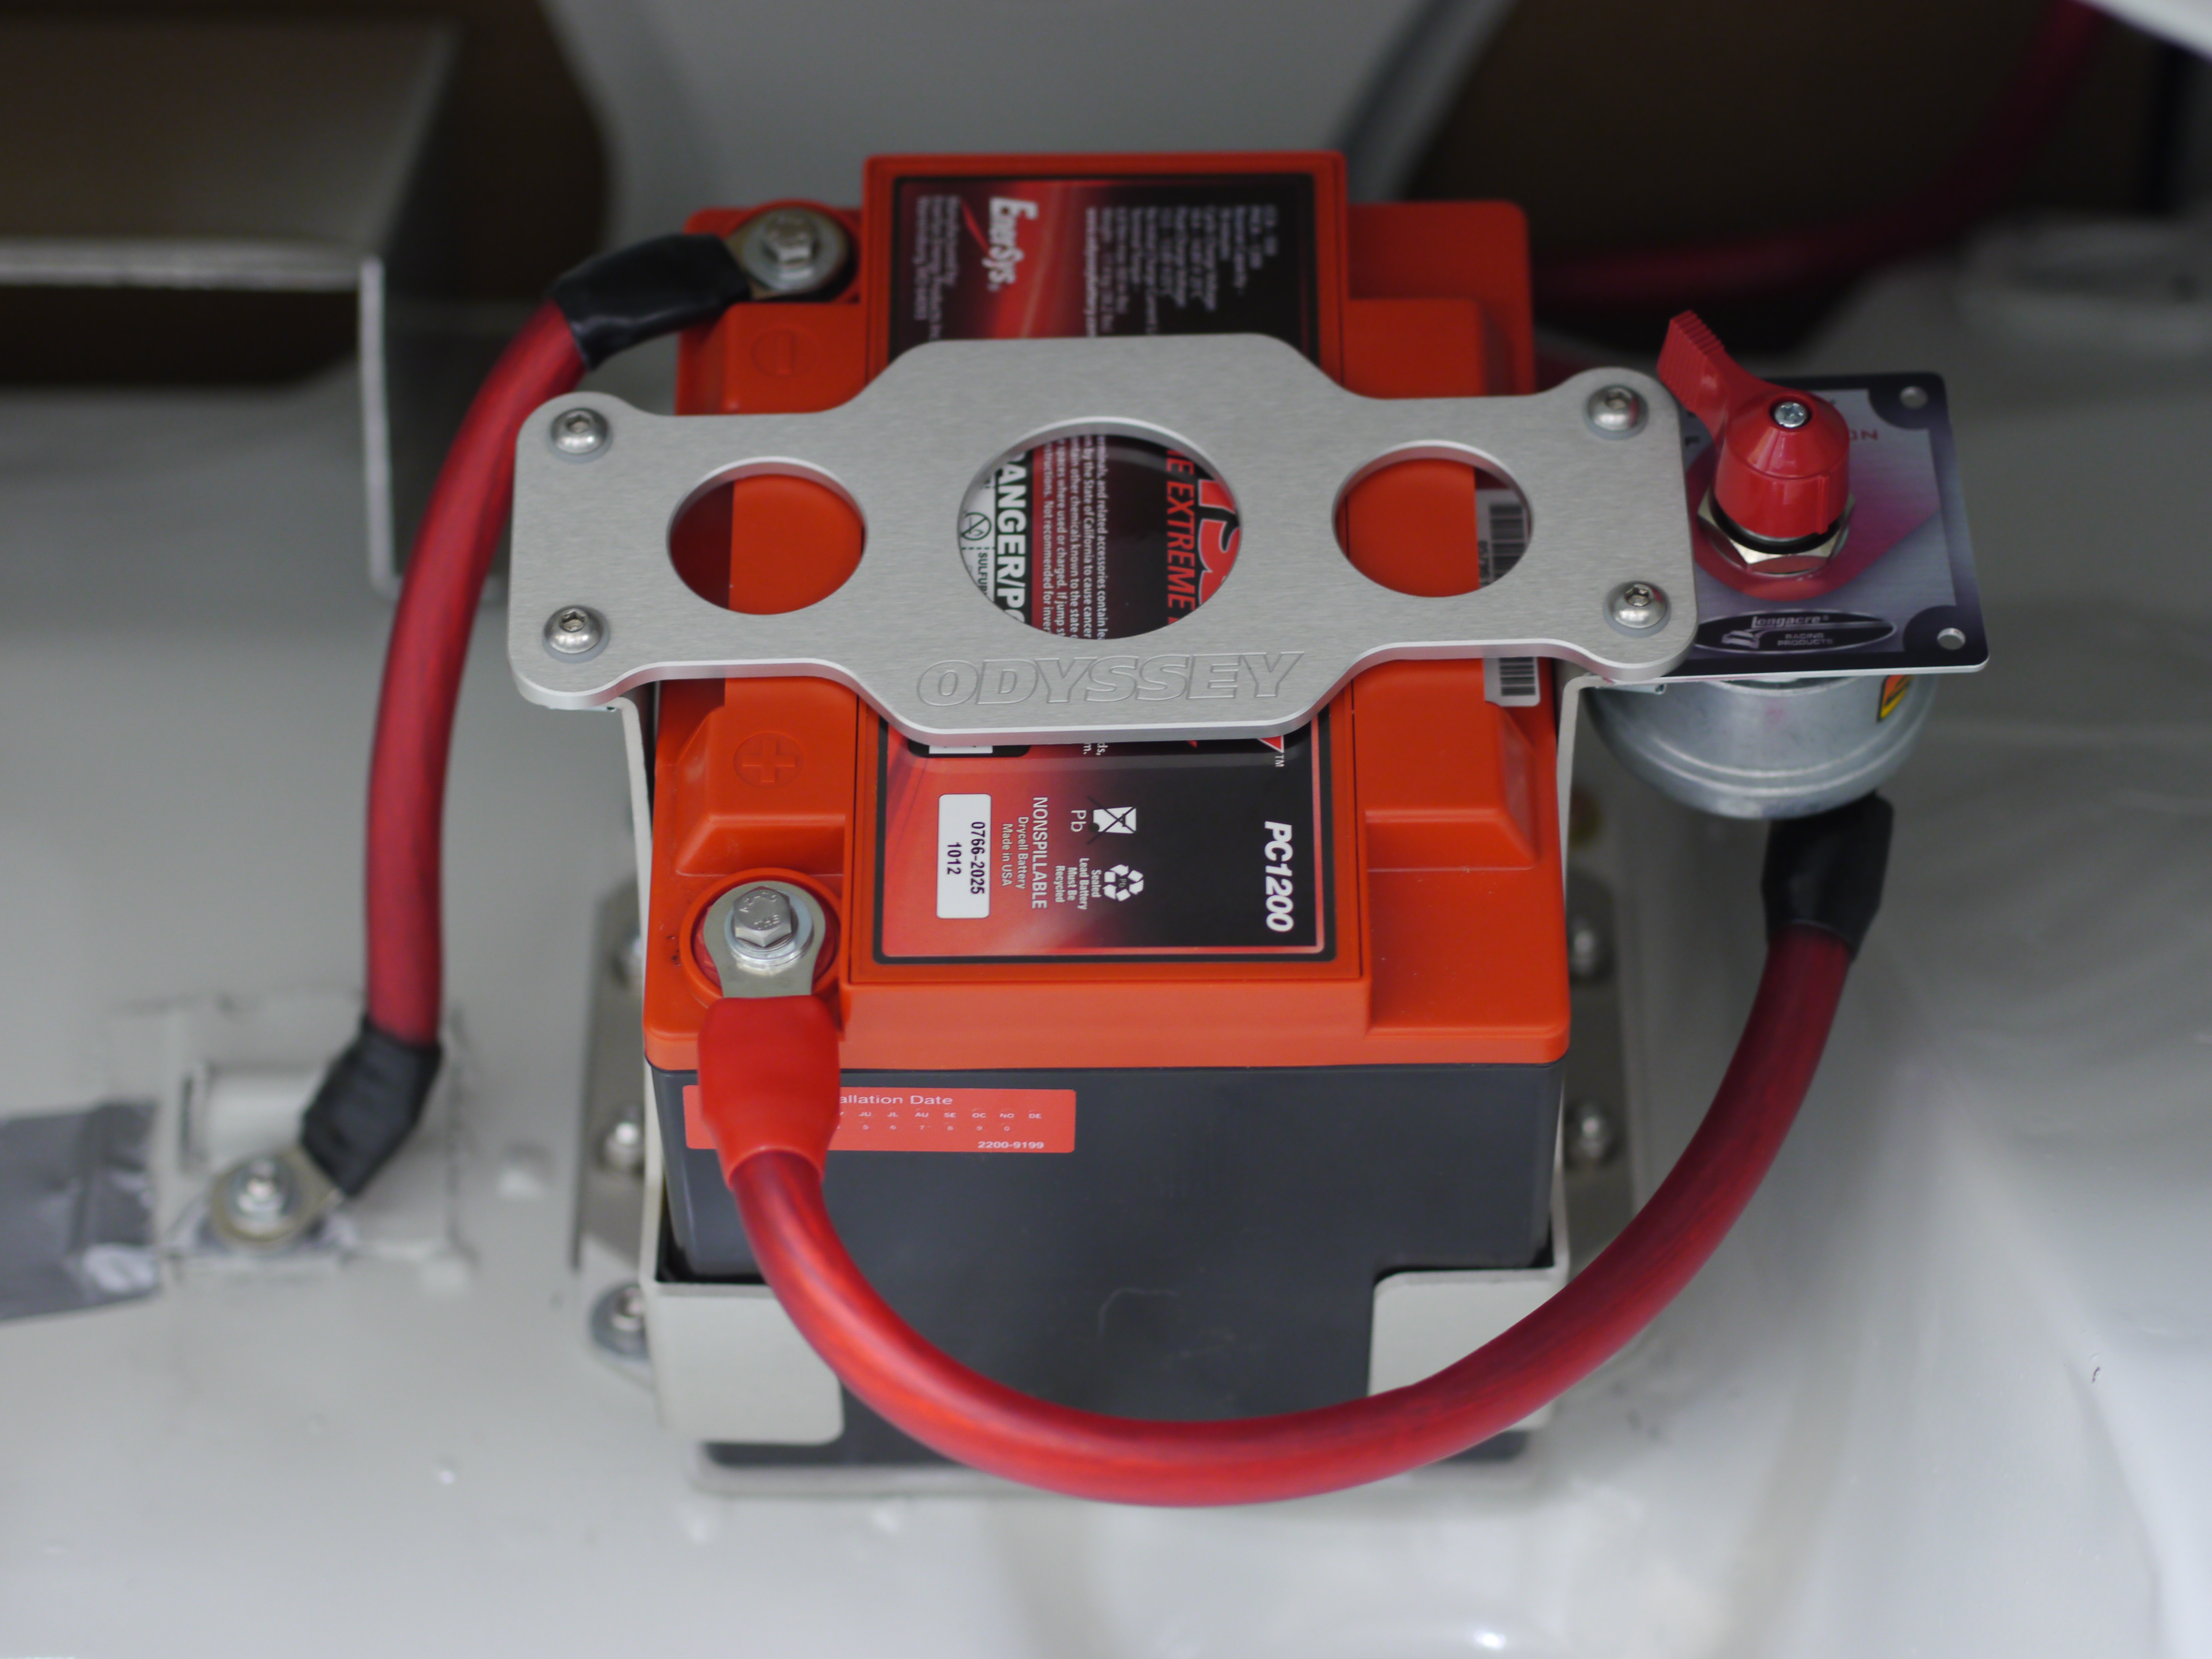
Left the old battery hold-down in place, this way I can swap to the 4lb. battery in about 5 minutes if desired.
Where should I put my battery?
Anybody building a car for a class that allows one to move the battery, likely ends up asking themselves this question at one time or another.
In some cases, advances in modern battery technology have allowed for such compact and lightweight batteries, you almost don’t even need to worry about it. There are batteries out there literally under 2 pounds, that can start small 4-cylinder engines. If the other needs of the electrical system can tolerate a battery like this, there is little to gain from moving it from wherever it was stock, assuming it is already pretty close to the starter.
For cars with bigger engines, or cars that have more demanding electrical requirements, the battery will end up having a significant impact on the static front:rear weight distribution of the car.
Let’s take an example 3000lb. car with front weight of 1600lbs. (53.33%) and rear weight of 1400lbs. (46.66%). Say this car has a 30lb. battery right at the front axle line, and we move it to the rear axle line.
Front weight is now 1570 (52.33%), rear weight 1430 (47.66%). That’s a whopping 1% shift in static weight distribution, just by moving the battery!
The reality too, with a car like this Camaro, is the battery starts out about 18″ in front of the front axle, and ends up a bit behind the rear, having more than a 1% effect (assuming those weights are about right).
A lot of people fuss over engine setback, and go to great lengths with firewall modification, custom motor and trans mounts, driveshafts, etc., to get the motor back another 1-2″. While those aren’t necessarily bad ideas for classes that allow it, moving 600lbs. rearward 1-2″, is only about 1/6th as helpful, as moving the battery to the trunk (11 feet or more in a Camaro).

If moving it rearward is good, why do I have it where it is, just about as far forward in the trunk as possible? There is room to go rearward another 2 feet or so?
While doing so would improve the appearance of the static weight distribution numbers, the picture above tells the tale.
Weight placed beyond the axles (ahead of the front, behind the rear) has some negative effects, at least for a car that expects to turn corners.
While placing the battery further back does put more weight on the rear tires (a good thing, especially at launch time), it takes load off the front tires – without actually reducing the amount of mass the front tires have to haul around the corner. The rear axle acts like the fulcrum in a teeter-totter; the further away from the fulcrum, the more leverage the battery’s weight has in “lifting” the front axle. This is a very important thing to keep in mind – while we might feel good about the lower registered front axle weight on a set of corner balancing scales as we move the battery further and further behind the rear axle, what we’re really doing is taking away some of the load those tires deserve to get, load which would add to front grip. While it is true (harken back to the CVD series for more on this) that a tire is more efficient (more grip per unit of load) when more lightly loaded, it still produces less total grip when more lightly loaded.
This is one of two reasons why weight/mass located outside of the vehicle’s wheelbase is a bad thing. The other, is that it tends to increase the polar moment of inertia – which may be okay for a Bonneville car that needs to be arrow-stable, but autocross is at the other end of the extreme, where a car’s ability to quickly rotate is paramount.
With this in mind, there are lots of micro decisions about where to place things in a car. Obviously there are requirements that things be usable, and reliable, and serviceable, but beyond that – when you have some genuine freedom on where to place things – here’s what I use to take creativity and aesthetics out of the equation:
- It should be as low as possible. This minimizes CG height which aids in cornering and braking.
- It should be as far rearward as possible, without being behind the rear axle. This puts more weight on the drive tires (for RWD), and helps unburden the front, without introducing the teeter-totter/lever effect described above. Some already heavily rear-biased cars, like a Porsche 911, may be exceptions to this.
- It should be as close to axle center line as possible. This helps reduce polar moment further. If you imagine looking at a car from above, it would be easier to rotate a car with its mass centered at the shifter, vs. one where the mass is all in the doors.
Obviously few things are as heavy as the car’s battery, but a lot of what makes a really fast car fast, is the incremental contribution of a large number of very small things. In this case, placing every other little thing you can a bit lower and a bit further back, could end up leading to that extra thousandth or hundredth of a second that separates first from second.
In the case of this Camaro, with ultimate freedom, I’d probably run the 4lb. battery where the passenger’s feet go (allowing for super-short cables), and with the big battery, would run it where the right rear seat bottom is. But since we can’t have the battery in the “passenger compartment” in Street Touring, instead chose to mount it just about as far forward in the trunk as possible. It could have gone more rearward which would have the benefit of making it lower and improving the appearance of static weight distribution, but the negative effect on front tire loading is something I wished to minimize, particularly in light of these cars’ known penchant for push.
The other big question mark is fuel level – the difference between full and low fuel levels is probably 80lbs., and it’s all back behind the rear axle. If I can find a way to run it with a low tank, it could have benefits on handling well beyond the pure weight saving element.
Oh, since I know everyone is anxious to see the Rhoades Camaro out dodging cones, here is the young Rhoades showing dad how it’s done 🙂

Quick data from a tire test
My buddy Jeff Cawthorne ran a best-effort tire test this past weekend of two new tires in the Extreme Performance Summer category – the BFGoodich G-Force Rival against the Dunlop Direzza ZII. The test was conducted in his “Stock-prepped” (extra front camber, lightened exhaust) 2013 Scion FRS. For those that don’t know him, Jeff is a veteran racer who would likely have a few National Championship jackets hanging in his closet, if any of us could ever convince him to come to Nats…;)
Upon hearing word of the test I offered Jeff my DL1 data acquisition system, to get a peek at how these new tires are really working. My Camaro will be making its maiden voyages on previous-gen tires, the Yokohama Advan Neova AD08. Both of the tires tested are newer and quite probably better than the Yokohamas.
Below is a screen capture from the Race-Technology data analysis software, showing a comparison of the best Rival run (red) v. the best ZII run (blue).
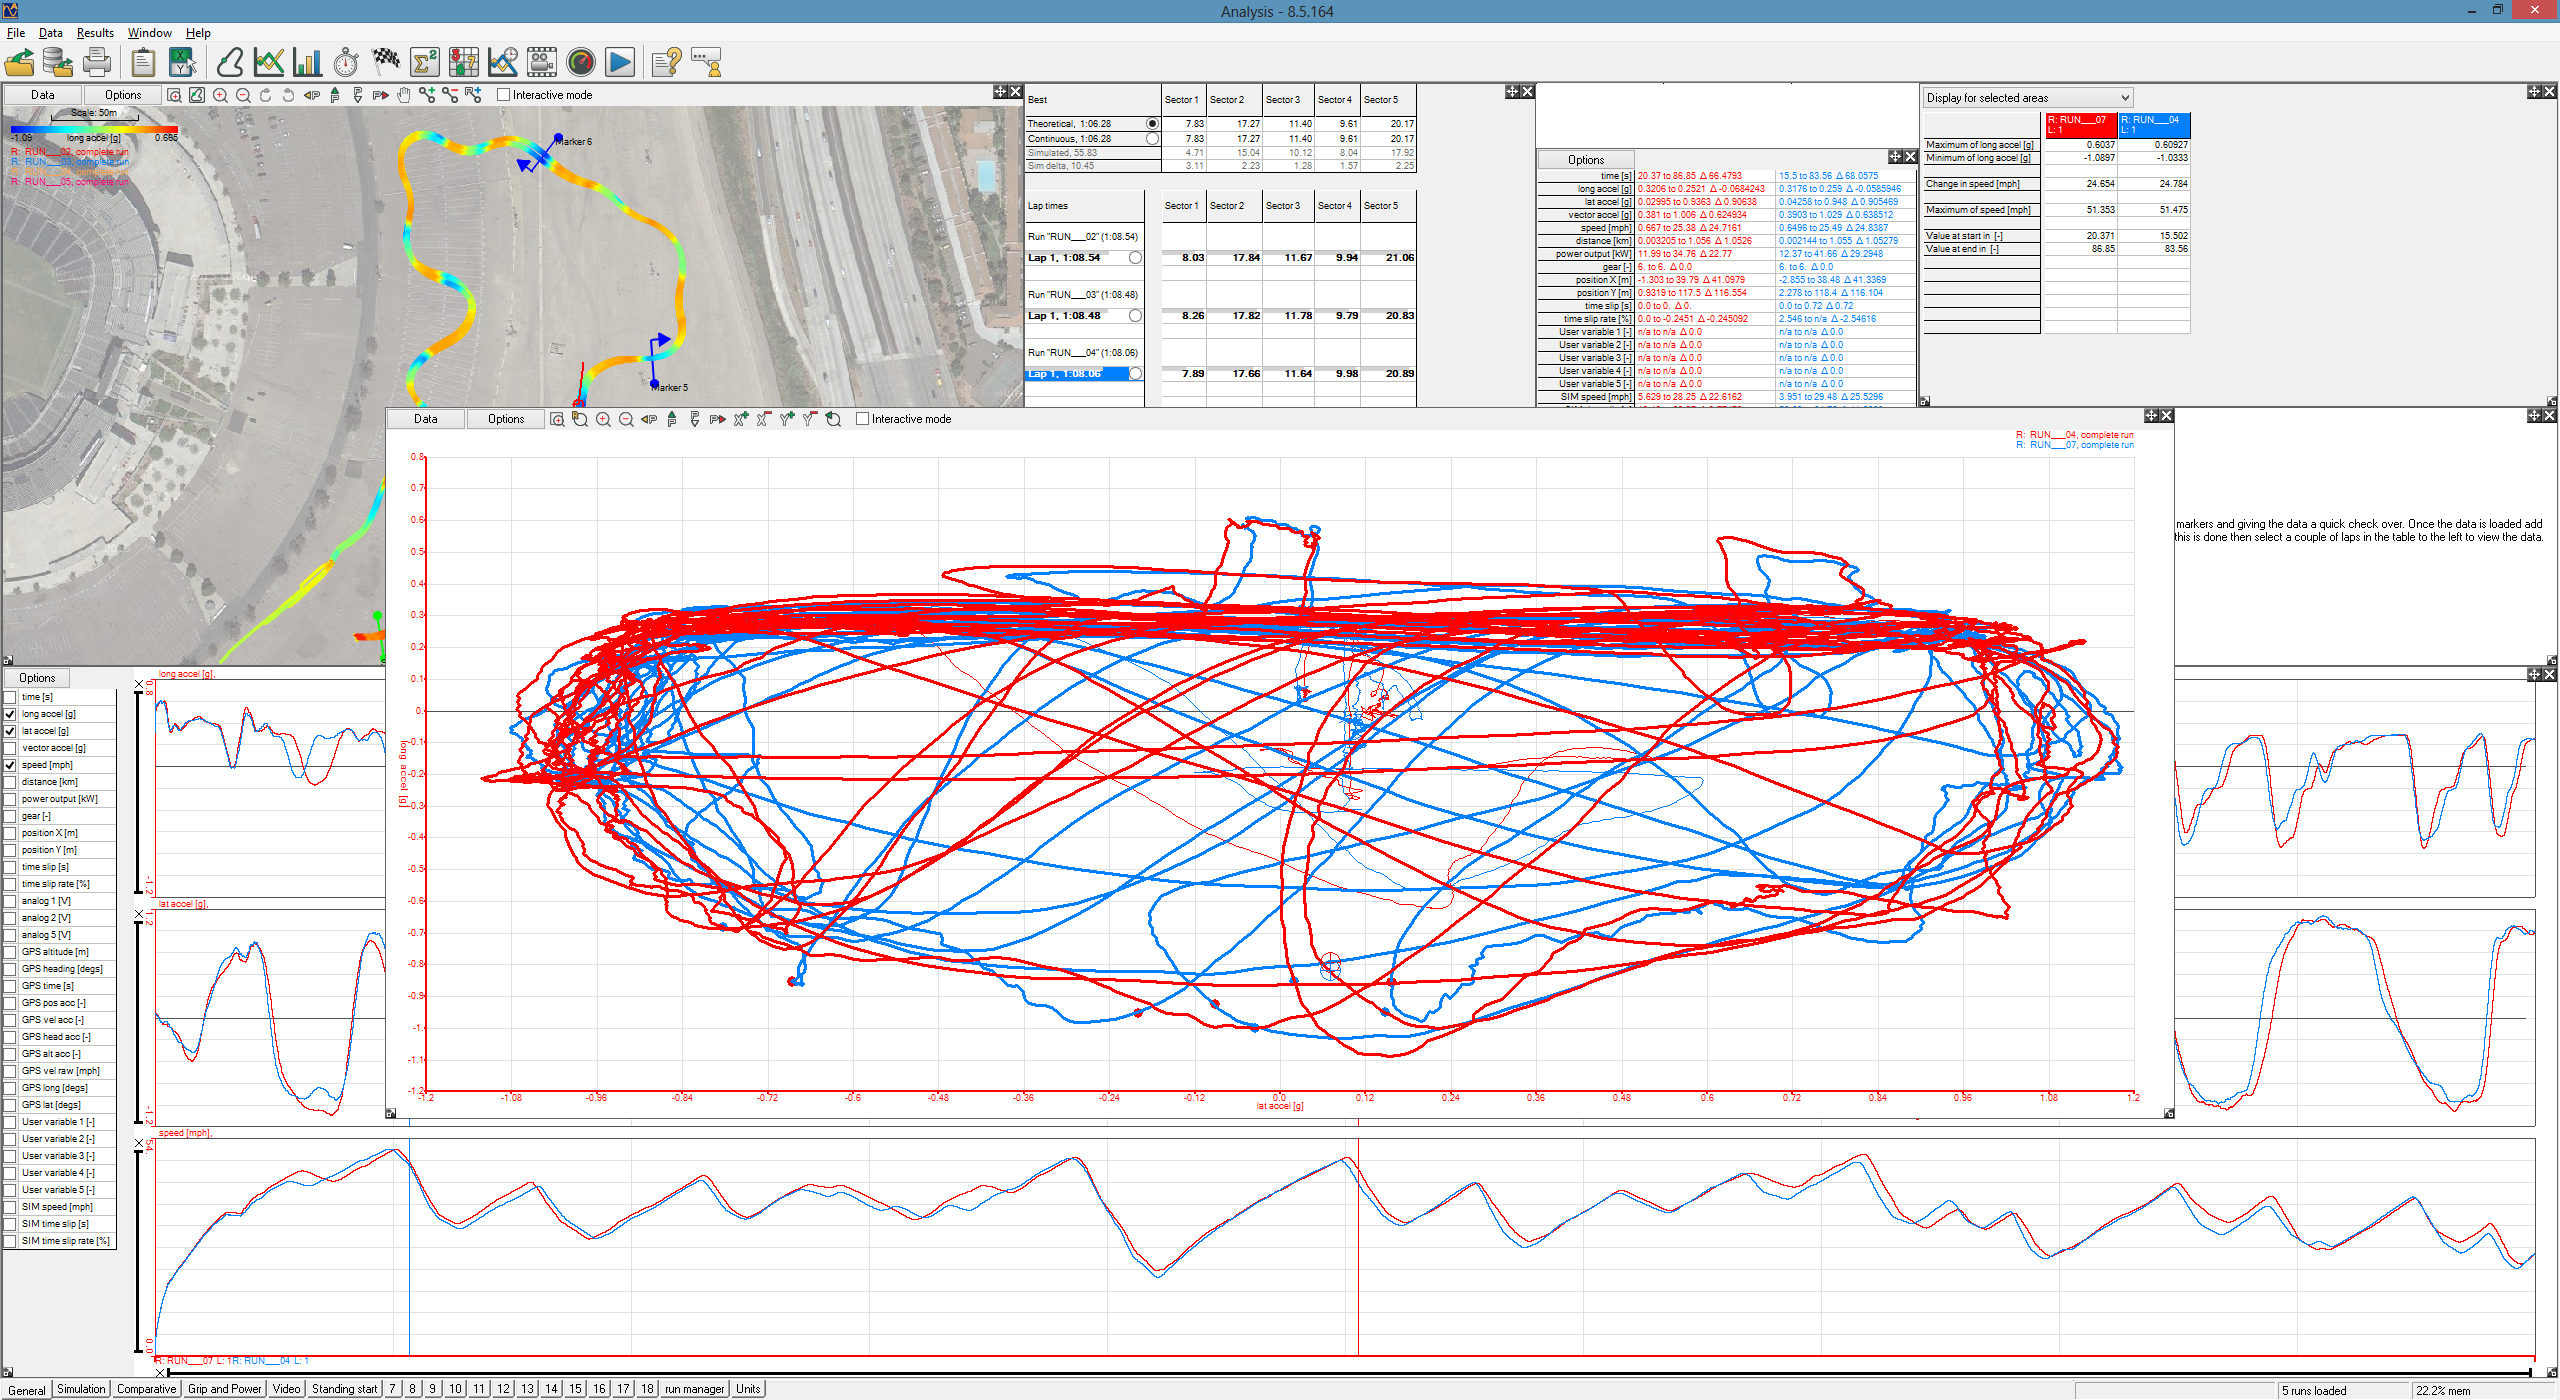
The main graph in the center here is an X-Y graph I do sometimes when I’m not looking to do any driving analysis, but instead see if a setup change made any difference in the car’s limits. The outer edges of this graph shape is sometimes called the “envelope” though to me the shape a lot of the time looks more like an acorn. (More details on this here in CVD Part2)
This was Jeff’s first time on these tires, in a car that was new to him, and using a DL1 for the first time – all at an event that wasn’t really designed to let him execute a careful test plan in the way anyone would have wanted to. As such, he wasn’t able to get all the data he’d like, or take as many runs, under the sorts of conditions he would’ve liked.
On this day, the Rivals were a lot – 1.4 seconds on a ~65 second course – faster. So there’s not much to see in the data, the Rivals were faster everywhere, in all sectors of the course, and in all phases of the corner. The limits appear a little higher, and the data indicates to me, Jeff had an easier time keeping the Rival at or near its limit.
However – the very next day, Jeff did something of a repeat test at a regular local championship event, and was a little faster on the Dunlop. Didn’t get data from that day unfortunately, but the actual differences are likely quite a bit smaller than the first day’s results bore.
There’s another event this weekend on a grippier surface, hope to get more data from it.
Rear Shocks
This week both front and rear shocks arrived for the Camaro.
Despite my history of nothing but satisfaction and success with the 28-series Koni shocks, for this car, I have chosen to give the Penske platform a try, for a few reasons-
- They offer some more modern valving options not available in the typical 2812Mk2 bodies I’ve run. Will explain that below.
- I do have some experience on Penske triple adjustable shocks – the Lexus IS300 owned by Jason Uyeda I drove a bit in 2005 had them, and they worked great. Also, Doug Hayashi’s Honda S2000 we ran in the 2003 Open Track Challenge had a set built and valved by Erik Messley, and that car was sweet too.
- The people I use to build my shocks, ProPartsUSA, has experience with Penske, and would be able to help me out. I wouldn’t have tried this were it not the case.
- I need *some* excuse to run some kind of Penske sticker on the car. The classic Trans-Am cars always had “Penske-Hilton Racing” or “Penske-Godsall Racing” on the front fenders – if I put “Penske Racing Shocks” in the same spot, should give it the look without being totally illegitimate. Of course advertising for people when you don’t have to (not like anybody is cutting me deals) is kinda silly IMO so who knows what will go there.
What actually got me started down this path was ProParts mentioning they had a set of very high-end 8765‘s sitting on a shelf that they’d used for a test but never on a car, that they could pass on for a very good price. Their dimensions put them in range for the rears, so they proceeded to build them.
Not having built/tuned a live axle car before, many aspects of what comprises an “ideal” rear shock valving are at this time a mystery to me. Some things are known – spring rate, ride frequency, and motion ratio – which, unlike so many aspects of this chassis, actually isn’t a problem. It is basically 1:1 in bump, and close to it in roll. I also know my own preferences – which in general, are to run the rear shocks fairly soft. Too much rear compression, and you risk “blowing the tires away” with a rapid throttle press. Too much rear rebound ups the chances of losing the rear end in a transition type maneuver.
Of course, too little, the car feels dead, and difficult to make “dance” through tight spaces, of which we have plenty in autocross. In my experience if you have a fairly well balanced RWD chassis (either naturally like a Viper or with freedom over bars and springs like an STS 240sx), softer rear shocks are something that makes a car easier to drive, helping you minimize the frequency and magnitude of mistakes, even if maybe it sacrifices ultimate potential a little.
All that said, here’s a few dynos of the rear shocks-
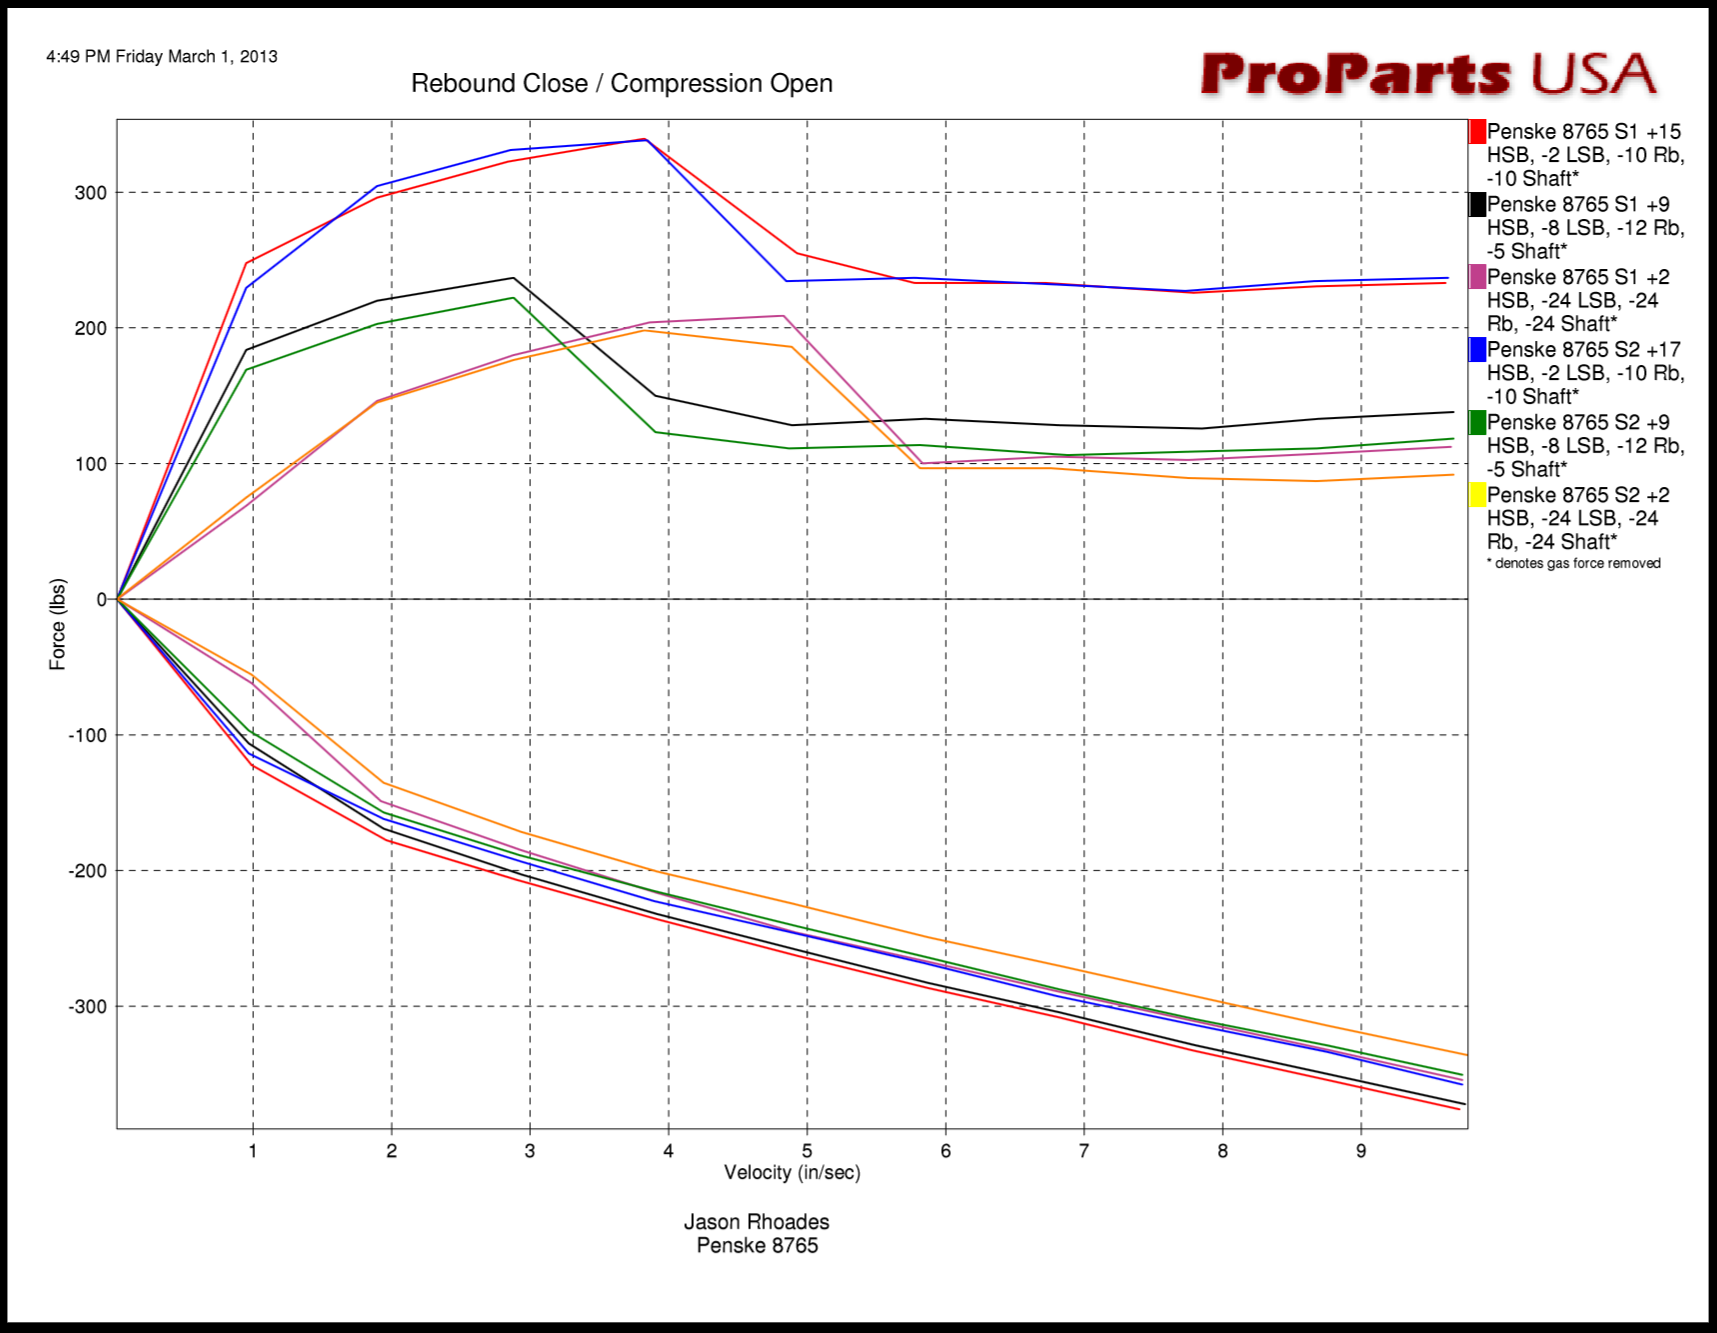
On the rebound side, we have modest forces, and a mildly regressive curve. This shock will be operating around 3in/sec for typical (non-bump) autocross maneuvers. I would have like a slightly wider range of adjustment with another 20% available both below and above this range, but all told it’s probably about where it needs to be anyway.
Things start to get really interesting on the bump side, and this is where the 8765 separates itself from the more-common 8760. Note in the legend at the upper right, there are four dimensions given for each dyno:
- HSB
- LSB
- Rb
- Shaft
Aaaack! Four adjustments?!?!?! In the picture above notice there are two wheels in the eyelet at the end of the shaft, and there are two knobs at the end of the canister. At the other end of the canister is the Schrader valve for gas pressure, which one could even consider a fifth adjustment – oiy.
For those that haven’t seen it, here is what I consider an excellent, clear and concise guide to shock tuning by Neil “Fireball” Roberts:
http://www.ozebiz.com.au/racetech/theory/shocktune1.html
There are some people who will feel that aspects of this are incorrect, but for me, it has worked, and it fits in well with what my gut/intuition tells me is happening at each tire in different phases of the corner.
Now, when Neil talks about bump and rebound, he is talking about their low-speed elements. High-speed shock tuning doesn’t usually come into play for tuning handling – it does change how the car works over bumps though.
On the compression side you can see these shocks have an unusual shape – the compression force actually drops at a certain point. This is known as “regressive” valving and was pioneered in F1, to help keep their chassis from getting upset when the cars hit curbs. This allowed them to continue to have big low-speed compression forces to manage the aerodynamics better, but then have a chassis that became super soft and compliant (relatively speaking) when presented with a big obstacle.
We don’t have curbs in autocross but our sites do occasionally have bumps, and in theory this approach should help keep that big heavy rear axle more compliant over those bumps, while still providing a good measure of traditional low-speed control.
The additional adjustment (“Shaft” on the shock dyno) interacts with the High-Speed-Bump settting, to determine at what shock velocity things “blow off” into regressive mode.
Part of what made me interested in this capability in conjunction with a live rear axle car, is the shock’s contribution to axle torque management. The car depends on its leaf springs to control axle wind-up under acceleration and braking. In ’67 the rear shocks were laid out in a “non-staggered” arrangement, with both lower mounts ahead of the rear axle. These cars were notorious for bad axle tramp, and as a partial remedy, in ’68 the shocks were “staggered”, with one lower mount of the shocks ahead of the axle, with the other behind. So, in a ’67, both rear shocks are in bump under acceleration, and rebound under braking.
When a car is accelerating, the front of the diff wants to rotate upwards, which wants to twist the springs in side view. The much-stiffer-than-stock (approx. 3x) springs I’m starting with will help this somewhat, but the big (1.5″) spacer block hurts, as do the high-grip tires and increased horsepower.
Axle tramp or hop is a violent condition when a wheel/tire begin to bounce, suddenly becoming loaded then unloaded. Not only does it kill acceleration off the starting line or out of a corner, it can also destroy the beefiest of parts. For an example of how it can look, check out the 1:13 mark of this Mustang driver being a hooligan on the streets of San Francisco – granted that was in reverse, but the principles are the same.
Axle tramp can be cured with 75lb. torque arm setups, but I’m hoping that with this range of valving characteristics, it can be sufficiently mitigated with the right shock settings. Sometimes, stiffer valving isn’t the solution.
Sorry not much picture content at this time – have the rear shocks mounted on the car, but the remote reservoir canisters are dangling loose. Darn those canisters!!!
Dash Replacement
The Race-Technology DASH2 was a purchase I’d made early on in this build (back in 2010) when I saw a basically new one come up for sale for a good used price. It sat in a box for about two years, until I was ready to get it mounted in the car and wired in (covered here, in the second half).
The Race-Technology DL1 data acquisition system has served me well since 2006 – never a fault or hiccup in what has to be 100+ events, many times crammed into the center console of baking hot cars. Race Technology’s analysis software has always been good, and they’ve made continuous improvement over the years, both for general purpose and closed-circuit autocross-type events. The DL1 offers amazing bang for the buck, and at no point had I come close to maxing out its capabilities to datalog many analog signals simultaneously.
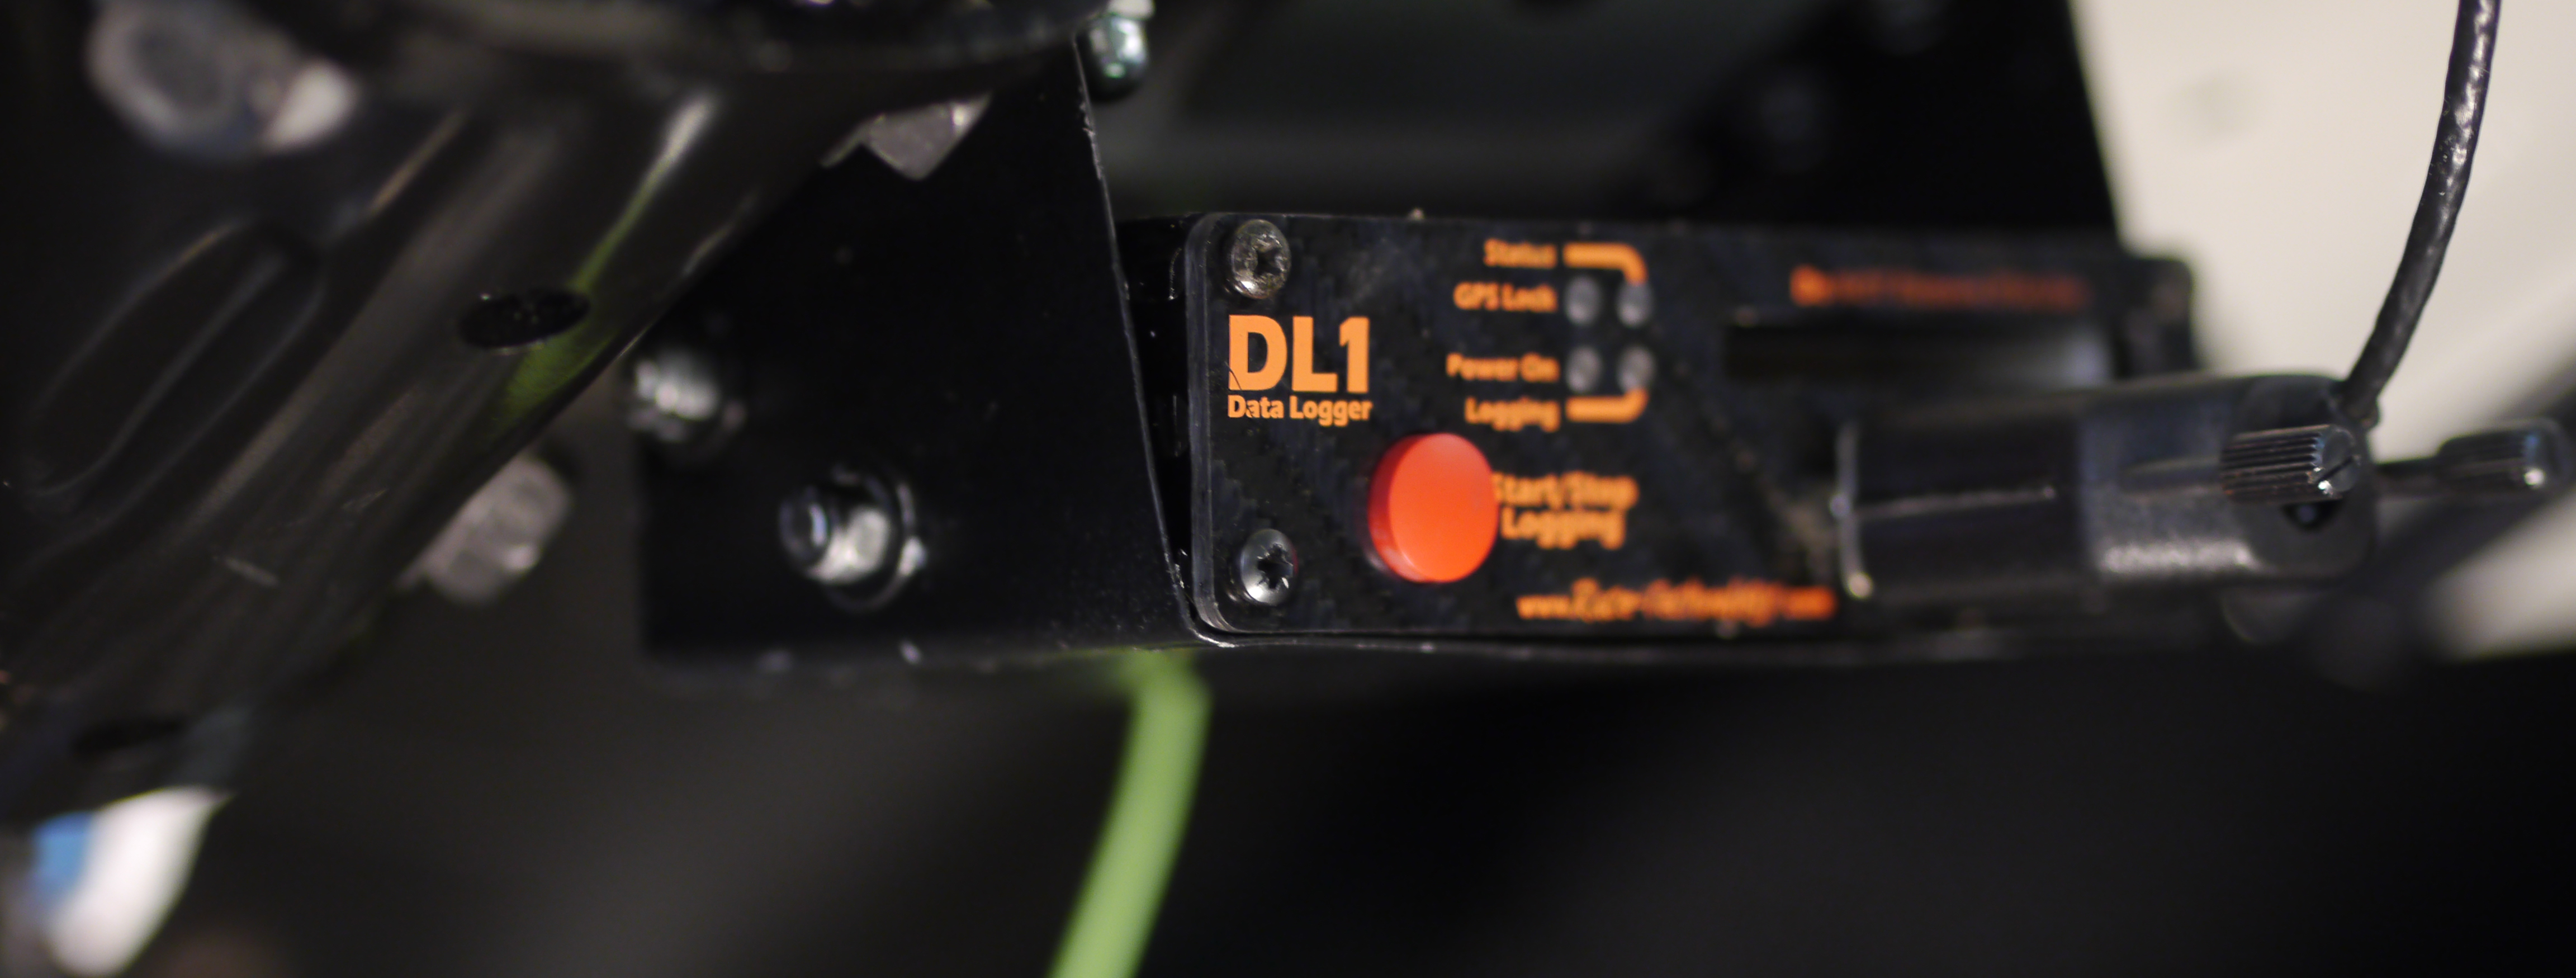
Unfortunately I found myself having lots of problems with the DASH2 paired with the DL1. It required a strange sequence of button pushes to start displaying data, and sometimes it would just freeze while in action. Any time the car stalled or had to be restarted, you had to repeat the sequence – which served to compound the already aggravating scene of trying to start a finicky high-compression carbureted musclecar with a dying battery. I spent a lot of time (time that could have been spent advancing other elements of the car) playing with different data speed settings for the serial interface, turning off unused channels, all to no avail.
There have been some data acquisition advancements since 2006. One is an increase in available GPS frequency – the DL1 MK2 I have is 5hz, and there are now 10 or 20hz options. The other thing is the availability of combined dash/datalogger units in a single box. In general I don’t like the proliferation of “magic boxes” and other add-ons inside an interior, preferring things simple and “clean”.
Despite 7 years of nothing but positive experiences (until just recently), outstanding software that might be the most advanced and in-depth *for autocross use*, and excellent responsiveness and attempts to make things right through good service, I decided to punt on the R-T gear. So what now?
Definitely leaning toward an integrated dash/logger. I enjoy nerding out on data, diving into deep analysis on the nights between and days after a race – so I need very good software. It’s got to be of a quality commensurate with the rest of the build, and available in time to have it here and on the car in advance of the SD Tour later this month.
With those parameters in mind, there are really only two other choices – AiM and Motec.
AiM is coming out with their MXL2 very soon now, which appears to offer the combined data/dash capability present in the DL1+DASH2 Race-Technology combination, at a reasonable and competitive price…but it’s not out yet, and retailers weren’t sure exactly when it would be. They have the Pista dash which does these things, but it is getting very long in the tooth now, and if I went that way, I’d be installing something that is basically already outdated.
That left Motec. The problem with them isn’t quality or capability or even availability – it’s price. Their ADL3 (Advanced Data Logger) system used in most professional race cars is amazingly robust and powerful – with a price tag to match. The ADL3’s cost of entry makes sense when you’ve got big-name sponsors and are vying not just for first, but also for TV time during your race. Besides being way too much $$$, the ADL3 is also way more than the Camaro needs. They have a lower-priced SDL3 (Sport Data Logger) which cuts out a lot of the super-high-end features of the ADL3, and about halves the price. That puts it much closer, but the thing about Motec is they get you with add-ons – the GPS is $$, additional I/O capability is $$, and even turning on the built-in data logging capability is $$. So, even if the SDL3 started out within the realm of reason, by the time the needed add-ons are tallied, it is back into unreasonable-land.
Fortunately there is one step further down their food chain, the CDL3 (Club Data Logger). This is a relatively recent unit, introduced at the end of 2011. Designed for the weekend warrior club racer type, it includes even few features than the SDL3 – but even then, it still does more than I need.
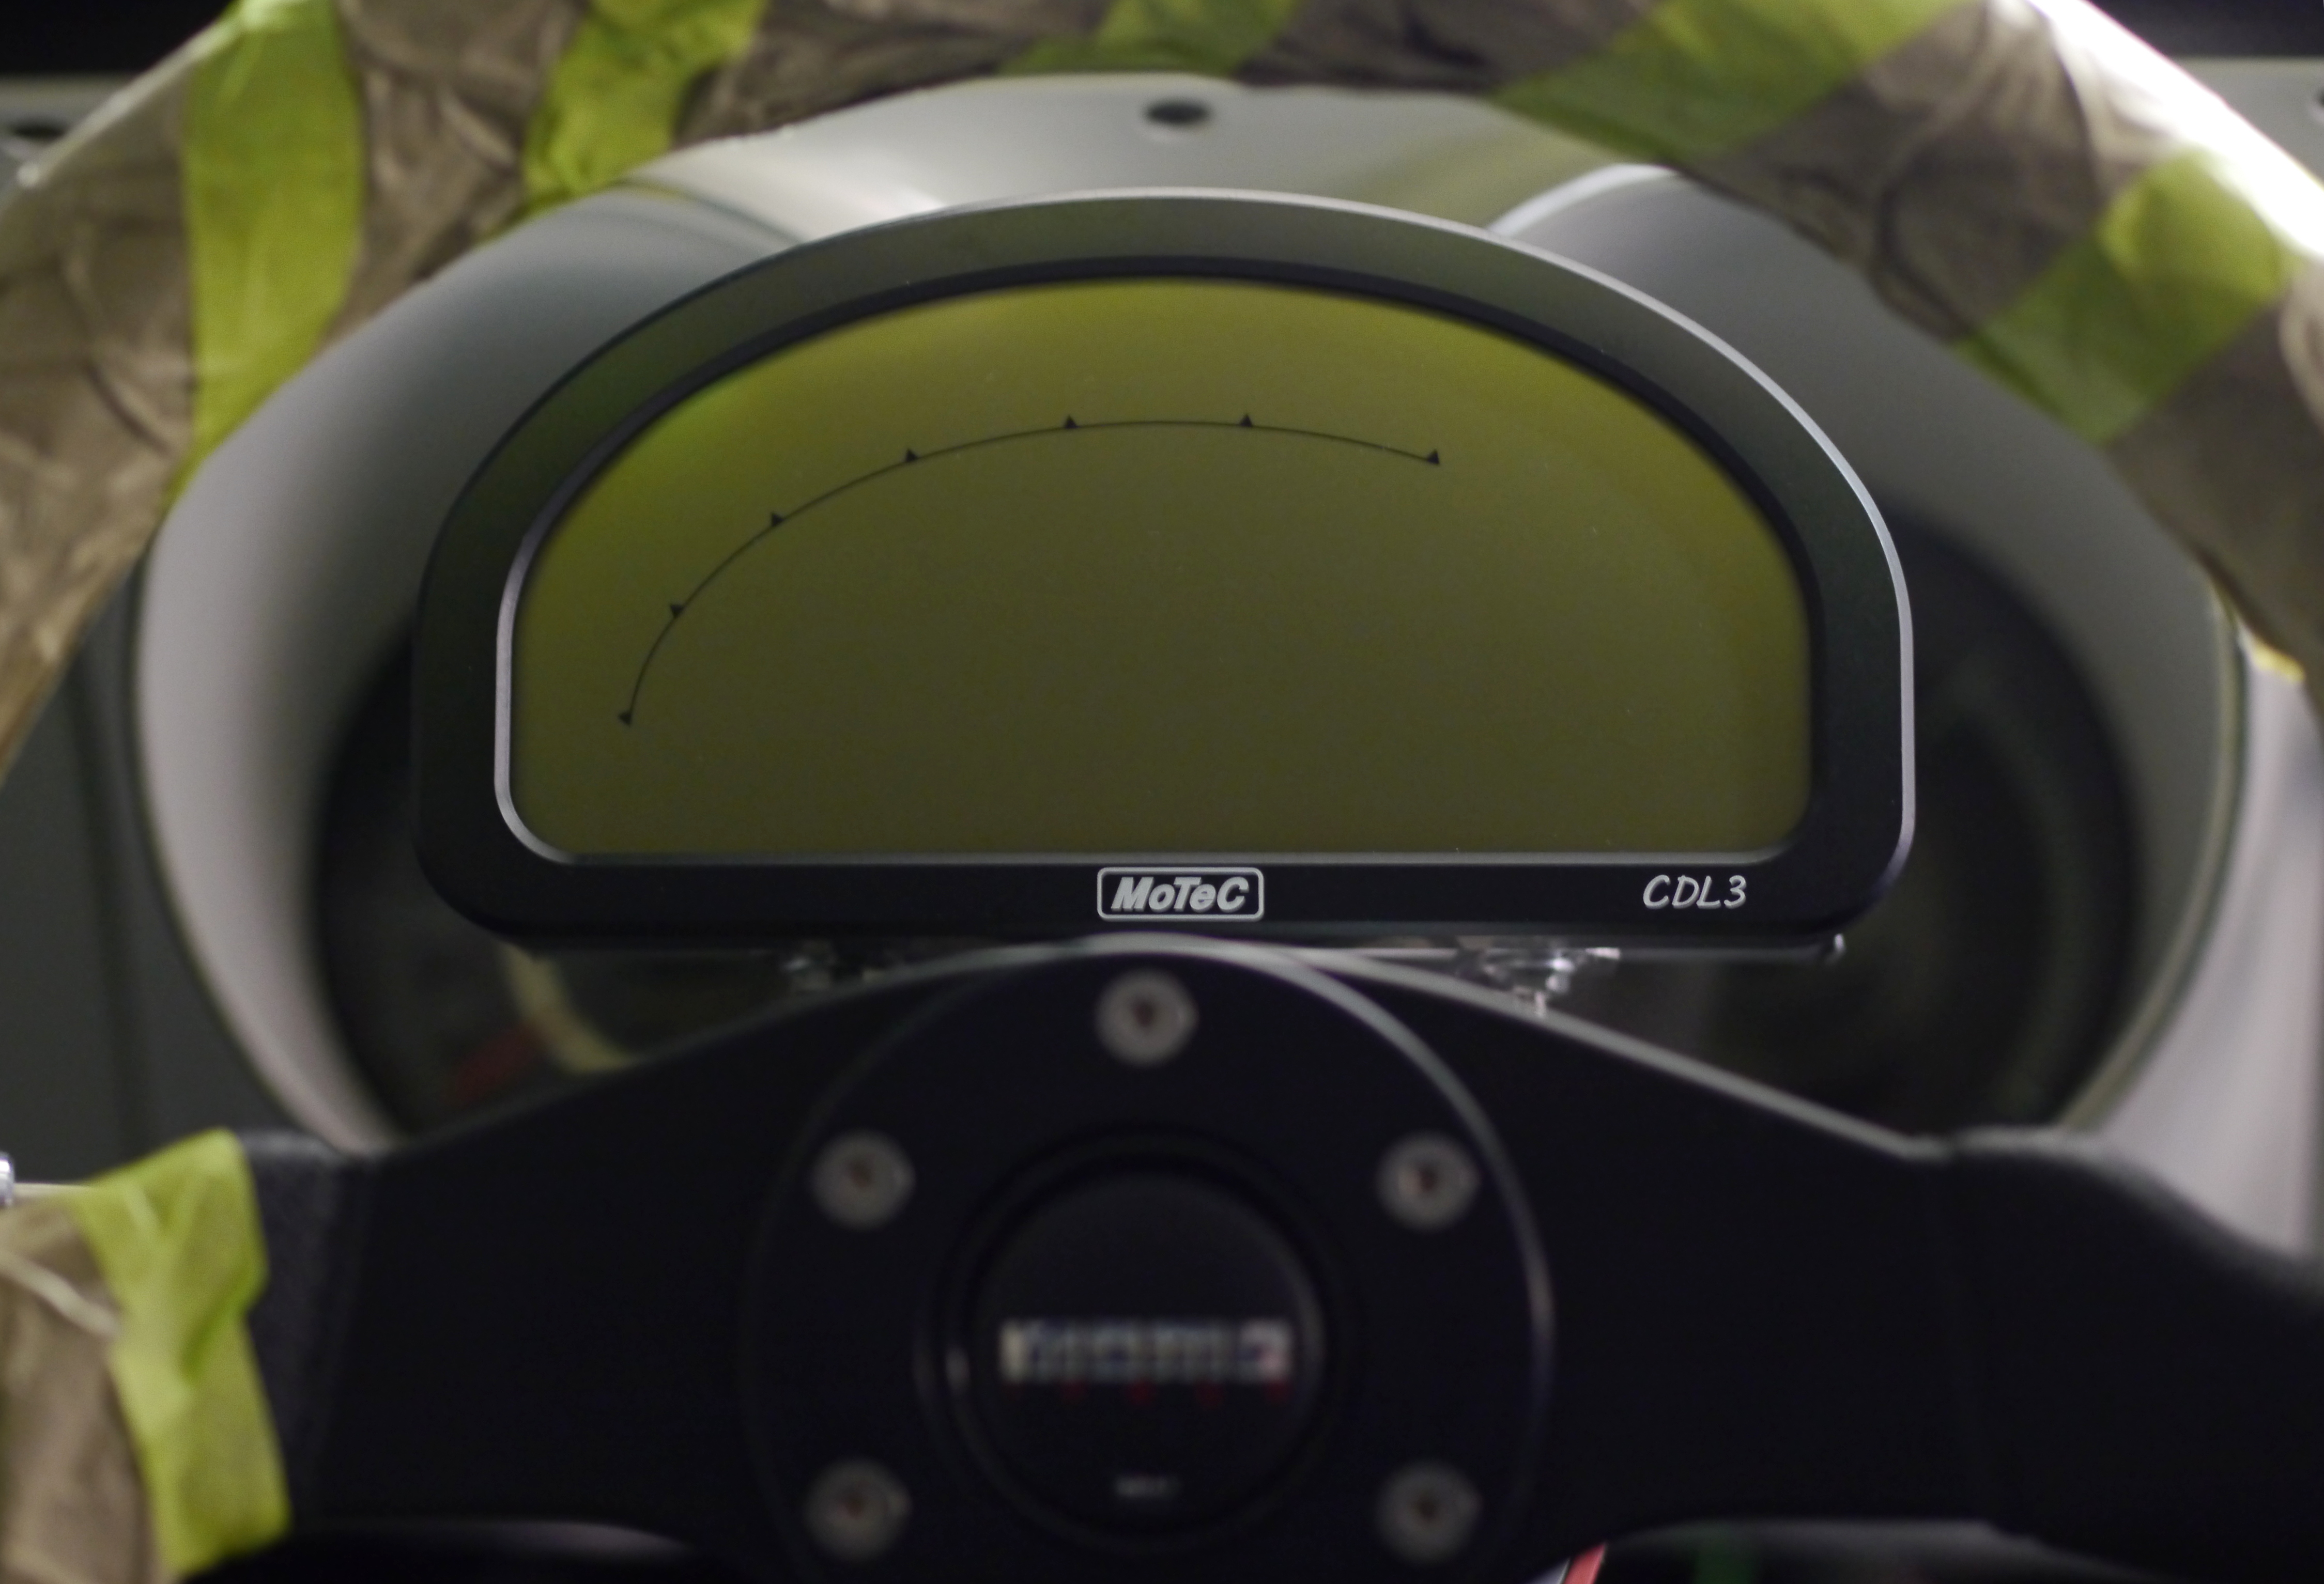
Well, there she is. Bracketry was a bit rushed, as I’m getting the looming sense time is running out; the impetus is on getting it in (done) and wired (not yet done). Excited to get some data collected and begin to use their software.