Playing with the front suspension
While I should have spent the day doing something awful like bending fuel lines or polishing up ancient vent window trim, instead spent it looking at the front suspension.
The car is now sitting on the suspension, with jackstands under the front control arms and rear axle. Trying to get the bushings and springs to settle a bit, and get an idea of how much they’ll compress under the car’s weight.
Front spring perches are at a height placing the car where I believe its static ride height will be once it’s on the ground. It has about 1.5″ until the control arm hits the frame, which out at the tire is over 2″ of bump travel. Should be plenty to handle what’s out there, assuming there aren’t any big tire rub issues that pop up first.
I put the driver’s side together with the camber (rear) portion of the adjustable upper control arms fully shortened, maximizing negative camber. The factory upper control arm had an effective length of ~9.5″. The SPC arms I’m using, when fully shortened, have an effective length of ~8.5″.
With offset bushings in the lower control arms, the SPC arm fully shortened, and the car at what I believe will be its static ride height, the front suspension showed only 2.5 degrees of negative camber! That might sound like a lot for those accustomed to primarily street cars, where anything more than -1 is oddball. But for a racer, -2.5 in front is just about the minimum on anything – it might just barely be enough if you have fantastic camber curves, no body roll, and tires that are accommodating of modest camber settings. But everybody else at the autocross uses more if they can get it, and in the case of catastrophically bad geometry and lots of weight on a floppy 265 street tire, I will need tons more.
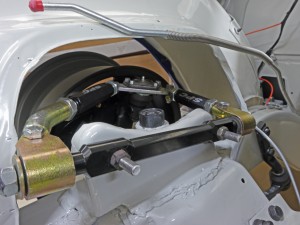
Good news is there are a couple options. The factory describes using shims at the upper control arm mounting point, to add camber and/or caster. I have a bunch of 1/8″ shims on hand, but then decided to make my own out of aluminum stock:
The silver material is 1/2″ thick, the darker stuff, 1/4″. 3/4″ is about as far as you can safely go with the factory UCA fasteners.
In building the shims and measuring how they affected camber, I found that for each 1/8″ of shim, the car would gain about 1/2 a degree of negative camber. Those values should be handy for any of the guys running stock-height spindles and factory pickup points.
So together those two shims added 6/8ths, or 3 degrees negative, taking it to a static 5.5 degrees negative camber.
That number sounds really too far out there, and I certainly hope to find that’s the case. At this ride height, the outer pivot point of the upper control arm appears parallel, or perhaps just slightly above, the inner pivot point. This is a good thing, meaning the UCA will be pulling the top of the spindle “in”, in a manner that should produce favorable negative camber gain. However the lower control arm is definitely past parallel, with the lower ball joint a little bit above the inner pivot point. This means the suspension is also pulling in the lower part of the spindle, a camber-robbing direction.
One helpful element, is the lower control arm is effectively ~16″ long, whereas our SPC full-short arm is only ~8.5″. The smaller radius of the upper arm should product lateral (inward) movement more quickly compared to the lower arm, hopefully passing it somepoint soon, and generating some negative camber gain. One could do something like the Guldstrand Mod – it lowers the mounting point for the upper control arm, putting it in a steeper part of its travel, generating more camber gain. Unfortunately relocating pickup points is not only illegal in ST, it’s illegal in most forms of motorsport – at least those that don’t also allow for a complete tube frame chassis.
Since the upper control arm is in a beneficial part of its travel at this ride height (which I believe is just about on the bump stop in a stock car) – there may be a better way than shims. What if one could shorter the upper arm even more?
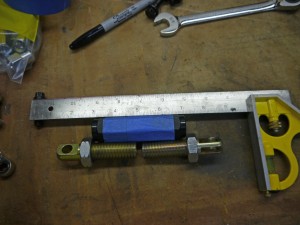
The turnbuckle for camber adjustment on the SPC arm is 4″ long as delievered from the supplier. SPC does not appear to make a shorter turnbuckle-
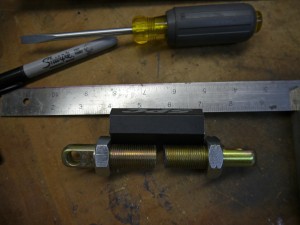
So I made one, by cutting down each end of the turnbuckle by 1/2″, and cutting down the threaded inserts by an equivalent amount. The result-
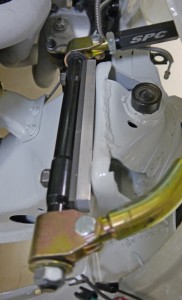
With the turnbuckle now 3″ in length, the upper control arm can be shortened to 7.5″ in length, less than half the length of the lower control arm. Here it is on the car:
No clearance issues anywhere I could see, fits fine even at full short. An added benefit I was noticing with the negative camber, is the lower ball joint appeared to sit at a more natural angle. The lower control arm has a bit of a tilt to it, and with the stock upper control arm at this ride height, the car would normally have its camber about eight degrees more positive than this, equating to an extra eight degree of tilt to an already outward-tilted ball joint.
Still, not sure I will need this much. Won’t know for sure until some testing and tuning is done. I ran about -4.5 degrees on my strut-suspended 240sx, but it had a very compromised suspension at the ride heights I used, only losing camber in bump. I’ll have to do some more measurements with the springs out, but there’s a chance with this upper arm, the car is at least not losing any camber.
As stated elsewhere in this blog, I’m a big believer in providing yourself with a wide range of adjustability. You don’t ever want to be at the extreme of any of your self-defined adjustment ranges, for what if “more” in a given tuning direction, was better? In this case with no shims and the upper arms full short, the car has a ”
“natural” negative camber setting of over six degrees (which I have seen people use on tracked E36 BMW race cars). By lengthening the upper arm, camber could be brought to zero, and with shims, could go even further negative, to up past 10 degrees, which I couldn’t ever see needing. There’s also the possibility, if the short arm length causes issues, where it could be lengthened, in concert with shims, to maintain the same static value, but change the dynamic geometry to something less aggressive in camber gain.
Hopefully this is enough to begin to tame the Camaro’s front suspension demons!
2 rule changes for 2013 – motor mounts and oil pans
The rules I have linked to here were for the 2011 season, and it’s looking like 2013 will be the first real season the car gets.
The SCCA released its October Fastrack recently, and besides the controversial classing of the new Scion/Subaru FT86 twins in STX, two new allowances were communicated.
One, the ST category is now free to run motor mounts of unrestricted origin, so long as they are no lighter than stock.
Two, the ST category is now allowed to run aftermarket oil pans and pickups.
The oil pan allowance will be a great help to the Camaro, as the car is not known for its good oil control from the factory, under heavy lateral loads. The motor mount allowance is less of a boon, but in theory, having the engine solidly mounted could contribute to overall vehicle stiffness, which is a weak point of the Camaro.
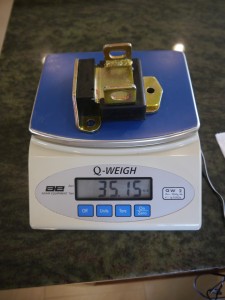
So solid mounts it is. First, I weighed the brand new Prothane mount as a baseline. The original motor mounts were long long gone, so I don’t know exactly what they weighed. The Prothane units are quite beefy, made of solid polyurethane, whereas factory mounts tend to be soft rubber with voids, allowing for more movement. I figure as long as my solid mounts weigh at least as much as the Prothane mounts, I’ll be ok. If anyone out there has a perfect OEM motor mount they can weigh, I’d appreciate it.
Here’s the Prothane, not light at over 35 ounces:
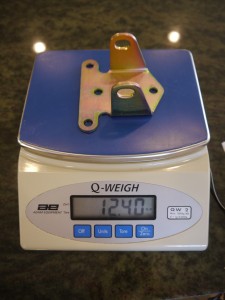
And here’s a new Moroso solid mount:
12.4 ounces, almost 23 ounces lighter, so between the two, almost 3 pounds difference! Ugg. Going to have to figure out how to add 3 pounds to these mounts to stay legal.
The oil pan is another project, haven’t quite started on yet.
It’s been two years!
Well, it’s officially been two years since I flew up to Sacramento to drive this thing home:
It’s come a long long way since then. I broke the project into five phases:
- Disassembly/teardown
- Fabrication
- Body & paint
- Assembly
- Tuning
Phase 1 finished pretty quickly, I had the car stripped to the shell and off to John Coffey for fabrication, in just over 2 months – November 2010.
Phase 2 took 5 months, to the end of April 2011. A little longer than I originally anticipated, though not really all that long in retrospect. There may be a couple other things I need to have John fab up for me, but the key chassis elements are done.
Phase 3 was the one I feared the most – “paint jail”. We’ve all heard stories of guys with project cars sent off to the body shop, never to return. Pat Smith of Pat’s Custom Cars did a fantastic job in producing a quick turnaround, he had the car a bit over 4 months. Some of the speed might have been due to the solidity of the base car – very little metal repairs were needed, all the original panels were kept intact. Car was hope by September of 2011.
Phase 4 is where it’s been for the past year. Those that have done one of these can appreciate how long this part takes when you’re taking the time to “do it right”. Lots of things don’t fit right without a little tweaking, and it takes a long long time to get all the details done right. When you’re putting this much work into something, any little imperfect shortcut will be staring back at you forever. In addition to the sheer amount of work this step entails for me, life has been busy – the day job/career has been going well but consuming 60-70 hours/week pretty routinely. Earlier this year during my project’s pause, I started a new business and have been working to get it off the ground. Oh, and then there’s this guy:
What was a tiny few cells rapidly dividing when I bought the Camaro, is now almost one and a half years old.
Still chipping away at the to-do list. Even as things get knocked off, it hovers around 50 items long, as I discover new things along the way that need doing. I’ve also been cheating a bit, making some suspension tweaks along the way. Those parts could wait until after the car is on the road as part of the final Phase 5, but many of the tweaks are fun and simple to do, good projects when there’s only 30-40 minutes to work on things.
Usually after 2 years I’m thinking of moving on to something else – in this case, just getting started! The car should provide for a lot of fun for a long long time, in lots of different types of events.
To those that have been following the project this whole time, thanks for your patience!
First two “road & track” wheels arrived
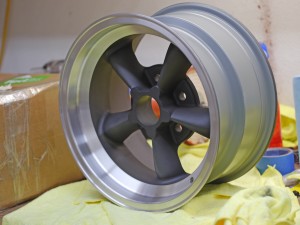
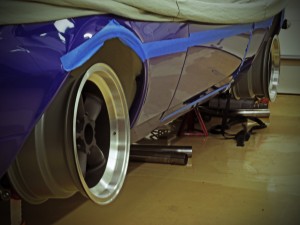
Should go from having no wheels & tires, to two sets, in another week or two. Pleased to see these Vintage Engineering 15×8 wheels fit my aftermarket big brake setup front and rear.
These are the ones I’ll use up front, with 4.25″ backspace. With a 15″ wheel, that’s all you can go (maybe 4 3/8″ max) before you have interference with the outer steering boot. Rears will have a bit more backspace (4.75″) to help fit the big 275 rear tire.
The plan for these wheels is to use them on street and on the track, and for any show-type events. I’m not really a car show type of person, but with the right stickers, hoping it could pass as a Penske/Sunoco replica to the untrained eye.
Once the rear wheels arrive, will get the Avons mounted, and see how this thing looks on the ground! There’s a good chance my STX wheels and tires will be arriving at the same time, should make for a lot of fun photos!
Wheels getting made
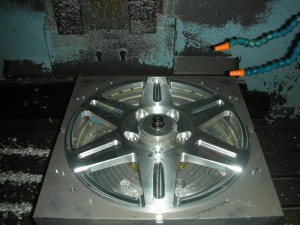
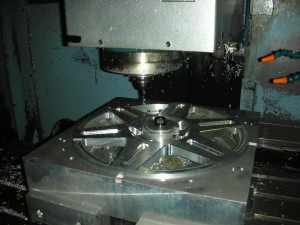
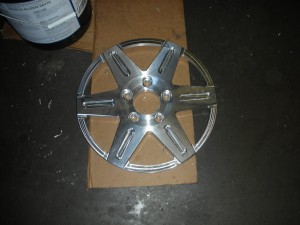
Finally some progress on my wheel manufacture, got a couple pics to share of the centers being made:
Can anyone guess the make and model?
